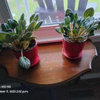
A few months ago, I was scouring these forums for info to set up my own African violet wick watering system and lights. I built on some of the ideas I found, and figured I should post what I came up with, so that others can benefit from my experiments.
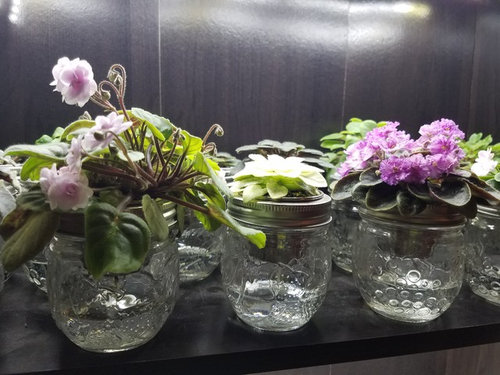
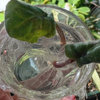
For my wick watering system, I decided to use 2.5 oz stainless steel condiment cups as plant pots, since all of my plants are minis, no standards. I used these: https://www.amazon.com/gp/product/B00QFRTR7O/ref=oh_aui_detailpage_o02_s00?ie=UTF8&psc=1. No problems with rusting so far. I drilled a hole in the bottom of each - a punch might work well also. I borrowed a de-burring tool to get rid of the sharp parts around the holes, which means I'm less likely to cut myself when repotting, though it probably wasn't necessary. For plants that I'm going to give away, I used 2.5 oz clear plastic condiment cups from the grocery store. If you don't want to mess with drilling the metal ones, these look ok also, and poking a hole in the bottom was very simple to do. I used white mason twine (from Lowe's) as the wick, and mixed my own soil from 1:1:1 peat, vermiculite, and perlite. I'm feeding with Optimara African Violet fertilizer at half strength, with a very small amount of Physan 20 mixed in to prevent algae (before I started using this, my clear jars were green). I used 8 oz jars, Ball "Collection Elite" since they're a little shorter and wider, and I liked how they looked better than regular 8 oz jars. I found that for my specific metal condiment cups, the little 4 oz ones were a little too short for practical use - I would probably have to refill them rather frequently. To label the plants, I use white electrical tape (available at Walmart etc.), written on with a fine-tip sharpie, which has stayed clear so far, and hasn't wiped off. I stuck it on the bottom of the condiment cups, so it's not visible unless I take the cup out of the jar to look.

For the lights, I'm using LED strip lights like these: https://www.amazon.com/gp/product/B013C2U0IO/ref=oh_aui_detailpage_o00_s00?ie=UTF8&psc=1. I used two strips per shelf, running the length of the shelf. I know how to solder, so I cut strips and soldered them together with wire to make the turns on the bookcase easier, and so that I could have two shelves of lights without running the lights down the side. There are definitely ways to get around soldering if you don't know how/don't have the equipment, though. In hindsight, I should have used black wire for all of it, since the red really sticks out. I might eventually go back and re-solder black wire in place of the red. I used this power supply: https://www.amazon.com/gp/product/B01461MOGQ/ref=oh_aui_detailpage_o00_s00?ie=UTF8&psc=1. I might eventually upgrade based on the reviews on the power supply's page - people suggested that it might not quite be powerful enough if I wanted to use the entire reel of lights. I'm not using the full reel right now, and although the power supply gets slightly warm, it hasn't been a problem. I used masking tape to stick the light strips to the inside of the bookcase I'm using, since at first I wasn't sure if I'd need to move them/add more lights. The light level seems to be perfect for the plants, though, but I haven't gotten around to permanently attaching them yet, since the masking tape is working fine.
The whole setup is in a three-shelf bookcase (I've seen similar ones at Walmart), on the top two shelves (I have a pet rabbit who would be entirely too happy to snack on any plants on the bottom shelf). Since the back is cardboard, it was easy to pull a little bit away from the side of the bookcase to run the wire for the lights through. The lights are plugged into a timer, and I have them set to be on for 14 hours a day.
The plants normally aren't crammed in like this, but my bottom shelf is currently taken up with rooting leaves for my family/friends, and some seeds sprouting for the summer. All of my African violets really seem to love the amount of light and the constant water/fertilizer, and a bunch of them are showing flower flowers and flower buds, now that they've recovered from an almost fatal treatment for powdery mildew (be very, very careful with Lysol spray, if that's your treatment method of choice...).
Anyway, I hope you all enjoy the pics of my plants and setup, and I hope this is helpful for anyone else who wants a relatively easy, nice-looking system, for low cost!


Elsa
skysong4Original Author
Related Discussions
how to tell if your african violet needs water
Q
Advice on newly wicked Setup Smelly?
Q
Basic care of African violets
Q
Watering tiny plantlet african violets...capillary matting.
Q
joyfulsu