


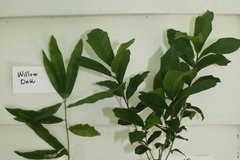
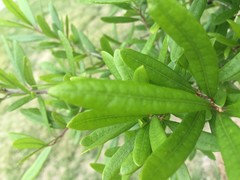
Distinguishing between Q. Virginiana and q. Phellos
bossyvossy
7 years ago
Featured Answer
Sort by:Oldest
Comments (50)

bossyvossy
7 years agoRelated Discussions
Most successful try at Live oak that favors Q. Virginiana
Comments (110)I never saw the above tree, and you mentioning it before. From what you mentioned, and I agree with, it seems our trees are of similar seed source. They mentioned (Mossy oaks) for Texans to take notice. I looked at my biggest of the 2 nicest late drops and the wood seems like it isn't limp and tender on either. I guess I should quit blabbering about it and see how it does in time, maybe adding an update in January, maybe the 15th of Jan. I want to thank David for the article. I got baby trees from one or 2 of those Virginia located Q. Virginiana before I tried the late drop L.O. They survived until around January or around-abouts then. My friends yard with the Late drop looks sad. Either the leaves are gone from wind, or beasts chopped them down. I never protected them. Yesterday I went to her yard but didn't know I would be beforehand, and brought no protection. It was dark so I could only say the headlights showed no leaves. My yellow leaved from the same batch late drops have their yellow leaves though. I will try 2 more in her yard in spring, if the present ones are dead. I will have to bring protection at planting time. I will start a new thread, or any repliers can. David I love the pics in your post, a couple trees were on the Virginia big tree website, but they were small pics. Those of the multiple trees (groves) aren't on the V big trees at all. They look healthier without the moss draped, but the moss in just some lower areas is nice. I recently saw a bigger pic of the champion Compton's oak, and am glad I have 3 of them, the pic someone posted shows the branching pattern, and it is really great....See MoreSouthern Live Oak (Quercus Virginiana) in PacNW
Comments (8)Ian, those are wonderful pictures of your 2 evergreen oaks! Wish I had planted those too. Agree that oaks are very desireable and worth the slightly longer growing time. Alas, even though I did a huge amount of research before planting, some things were learned a little late. Will replace trees that croak with evergreen oaks if the spot is right. Thanks for the info Bahia. Didn't think of the snow factor. I'll have to prune my Quercus virginiana strategically so it will fit in its spot between the house and garage and then limb out over the roof, so perhaps the shorter lengths will help the load, don't know the physics of weight bearing. It's not misty enough where I am for the mosses and lichens to really drip, and the 1000s of birds in the yard would make short work of that spanish moss so thanks for that education. Will have to gaze at pictures for the spanish moss effect. Found a cool picture at wikipedia of a southern live oak, oooooeeeee, such a great tree!...See Morehollysprings / all - can I ask a Q about crown buildup?
Comments (38)I am glad I saw this post pop back up as originally I did not see your response. Some more than others but most of the pictures you seem to lean towards appear to be fairly detailed moldings. If you look closely at the majority of the inspiration pictures they illustrate inset cabinets. You mentioned that you will be utilizing a full overlay cabinet design; with this in mind the process for applying the crown molding will be different however you can still achieve your desired look. In GreenDesigns second post they mentioned the cabinet maker taking the lead on this. Communication between you and your cabinet maker will be key here because how your crown molding is attached to the cabinets and what pieces are necessary will depend upon the construction methods used for your particular cabinets. I applaud you for educating yourself on how to achieve the look you desire which will in turn help you to relay to the cabinet maker exactly what you are looking for. I will use my personal cabinets as an example. I too have full overlay cabinet doors. However there were certain techniques used in order to give a more "inset" look. Here is a post that contains a few pictures of my cabinets unfortunately I do not have more detailed photos of the molding at this time: http://ths.gardenweb.com/forums/load/kitchbath/msg081425281125.html In order to accomplish this look and achieve a clean install we attached a nailing block to the top of the cabinet. A nailing block is a support piece that is placed on top of the cabinet box in order to give the crown molding something to attach to. It is common to have the front edge of the nailing block line up with the face of the cabinet frame. Our cabinet doors are 3/4" thick so we bumped the nailing block out 3/4 of an inch in order to line up with the front of the door. As a result when we attached the crown molding to the nailing block the doors appear inset. If this is the look you would like to achieve your process will be slightly different because of the larger gap you have to cover from the top of the cabinets to the ceiling. We will work under the assumption that your cabinet doors are 3/4" thick. The cabinet maker will need to attach a nailing block flush with the face of your cabinet frame. Instead of attaching the crown molding directly to the nailing block a frieze board or fascia board that is the same finished thickness as your cabinet doors will need to be attached. I would make the exposed portion of the frieze board a minimum of 3” and a max of 6”. How much of the frieze board is exposed will have a direct relationship with the rest of the pieces necessary to complete the install. For instance if you only want to see approx. 3” of the frieze board you would then need to attach an upside down piece of base molding to the frieze board 3” up from the bottom of the frieze board before finally securing the crown molding to the ceiling and the base board molding. The size of crown molding you choose to use would dictate the size of base molding used in this application. If you want to see more of the frieze board and utilize a larger crown this will allow you to leave out the base molding and the crown molding would be attached directly to the frieze board and the ceiling. In this application I would have approximately 5” of the frieze board showing. If you feel like you need to break up the frieze board height you can add a piece of astragal molding which is a small bead or convex molding that comes in countless profiles. The following is a basic guide for crown molding sizing with regards to room height. Remember there are no rules, just guidelines. For example I myself have had success placing larger moldings in rooms with 8ft ceilings. • 8ft ceiling 3”-5” drop height • 9ft ceilings 5”-10” drop height • 10-12ft ceilings 10”-20” drop height • 16ft ceilings 18”-25” drop height The distance the crown molding protrudes out into the room is a result of the moldings spring angle. There are three common spring angles for crown molding 38 degrees, 45 degrees and 52 degrees. The larger the spring angle the more the crown molding will protrude away from the wall or cabinets and into the room. The most widely used crown moldings have a spring angle of 38 degrees. There are countless ways to accomplish this task. Many different types of molding (friezes, coves, chair rails, bases, astragals, spring crowns) can be used to achieve an eye pleasing proportionate result. The molding types used should coordinate with and compliment the profiles on your cabinet doors if there are any as well as the other moldings in the kitchen and ideally throughout the house. Keep in mind that coordinate and compliment do not always mean an exact match. Please do not hesitate to ask for clarification on anything you may be unclear of or any additional questions you may have, I am more than happy to help out any way I can. When you are communicating with your cabinet maker be sure to show him inspiration photos that are eye pleasing to you and be very clear about specifically what is appealing to you and exactly what you are looking for. Remember what you are looking to do can be accomplished!...See Morequercus virginiana x q shumardii
Comments (7)No. Q.virginiana is in the white oak group, Q.shumardii in the red/black oak group. Different sections of the same genus. They will not hybridize. Hybrids exist between various species of the white oak group. Hybrids exist between various species of the red/black oak group. But... none between the two sections....See Morejoeinmo 6b-7a
7 years agopoaky1
7 years agorhizo_1 (North AL) zone 7
7 years ago
Dave in NoVA • N. Virginia • zone 7A
7 years agolast modified: 7 years agosam_md
7 years agorhizo_1 (North AL) zone 7
7 years agojoeinmo 6b-7a
7 years agolast modified: 7 years agobossyvossy
7 years agokentrees12
7 years agosam_md
7 years agobossyvossy
7 years agobossyvossy
7 years agobossyvossy
7 years agobossyvossy
7 years agobossyvossy
7 years agobossyvossy
7 years agokentrees12
7 years agojoeinmo 6b-7a
7 years agojoeinmo 6b-7a
7 years agopoaky1
7 years agokentrees12
7 years agoDave in NoVA • N. Virginia • zone 7A
7 years agolast modified: 7 years agopoaky1
7 years agobossyvossy
7 years agopoaky1
7 years agobossyvossy
7 years agopoaky1
7 years agobossyvossy
7 years agoDave in NoVA • N. Virginia • zone 7A
7 years agolast modified: 7 years agobossyvossy
7 years agobossyvossy
7 years agopoaky1
7 years agojoeinmo 6b-7a
7 years agopoaky1
7 years agolast modified: 7 years agoDave in NoVA • N. Virginia • zone 7A
7 years agopoaky1
7 years agobossyvossy
7 years agobossyvossy
7 years agotjayars1
7 years agoedlincoln
7 years agobossyvossy
7 years agopoaky1
7 years agobossyvossy
7 years agopoaky1
7 years agoalabamatreehugger 8b SW Alabama
7 years agolast modified: 7 years agobossyvossy
7 years agolast modified: 7 years ago


joeinmo 6b-7a