


Some smartphone-buying advice, pls?
pammyfay
8 years ago
Featured Answer
Sort by:Oldest
Comments (6)
Related Discussions
Help: Your ideal bev/bar layout if small area? Advice pls...?
Comments (5)HI xedos, thanks for your reply here too - as I've apologized elsewhere, I've completely stopped getting notifications from GW so I didn't think I had any replies (sadly.) So, I've ruled out the big GE Monogram unit. Just not worth the money for the life we lead - entertaining is one thing but that's about quick consumption of decent-priced beverages, not storing in a showcase. :-) I did go back to the combo unit but my husband was not thrilled with the temperature that would remain for her beer. He is a bottled beer guy, boutique brands, and they should really be at 35 or 36. I think we'll go with the bev center in the island to solve this - and then he has his own place to go and can feel territorial. So, that sticks me back with a wine cooler (single or dual zone) and an ice maker. Or that u-line pair, I suppose. I'm leaning towards the Dual Zone Marvel - a little afraid it's loud? But, then I've got all the wine in there and don't have to think about it. I'd love to have the can/beverage storage in that wet bar area too but as you said, somethings gotta give. Maybe it will move people out of the wet bar and into the next room (the kitchen, of course!) Thinking of the Manitowoc ice machine - also terrified that it is crazy loud but all ice machines make noise...? Oh, last thing, while it is "new" construction because we gutted the old kitchen in our 1917 colonial, that ONE window in the wet bar is here to stay. It's not ideal, although I do like the idea of having natural light in that space. I was thinking of actually getting more of a decorative type of window to dress it up a little. Thanks for the tip on the Kohler trough sink. I wasn't exactly sure how people use those? Need to investigate there. "Lighting guy" and I discussed all the lighting - practical and then the "drama" - :-) THANKS for replying - I really appreciate it. I have so many decisions to make and it's difficult to make them on my own. There are either too many resources or not enough. And, my husband has a "I care deeply but have no preference," attitude which seems great but leaves me solo to make all the decisions. :)...See MoreReceiving 20 guests for Christmas dinner, advice needed pls
Comments (12)I think the trick is to do as much ahead of time as possible, stick with fairly simple recipes and have one or two Martha-y touches. And as others have mentioned - decor is a good place for the Martha touches, since you can do that way ahead of time. Mashed potatoes are a great option since they fill up a big bowl on the table, most people eat them and they are a snap to make. Why not use vegetable stock and a bit of roasted garlic instead of dairy products? (I know that chicken stock is the generic substitute for butter with dieters, but I think that vegetable stock has a bit more flavor) I'd serve a simple veggie that can be steamed or blanched at the last minute - broccoli, asparagus, green beans - whatever your family likes. Add a bit of lemon or margarine or olive oil to keep the dairy out. (another big bowl on the table with minimal effort) Fruit salad was a great idea. A green salad would be good too. You should be safe with almost any oil-based dressing. Throw in some star fruit or pluots or something to make it seem fancy shmancy. Breads and rolls were my favorites as a kid - and certainly what I see being snatched up at the kid's table at our family gatherings. Bread doesn't need to contain dairy - you could ask what kind of bread the kids normally eat or call your local bakery. Since they are more likely to use real ingredients rather than chemicals, they'll be able to tell you what's safe. Or if wanted to be kind of Martha, you could make your own bread - not a big deal if you have a bread maker or make the dough the day before and slow the rise in your fridge until the day of the party. You've got pies coming. If you want another dessert, there is a great recipe for oatmeal chocolate chip cookies that the kiddos would like in The Garden of Vegan. Vegan or kosher recipes are good ways to keep the dairy out. A veggie tray or hummus and pita bread or some spiced nuts are super easy things for guests to nibble on until dinner is ready. I think we forget how delicious things can be with simpler flavors or just a few ingredients. If you fill your menu with stuff like that, you will have more time for one or two knock your socks off details and more time to spend with your guests....See MoreFARON!!! Need some reassurance pls!!!
Comments (7)Hi - I'm a gal and I just sanded my deck yesterday with the vibrating floor sander that's talked about on this forum, which I rented from HD. All in all it had plusses and minuses, and here are the details of my story. The hardest part for me was getting it in and out of my hatchback Subaru Forrester. It fit fine, but it is heavy enough that I could not lift it by myself, and I'm pretty strong. At HD, the tool rental guy loaded it for me and at home my DH and I worked together to get it out and back in at the end of the job. We have about 10 steps up to our deck and DH and I got it up there by me pulling on the handlebar and him giving a lift to the floor machine part at the beginning of each step. It was definitely work to do this, for both of us, but we did it. I was able to get it back down the steps by myself by "bumping" it down each step. I found it was easier to do this with the handle on the "down" side with the sander machine part coming down last. There was no damage to our wooden deck stairs. Actually using the machine to sand is a breeze. Although it is a heavy piece of equipment, it feels as if it's floating on air when you're sanding. I guess the vibration makes it pop up and down very fast. It moves incredibly easy and it was very relaxing to do--do you think there's such a thing as Zen floor sanding meditation? Anyway, that's kinda what it felt like. The space I sanded is about 15' square. It took me about 2.5 hours to go over all of it with 60 grit paper. I used 7 sheets of sandpaper, 1 red pad and 2 white ones. I had to use the white ones because HD ran out of the red. I wish I had had all 3 in red instead, as it worked much better, being considerably thicker. Here are some observations on the sanding process. Our deck is pine and new. I had put a Cabot semi-solid stain on it in the bright sunshine (which is intense here in Santa Fe) and it flash dried on the surface--my fault, now I know better. It was splotchy, ugly, with water marks. So I wanted to sand it off to start over. First off, the pads really matter. It sanded so much better with a fresh red pad. Like, 100% better. So, get lots of pads. Second, the vibrating sander works quite well and fast if your boards are perfectly flat. If you have a little cupping as I did, the sander is not as effective. This is because to sand the middle of the board, the sander first has to take off its raised edges. I was sorry I hadn't gotten a coarser grit paper. The 60 grit seemed agonizingly slow for this and the pads didn't last long with this kind of work. I hadn't expected it because I didn't even realize my boards were cupped--this is to say that even the little cupping I had really put a crimp on things. I ended up after 2.5 hours with a sanded deck that is quite a bit flatter, but which still has flashed stain spots all over the new looking wood. Another hour or 2 and maybe I would have gotten them all out but I ran out of pads and didn't want to continue with 60 grit. So we put the sander back in the car and returned it before I ever got to the 80 grit stage. You will also probably need to do edges with a hand sander. That's OK in my view. Also, although our steps up to the deck are wide, this machine is too big to use on them. Now I'm thinking of renting HD's drum sander to finish the job on the deck proper and to try on the steps. It's a considerably smaller *and* more powerful machine. I know the chances to mess up are greater but I've sanded a lot of stuff including with a hand belt sander and I think I would be OK with not gouging the wood. But if anyone has any tips I'd appreciate it. I'd like to finish leveling the cupping and get rid of the remaining stain spots. Otherwise I would use my hand belt sander to finish the job. A last note. There is another sander that I've used on an interior wood floor a couple of years ago. This wasa a Varathane sander, which a hardware store (OSH) in L.A. rented. It was a "safe" orbital floor sander, designed for DYI. It's also slow on curved boards (I had them in oak) but eventually got the job done and faster than the HD vibrating type. I'm not sure I can find it here in Santa Fe but thought I'd pass it on. Swirl marks were a little bit of an issue with this one if I remember correctly, but not a big deal....See MoreUndertones Scare ME! Need your advice Pls! (Lots of PICS)
Comments (21)You are to be congratulated....BEAUTIFUL JOB! The contrast between counters and backsplash is perfect! The way you accessorized your countertops just brought everything together wonderfully! I will tell you what I've been using for the last five years. Maybe the lighting is different in your home, maybe the colors in your home won't work the way it does in mine. But for us, the perfect tan....not too dark, no undertones,no pinky, no green....has been Pony Tail by Pittsburg Paints but we've had it mixed in BM and SW. Computer monitors vary so here, the color might not look as good (or might even show undertones-which it doesn't have) as it does in the rooms where we've used it. Here it is against Dove White Door in our bedroom mid-afternoon/blinds open, with ceiling light and table light on: FOR DIY TILE PEOPLE: Our first bathroom: we tiled everything except what needed to be cut. We took those to Ho-De and since we are on a first-name basis with some of the employees, we asked about having them cut and they cut those tiles for us....I think we were charged 35 cents per cut. After the fourth cut the nice employee just cut the rest for free. While we were there, another employee wandered over, chatting with employee that was cutting our tiles. Second employee told us to buy a $15.97 tile cutter (only does straight cuts but that's all we were doing anyway) and told/showed us how to do it ourselves. These inexpensive Straight Tile Cutters are called "Snap and Score" tile cutters. By the time it came to doing the second bathroom tub tile, we decided we'd try the tile cutter. It's nothing fancy, my 11 year old grandson was helping with the cuts. The second bathroom used 4" x 4" Travertine squares and we had no problem making straight cuts with the little tile cutter. Line up the tile on the board/bar, score it with the little sharp thing attached to the running handle, then put a bit of pressure with the handle on the scored line and snap...easy peazy! I know there are the pro tile cutters with the water that runs to keep the blade cool. But for us, the few tiles we had to cut, the little $15.97 tile cutter paid for itself 10 times over! Buy some extra tiles and practice and I know you'll get the hang of it! IMPORTANT: make sure the tile cutter you buy is big enough for the tiles you want to cut, and that it will cut the thickness of your chosen tile. Then there is the grinder. We have several grinders....4" 4.5" and 5 inch. You can buy special blades, buffers, sanders that will make straight cuts on granite and those types of stone. Just measure the stone, draw a light mark in pencil where you want to cut and run the grinder blade over the pencil line. In less than half a minute you have a cut tile. Then switch out the blade to a sanding disc or buffer disc and smooth out the rough edges you just cut. Again, 11 year old grandson helps with the sanding/buffing and is getting pretty good at it. lol The little bit of $$$ you spend on the tools....they really do pay for themselves. If you want professionalism and perfection, then you might not want to do the tile cutting yourself. Reason I say this.....the more we did the better we got and we can now look back at rooms/areas where we first started our own cutting of tile and see where we could have done better. Mr.Amity's Motto: "It's not professional, but it's passable and presentable (just don't look too closely)." :) Grinder: Here is a link that might be useful: YouTube Video: How to Straight Cut tile...See More
pammyfay
8 years ago
Related Stories

HOME TECHThe Future of Home Automation: Cheap, Wearable and Mobile!
Look for smart watches and glasses that can control your smart-phone apps, which in turn automate your home equipment
Full StoryFURNITURE10 Secrets of Successful Secondhand Furniture Shopping
Design professionals offer tips on how, where and what to buy
Full Story
CHRISTMASGift Giving the Simple-ish Way
If buying holiday gifts drives you to the spiked holiday punch, try these easier but still rewarding traditions
Full Story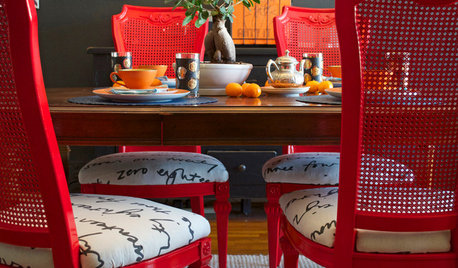
DIY PROJECTSDining Set Makeover: Paint and Tea-Tinted Fabric Make Old Chairs New
Reclaim dated dining chairs for far less than buying new, using spray paint, modern fabric and a handful of tea bags
Full Story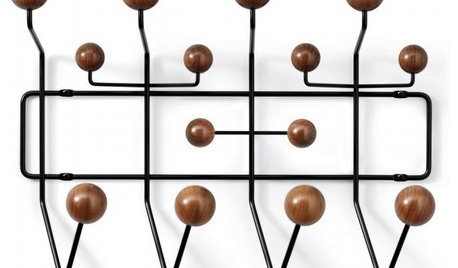
40 Stylish Gifts for Modern Men
Houzz Gift Guide 2010: What to Buy for the Guy Who Has (Almost) Everything
Full Story
THE HARDWORKING HOMECES 2015: Inching Toward a Smarter Home
Companies are betting big on connected devices in 2015. Here’s a look at what’s to come
Full Story
COLOR12 Tried-and-True Paint Colors for Your Walls
Discover one pro designer's time-tested favorite paint colors for kitchens, baths, bedrooms and more
Full Story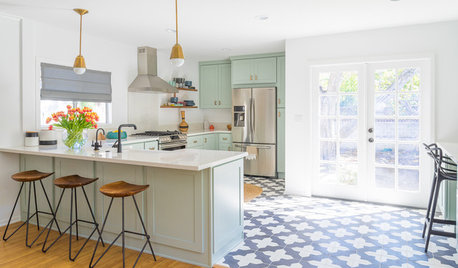
KITCHEN DESIGNTrending Now: 25 Kitchen Photos Houzzers Can’t Get Enough Of
Use the kitchens that have been added to the most ideabooks in the last few months to inspire your dream project
Full Story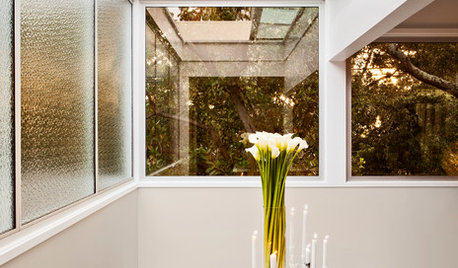
LIGHTING10 Reasons to Love Skylights
Get beautiful, mood-boosting natural light where you need it most, without sacrificing your privacy
Full Story
HOUSEKEEPINGHow to Clean Your Fridge, Inside and Out
Keep your refrigerator clean and fresh, while you gain storage space and lose those ‘UFOs’
Full Story
Lindsey_CA