


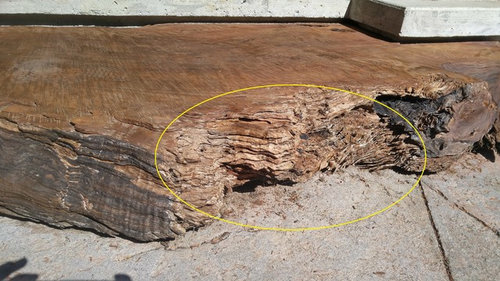
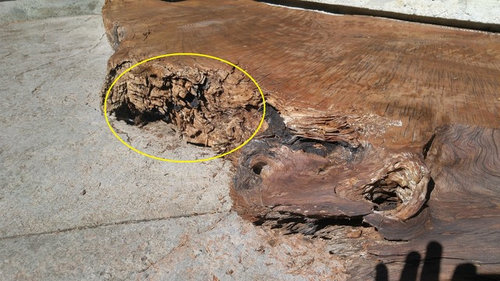
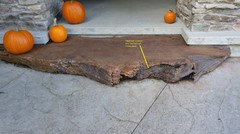
Finishing a weathered and partially rotted exterior redwood step
8 years ago
Featured Answer
Sort by:Oldest
Comments (8)
 8 years ago
 PRO8 years agolast modified: 8 years ago
Related Discussions
Sealing Redwood
Comments (8)I'm still learning about GHs, and have been receiving a lot of help from some truly nice people, but haven't been able to give anything back yet, but wood, I know, so here goes: my contribution. By nature, redwood is pretty weather resistant, but no wood is concrete. If you really want to the job completely, sacrifice some extra time and cash, and buy high quality semi-tranparent, penetrating OIL stain in whatever color tone most pleases you. You can get it the exact soft red-brown tone of the natural redwood, if that is the appearance you want to maintain. If you aren't sure, take a scrap piece to the store and ask the clerk to dab a bit of different stains on it, to see what you like best. You are presumably using plans? Good. Follow them, and pre-cut all of your lumber. Stain-seal every piece BEFORE you use it, and don't forget the cut ends. This will insure that even the pieces that lay against one another are still sealed. There is another technique that's even better, but takes more effort. However, it might be worth it for the wood used in the base, which logic dictates would need it most. It's as close to pressure treating as you can get for a home job. Make a trough from some reasonably heavy plastic sheeting, using timbers, rocks, old buckets: whatever you have on hand to support the plastic; to create a trough long, wide and deep enough to hold the lumber. Tap a 4" nail about 1" deep into each end of every piece: enough to hold, but still easy to pull out. Get some sawhorses ready, because when you are done, the nails will support the lumber on the sawhorses. Now pour the stain into the "trough" and immerse the lumber INTO it, making sure the stain covers the wood completely. Let it sit there for a few hours, turning it, to make sure every surface gets throughly soaked, to allow the wood to absorb as much of the stain as it can. Even better: suspend the lumber in the stain. You can use the sawhorses, straddling the trough, and any sturdy twine. Then, use the nails to support the lumber, and hang to dry, which might take several days. Time? Yes, obviously. Reward? More time; many long years of it before you will ever need to do more with that redwood besides admiring it's natural beauty. BTW: We used this technique on plain pine 2 x 6s horse fencing, back before pressure treated lumber was on the market. It lasted over 30 years, and we are just 20 miles from Lake Michigan's "lake effect" winter weather, which is far more the cold-wet that rots anything, than the dry freeze that actually preserves. Have fun, and good luck. (If we were just 20 years younger, my Gh would be home built too, but age takes it's toll, so mine is a kit.)...See MoreOne step forward, two steps back... long...
Comments (9)So sorry to hear of your surprises and the delays. Yes, we've been there, too. Sometimes it's better to have the rough weather come and test our work earlier rather than later. We moved into our house in the spring, and saw that we might have a drainage problem caused by a very large concrete handicap ramp blocking the flow of water away from the house. We'll have to get around to removing that ramp, we figured. Sure enough, soon enough, one night we had a deluge (the night before we were hosting a large family celebration, of course) and found water coming into the basement. Maybe the ramp was causing water to pool, we thought. We looked out back and saw -- a lake (!) ten feet wide and twenty feet long, and a foot deep, against the back of the house. I have fond, ridiculous pictures in my head of my husband sitting on an overturned bucket, in the rain at two in the morning, holding one end of a garden hose under the water level to siphon our lake down, through the hole of the hastily disconnected drier vent, into the drain of the laundry tub in the basement. No, it wasn't fun to put off thinking about cabinet styles and appliance choices for the kitchen, while we removed the ramp, fixed the gutters and downspouts and attended to the grade around the house. And removing the ramp led to the restoration of the whole back porch and the need to restucco a section of the back of the house. Ten months later, I almost have a finished kitchen. You'll get there, too. Hang in there....See MoreHelp me design new front steps, please
Comments (24)Here's a vote for NOT doing the railing in white or any color other than black. Keep it traditional! There's nothing like beautiful black railings, not to mention, regardless of what you do with your house's colors in the future, black railings will work. On to the steps: first thing is make sure you understand your city's codes and regs. You might not be permitted to reduce the height of the risers, as some have suggested, and I suppose it's possible that a deck-type construction in the place of the top step might not be allowed either. (It's really amazing the number of things covered by codes.) With regs on the depth of treads and height of risers, doing any kind of deck or landing will require that the steps be extended, at least by the depth of a full riser to replace that bit in front of the door. (I think that's correct.) In that case, I think you'll have to go down sideways and then right angle straight down toward the street -- there isn't room to go all the way down because you'll cut into the sidewalk. And that's probably against code as well, not to mention displeasing aesthetically. We had a very similar situation here with our back steps, the ones we use all the time: door to a mudroom, with concrete steps going sideways (but each was as long as the mudroom!) from a concrete landing (equally long, or wide if you will -- the whole thing looked like some kind of loading dock!) We now have: a small covered porch in front of the door, about 3 feet by 7 feet; one step going down sideways along the side of the house onto a landing that is about 4 feet by 4 feet; then right angle down straight 3 more steps. The porch, landing and treads are native bluestone; the sides of the whole thing look like dry-laid stone but are in fact cemented in; but the inside consists of the broken-up concrete. The railings are black. They are hand-forged in a design of the fabricator's making, and look 18th century. They had to be done according to code, i.e., a certain height, a certain distance between each spindle or whatever it's called, all around the porch,and then down from the landing to the last tread. Not cheap, unfortunately, but when the building inspector came by to check on the finished work, he didn't even get out of the car....took one look, said they were among the most beautiful he'd ever seen, gave us his blessing, and left. I got the idea for stone steps and iron railings after dealing with always-rotting wood and/or always-deteriorating paint at our former house. I was so sick of having to paint at least every other year! Our stone steps and iron look gorgeous, and they are virtually maintenance free, so I suppose the cost is something I no longer think about! And in fact, given the cost of wood and the labor cost in doing the construction, it's not clear what the marginal increase in cost of stone/iron over wood actually was. which leads, in a rambling way to this: what direction does your weather come from? Our wood steps at the old house were directly in the line of storms, and snow would collect and sit on them. Hence the rot and peeling paint. If you decide to go with wooden steps, I strongly urge you to use the absolute best paint you can. Something like Fine Paints of Europe. I finally used FPE on the wood porch railing at the old place, but never used anything but Benjamin Moore on the landing and treads. Year after year, the latter had to be redone while the former looked as good as when I first painted. Sorry for the ramble today....many things going on around me!...See MoreHow good is Weather Shield?
Comments (110)Let's talk glass and spacers and LowE and argon from the videos. First, and not mentioned in any of the videos that I recall, Andersen, Marvin, Pella, and Weathershield all use Cardinal glass and Cardinal LowE coatings. In the Andersen to WS comparison video, Mr. Hauser explains that while AW uses a stainless steel metal block spacer, which is bad, WS uses a structural foam silicon (he said silicon) spacer which is good. Per Mr. Hauser the metallic spacer conducts cold into the house in winter and conducts heat into the house in summer, but fails to mention exactly how this change in thermal polarity is actually accomplished. While the WS foam spacer blocks ALL heat and cold transference because it's not metal. Clearly the non-metal is better. Gotta love all the useful information in full view on the foam spacer though. In the WS to Pella video Mr. Hauser forgoes any mention of spacers preferring to talk specifically on glass performance, i.e. U factor, LowE coatings, argon fill, etc. On this I give him props for trying although he kind of messes up some of the specifics about how this stuff actually works. He did mention for example that argon was used for convection, but then went on to describe it as conduction...but he does get the point across. He does mention both products are energy star and finally mentions that WS has glass options that could possibly outperform Pella, which is simply wrong. And to the Marvin to WS glass comparison. Starts off taking about single pane to dual pane then adds in LowE coatings which are "...a metallic alloy that is sprayed on the inside portion of the glass". That description makes me cringe but...nope nothing more, it makes me cringe. Next he talks about argon fill which is 38% denser than oxygen and so blocks heat and cold passing through the glass. If comments were available I would have asked, "since oxygen is 21% of our air, what about the 78% that is nitrogen? How does argon fill affect that? Next he states that both products can be energy star rated and both can be equal, "but we (WS) should be able to outperform them" (Marvin)". Remember when stainless steel / metal spacer was bad in the Andersen comparison? Apparently that is no longer true because next he mentions how both Marvin and WS are using a stainless steel spacer system, then looks visits the Marvin window first. Mr. Hauser states that this appears to be excess glue related to the spacer Marvin is using, but he doesn't know what caused it. I have no doubt that is a totally honest appraisal of what he sees there, but actually this is an issue with glazing the glass into the sash, this is NOT from the spacer. Clearly this is unsightly and in my opinion is totally unacceptable and should be replaced, but I can't speak to the warranty covering what happened to this sash. Knowing Marvin reasonably well, I would expect that they would replace this sash under warranty, but again that's only my personal opinion. Then showing the WS window that uses the Cardinal Endur stainless steel spacer system. This is an upgrade from the system used in the Andersen video. Apparently it's now okay to use the premium stainless steel spacer now. Cardinal has two different Stainless steel spacer systems, XL and Endur. XL is the older system Endur being the newer. Marvin, Andersen, Pella and WS all have access to and use both systems depending on their preference. The primary difference is that Endur is about 2°F warmer at the edge than XL. Long term durability and longevity should be pretty much identical. He then goes on to explain an NFRC sticker, once again saying that despite using the same glass and glazing system, WS can outperform Marvin (or Andersen or Pella in previous videos). The final thing I want to mention is the air and water dam that WS uses on this window. I find it very aesthetically displeasing. Actually I think it's ugly and looks very unprofessional. It also concerns me that they think they need it, while Mr. Hauser speaks of it as a plus that no one else uses. That white thing sticking up Definitely not a fan of that "board" at the base of the window. The bottom rail slides behind it and is partially covered by it when closed. To me that alone is a reason to be very wary of this product....See More- 8 years ago
- 8 years agolast modified: 8 years ago
 8 years ago
- 8 years ago
- 8 years ago
Related Stories
GARDENING AND LANDSCAPING8 Rot-Resistant Woods for Your Outdoor Projects
No need for chemical treatments on your deck or pergola. These woods stand up to weather, insects and time beautifully on their own
Full StoryCURB APPEALA New Stepped Entry Glows With Style
Rotting stairs and leaky windows lead to an inviting new facade that welcomes with light
Full Story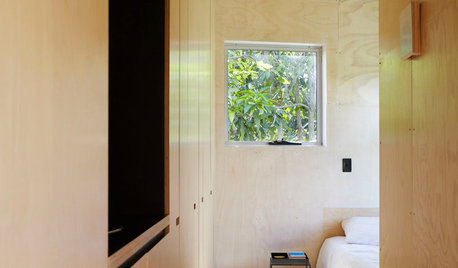
WOODDesign Workshop: Plywood as Finish
Trendproof your interior with this sensible guide to using this utilitarian material indoors
Full Story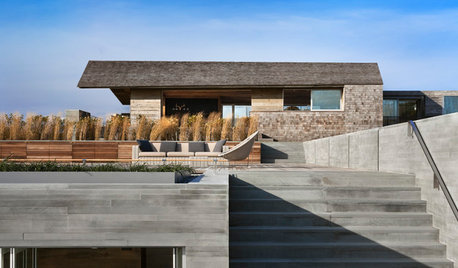
MATERIALSDesign Workshop: Natural Wood Siding Minus the Maintenance
No need to worry about upkeep when you choose wood that embraces weathering
Full Story
HOUSEKEEPINGIt’s Time to Clean Your Gutters — Here’s How
Follow these steps to care for your gutters so they can continue to protect your house
Full Story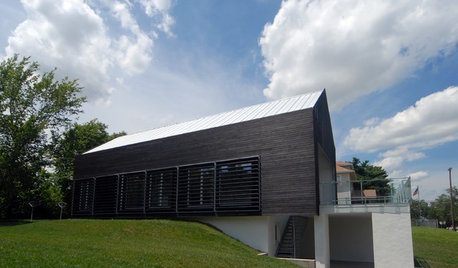
REMODELING GUIDES'Yakisugi-ita' Is Setting the Siding World on Fire
Exterior wood siding created by a Japanese burning technique is now alighting in the Western world
Full Story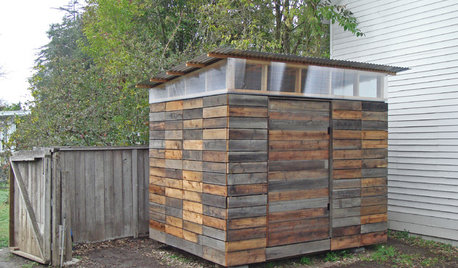
STORAGE2 Weeks + $2,000 = 1 Savvy Storage Shed
This homeowner took backyard storage and modern style into his own hands, building a shed with reclaimed redwood and ingenuity
Full Story
HOUZZ TOURSHouzz Tour: Making a Comeback in the Hollywood Hills
Get a front-row seat to see how this 1912 home went from rotting and crumbling to bright and picture perfect
Full Story
HOUSEKEEPINGHow to Tackle Your Home To-Dos
Make quick work of minor repairs and replacements with this thorough, step-by-step approach
Full Story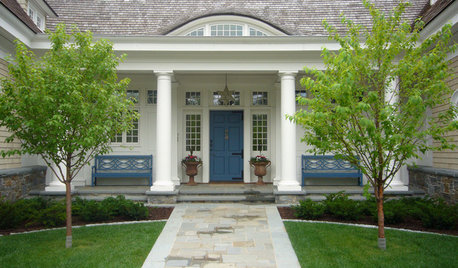
EXTERIORSCurb Appeal Feeling a Little Off? Some Questions to Consider
Color, scale, proportion, trim ... 14 things to think about if your exterior is bugging you
Full Story

Sombreuil