


Help with cotton duck slipcovers
budge1
16 years ago
Featured Answer
Sort by:Oldest
Comments (60)

pahance
16 years ago
squirrelheaven
16 years agoRelated Discussions
Slipcover Fabric for down sofa?
Comments (1)I suggest to aways get a sample or swatch of the fabric before making the actual purchase. A 100% cotton canvas is usually stiffer than a 100% cotton duck, no matter what the weight is. Softer the fabric the better it will feel....See Morecan you buy ikea white cotton duck?
Comments (1)I don't know if you can buy that specific fabric, but I hae bought fabric from them in store. Not expensive either....See MoreSlipcover Fabric selection - help - pics
Comments (8)Here is the link. I didn't read the description of the orange, but the description of the red says it is a medium weight cotton that is tightly woven and suitable for slipcovers. You might want to discuss it with your seamstress/upholsterer and make sure they think it's suitable. I've made a few slipcovers and it sounds good to me - just make sure you pre-shrink it. Also, never dry them in the drier - put them back on the chairs damp. Here is a link that might be useful: marigold orange...See MoreWhite slipcover-Need help finding fabric to cover dark upholstery
Comments (1)Where are you getting it slipcovered? When I got a quote on getting my chairs slipcovered I had the same problem but the upholsterer had many different weights and types of fabrics available to order. Does your upholsterer not have access or are you using a private person? The problem with using something underneath is that with a white cover you will likely be washing it fairly often and it will be a pain to arrange an underlayer each time. Maybe you could staple the underlayer on?...See Morechelone
16 years agochelone
16 years agomry193
16 years agosquirrelheaven
16 years agochelone
16 years agosquirrelheaven
16 years agobudge1
16 years agochelone
16 years agobudge1
16 years agochelone
16 years agobudge1
16 years agochelone
16 years agobudge1
16 years agochelone
16 years agosquirrelheaven
16 years agobudge1
16 years agopaddytc
16 years agosquirrelheaven
16 years ago
redbazel
16 years agoemagineer
16 years agobudge1
16 years agosquirrelheaven
16 years agooceanna
16 years agobudge1
16 years agomry193
16 years agooceanna
16 years agoemagineer
16 years agoemagineer
16 years agoemagineer
16 years agomoonshadow
16 years agobudge1
16 years agooceanna
16 years agobudge1
16 years agosquirrelheaven
16 years agobudge1
16 years agomry193
16 years agoles917
16 years agoemagineer
16 years agomoonshadow
16 years agochelone
16 years agoredbazel
16 years agooceanna
16 years agochelone
16 years agomoonshadow
16 years agolkremodel
16 years agobudge1
16 years agochelone
16 years agooceanna
16 years ago


Related Stories

UPHOLSTERYFabric Focus: Cozy, Carefree Cotton
Here’s why you should consider making cotton king in your home decor
Full Story
PRODUCT PICKSGuest Picks: Freshen Your Furniture With Slipcovers
Make a clean break with fussy, unwashable fabrics. These slipcovered furniture pieces let you keep things spotless with little effort
Full Story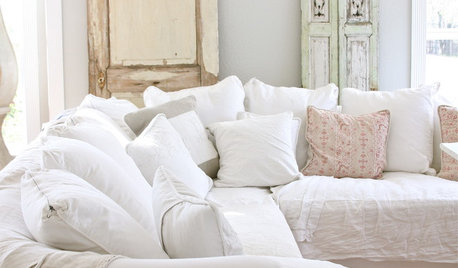
WHITEWhite Slipcovers for Pure Practicality
With a washing machine and bleach on your side, white slipcovers for couches and chairs keep your furniture looking pristine
Full Story
UPHOLSTERYSlipcover Magic: Casual, Washable and Fresh for the Season
Reinvent your sofas, chairs and ottomans with surprisingly chic and versatile slipcovers
Full Story
Your Guide to Stylish Slipcovers
Get the Look You Want With Custom, Semi-Custom and Readymade Slipcovers
Full Story
DECLUTTERINGDownsizing Help: Choosing What Furniture to Leave Behind
What to take, what to buy, how to make your favorite furniture fit ... get some answers from a homeowner who scaled way down
Full Story
COLOR10 Reasons to Make a Splash With Tomato Red
You won’t duck at these tomatoes. See how bold red shades can play up architecture, light up a dark spot and add drama
Full Story
GARDENING GUIDESGreat Design Plant: Discover Queen of the Prairie's Sweet Aroma
If you like the look of cotton candy and the smell of roses and want an easy perennial, you're in luck with this plant
Full Story
DECORATING GUIDESThe Cure for Houzz Envy: Family Room Touches Anyone Can Do
Easy and cheap fixes that will help your space look more polished and be more comfortable
Full Story
DECORATING GUIDESDare to Decorate With Colorful Upholstery
If a scarlet sofa or royal-blue recliner has your heart singing, here's help to make sure it hits the right notes
Full StorySponsored
Columbus Design-Build, Kitchen & Bath Remodeling, Historic Renovations


emagineer