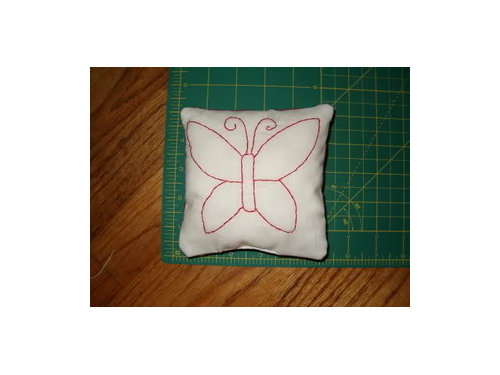
Redwork Butterfly Pin Cushion/Ornament. Please refer to the Redwork Lesson Plan post for supplies. Link to Butterfly pattern is listed below.
Disclaimer: I am not a professional teacher and this is my first time teaching Redwork (and teaching online). But I enjoy Redwork and Id like to share this technique with you. Some of you are beginners and some have much more experience than I do. Ask questions, share your tips and techniques. There is no one right way and I hope that we can all learn from each other. This project is for your own enjoyment and since the Mini Butterfly pattern is a free online pattern, any and all copyright and usage agreements are per the original pattern designer.
LESSON ONE: SEWING THE REDWORK BLOCK
WHAT IS REDWORK?
Redwork is simple embroidery designs worked in running stitch, traditionally in either Turkey red or in blue ( Bluework) and used for quilt blocks. The term "Turkey" red comes from the fact that the threads were made in Turkey. Redwork became popular in the early 1900s and often sold as "Penny Squares", six inch pre-printed muslin squares sold for a penny. Most often these were animal themes, children's themes, nature themes, and kitchen themes. As was pointed out in a previous post on the forum, red thread was used because it was one of the first colorfast threads. Modern Redwork can be in any color (color work). (See http://www.prettyimpressivestuff.com/redwork.htm for more info).
WHERE TO FIND REDWORK PATTERNS?
Patterns can be purchased or many are available to download for free from various quilting/sewing websites. But these arenÂt the only sources for patterns. Redwork can also be made from images from rubber stamps, coloring book pages, a child's drawing or any other pattern with a line drawing. The pattern we are using was originally intended as an appliqué pattern.
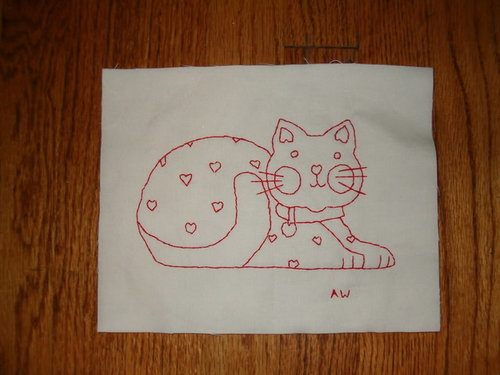
COLORING BOOK CAT
RUBBER STAMP IMAGE
TRANSFERRING REDWORK PATTERNS
Begin by transferring your pattern to your background fabric (muslin, white, etc). Cut your background square larger than the finished block, it will be trimmed after sewing. For the butterfly pattern, cut your fabric 8" square. Find the center of your fabric square by folding in half and half again and find the center of your design by measuring. The butterfly center is his body. There are several ways to transfer  if the fabric is light enough, you can simply place the design under the fabric and draw over with a pencil. You can also draw over you pattern to darken it so it will show through. Holding the pattern up to a window, using a lightbox or using a transfer pencil are also techniques for transfer.
I use a sharpened regular pencil for transferring. IÂve found the "washout" markers donÂt always wash out. Some people prefer to use red pencils for redwork. The main thing is that your line is dark enough for you to see to sew along. I use a "sketching" motion for tracing the lines  rather than keeping the pencil to fabric at all times, I gently sketch the pattern in small strokes, I find thatÂs easier to trace.
USING BATTING
The technique IÂll be teaching uses a layer of batting behind the fabric. I use Quilters Dream Poly, but any thin loft batting will work. This extra layer while sewing the Redwork makes the design pop a little as youÂll be "quilting" the design as you go. Plus it hides messy threads behind the batting and keeps it from showing through the redwork. For the butterfly project cut your batting to 8" square. This layer of batting will stay with the quilt block and will be trimmed the exact same size as the block.
STITCHES
The two most common stitches for Redwork, are Backstitch and Stem Stitch. The purpose of these stitches are to outline the design.
I personally use backstitch (as in the sample). I find itÂs an easy stitch that goes together quickly and creates a simple line. Here are instructions from the Embroiders Guild.
BACKSTITCH INSTRUCTIONS
"Bring the thread through on the stitch line and then take a small backward stitch through the fabric. Bring the needle through again a little in front of the first stitch, then take another stitch, inserting the needle at the point where it first came through." See illustration at:
http://www.embroiderersguild.com/stitch/stitches/back.html
STEM STITCH INSTRUCTIONS
"Work from left to right, taking regular small stitches along the line of the design. The thread always emerges on the left side of the previous stitch." Illustration:
http://www.embroiderersguild.com/stitch/stitches/stem.html
LETÂS GET STARTED SEWING!
For the redwork butterfly, download the pattern on Page 2 and transfer it to your 8" white background fabric square with the method of your choice. Cut your batting 8" square.
Layer together your white fabric with background square  you can baste the two together with large stitches (something I do for larger project) or hoop them together. For small projects IÂve just held them together. You want both of these layers to stay together the entire project.
Choose your thread: DMC and Anchor embroidery floss is readily available in most craft stores, Michaels, Walmart, JoAnns, etc. Cut an 18" length of the embroidery thread. Separate 2 threads from the six strands. You will need to cut several of 18" lengths for this project.
Begin sewing. As you begin sewing, use the first few stitches to tie the tail of your thread down in the back. To do this you will catch (or tuck) the tail under the stitches on the wrong side of the fabric as you bring the thread back to the right side. You will be sewing along the line of the pattern. Be sure to come up on the line and the return the stitch down in the hole of the previous stitch for backstitch and for stem stitch stay along the line. Are you off a little? Pull out that stitch and try again. It takes a little while to know where to come up and down to keep the line straight, but you will get the hang of it. Also, this doesnÂt need to be perfect. The beauty of a hand made work is that the imperfections are what makes it special. If you wanted it perfect, youÂd machine embroider it!
Continue around your design following along the lines. Keep your stitches a consistent length (mine are under ¼"). If you need to skip to another part of the pattern, try not to skip the thread more than an inch (though the background batting will hide these thread trails). When you reach the end of the thread, tie a knot and then tuck the tail of the thread under the stitches. You will be amazed how quickly you can sew your design.
Please post any questions or comments in this thread. In Lesson Two we will discuss adding embellishments. Looking forward to seeing your Redwork!
--Amy


nanajayne
new2quiltingOriginal Author
Related Discussions
Lesson in Entertaining from a guests view
Q
Redwork Quilt Top (pics)
Q
Forum Class Schedule!!!!!
Q
August Quilting Goals
Q
teresa_nc7
new2quiltingOriginal Author
new2quiltingOriginal Author
nana24
true4uca
new2quiltingOriginal Author
nanajayne
cannahavana
mallaround
marty_mo
teresa_nc7
cygram
new2quiltingOriginal Author
cygram
new2quiltingOriginal Author
marcia_m
new2quiltingOriginal Author
new2quiltingOriginal Author
fatquarters