


Cork floor installation (photo heavy!)
evilbunnie
15 years ago
Featured Answer
Sort by:Oldest
Comments (12)

plllog
15 years agolast modified: 9 years ago
musicmama61
15 years agolast modified: 9 years agoRelated Discussions
Cork floors installed! (DIY, even!)
Comments (9)Thanks, all. Like budge said, it will dent, but it springs back. I would imagine a piano or other heavy item might permanently dent it, though. Also, we've been advised to put felt pads or the little slider pads on furniture to keep from gouging if something is dragged. Even though these planks are prefinished, a finish coat (or two) of poly is recommended to seal the seams. A spill should be gotten up quickly, but I think that goes for about any flooring. It is supposed to wear really well. This is solid cork, 3mm thick (the old-school cork tiles from the '50s and earlier were usually 1/4" thick, so this is slightly thinner). So as budge said, it can be sanded and refinished. There are some floating floor cork products out there, too, but I don't think they can be refinished. They also require a transition/threshhold at openings, and I wanted a cleaner look than that. If you've laid ceramic tile (or think you might be able to), you can do this. I dribbled the glue down onto the floor and measured and cut the tiles. DH was on the kneepads trowling out the glue and placing the tiles I handed him. We had a little trouble with some tiles "floating" prior to the adhesive fully curing, so we have some gaps. We used Bostick's Best adhesive, and probably should have allowed for a little longer "open" time for curing before placing each group of tile. But we got a bit impatient. I plan to source a different kind of adhesive for the next room. It will be a roll-on rather than a trowel-down, so won't have as much "play" in it and will be less tiring for DH to work with. Now, it's much easier than ceramic when it comes to cutting and trimming. A ruler, a box-cutter and a cutting mat is all you need. No saws, no tile nippers, etc. The fumes from the adhesive were strong for two days, but I didn't smell it when I got home this evening....See MoreWe Are In the Home Stretch-photo heavy
Comments (33)Hi Elle3. Let me try and help you as I'm long distance right now in NY and the apartment is in FL. Thank you btw. The Irish Lace Donegal color is just a hair lighter than BM-34 Wilmington Tan. It's a beautiful tannish color and the tile has some mottling with the edges slightly darker and the center slightly lighter. (Not as much as shows on the Jeffrey Court website.) It's subtle which is what I wanted. Some tiles have such a large swing in color, but this doesn't. The Jeffrey Court tile also has two other colors we considered. One is called Cork and the other is called Tipperary. Both also would have worked. I'd get a sample of all three as the shading is close but slightly different. The Cork has a green cast to it and the Tipperary has more of a taupy beige cast to it. Any of the three would have worked beautifully with the cherry. What finally swayed me is that since my LR/DR/kitchen all open to one another, I wanted a warm tan color in the rest of the apartment. The Donegal was the warmest. I think any of the three would work with the Uba Tuba. Definitely get a sample. Where are you located? I ordered mine locally in SW FL. As for the grout color, I'll have to get back to you when I'm down there as I don't remember what brand or color. I return to FL on Xmas day and it will take me a couple of days to get settled with putting things away, buying what we still need (we started from scratch there as it's our snowbird place), setting up the computer, etc....See MoreCork floor -- Natural Cork Everglade Oak?
Comments (0)Has anyone installed Natural Cork's Everglade Oak floating cork floor, from their Cork Canvas line? Or any of their other Cork Canvas designs? Natural Cork - Cork Canvas Plank I'm getting ready to rip up the old wall-to-wall carpet in my 1BR condo and put down a floating cork floor. The new floor will be for the the living room/dining room, bedroom and hallway -- everything except the kitchen and bathroom. There are several aspects of cork that I like, especially its sound-dampening qualities. The hard part has been finding a color and texture/pattern that I like -- not too dark or too light, not a busy pattern, no warm orange or red undertones. After many visits to the few local flooring stores that have good experience with cork, I've settled on Natural Cork's Everglade Oak. It's imprinted with an HD image of a wood grain in a gray-brown color. I didn't set out looking for a cork floor with a wood-grain image, but after considering the way the "real" cork color options look with my walls and furniture I think the Everglade Oak works best. My runner-up choices are Kilmartin Pine, also from the Cork Canvas collection, and Eco-Timber's Fumed Oak which is also a wood-image cork. The Fumed Oak is a good medium brown but I think Natural Cork's products look more authentic. The Kilmartin Pine looks good but is darker than I'd like. Before I pull the trigger, I'd love to hear about others' experiences with this product or even see photos of them installed, if you have any. Thanks!...See MoreCOREtec Issues (photo heavy)
Comments (151)Cnunn: I am so sorry to hear about your flooring issue. I had my kitchen & laundry / bathroom renovated a few years ago, and I kept my Pergo laminate oak look flooring, which was installed years before my kitchen renovation. My Pergo flooring still looks and functions great! Nothing sticks to it, it does not ding or chip. Easy clean up with diluted vinegar and water! Everyone who has seen it swears it is wood. Best of luck on your journey....See Morekateskouros
15 years agolast modified: 9 years agovicnsb
15 years agolast modified: 9 years agoPoorOwner
15 years agolast modified: 9 years agogardenburgher
15 years agolast modified: 9 years agolyno
15 years agolast modified: 9 years agolaxsupermom
15 years agolast modified: 9 years agoannes_arbor
15 years agolast modified: 9 years ago
msrose
15 years agolast modified: 9 years agoevilbunnie
15 years agolast modified: 9 years ago
Related Stories

REMODELING GUIDESCork Flooring 101: Warm Up to a Natural Wonder
Comfortable, sustainable and easy on the eye, cork has a lot going for it. Use our guide to get familiar with this natural flooring material
Full Story
DECORATING GUIDESDiscover the Unstoppable Advantages of Cork for the Home
Look beyond wine stoppers to see cork's ecofriendliness, durability, fire resistance and antimicrobial nature for all kinds of home products
Full Story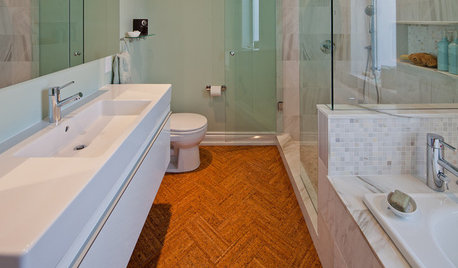
FLOORSWill Cork Float for Your Bathroom Floor?
Get the facts on advantages, disadvantages, costs and installation to see if a cork bathroom floor is right for you
Full Story
KITCHEN DESIGNKitchen Sinks: Fireclay Brims With Heavy-Duty Character
Cured at fiery temperatures, fireclay makes for farmhouse sinks that just say no to scratches and dents
Full Story
MODERN HOMESHouzz Tour: Heavy Metal Rocks a Modern Missouri Home
Steel shows up all over this single-level family home, but wood and other textures warm the look
Full Story
KITCHEN BACKSPLASHESHow to Install a Tile Backsplash
If you've got a steady hand, a few easy-to-find supplies and patience, you can install a tile backsplash in a kitchen or bathroom
Full Story
REMODELING GUIDESContractor Tips: How to Install Tile
Before you pick up a single tile, pull from these tips for expert results
Full Story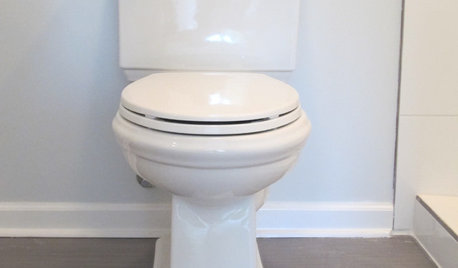
BATHROOM DESIGNHow to Install a Toilet in an Hour
Putting a new commode in a bathroom or powder room yourself saves plumber fees, and it's less scary than you might expect
Full Story
LIGHTINGReady to Install a Chandelier? Here's How to Get It Done
Go for a dramatic look or define a space in an open plan with a light fixture that’s a star
Full Story
FLOORSWhat's the Right Wood Floor Installation for You?
Straight, diagonal, chevron, parquet and more. See which floor design is best for your space
Full Story
homepro01