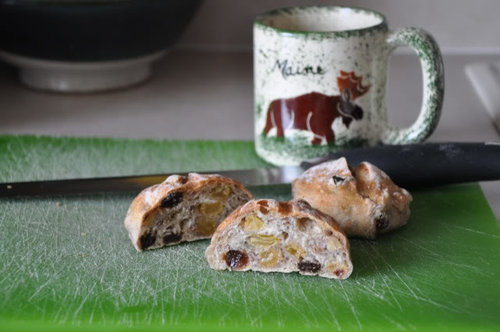
At the request of a couple of members, here's my raisin walnut roll recipe. They're dense and chewy but not tough, and just perfect for a winter snack.
Rustic raisin-walnut rolls
This recipe takes some patience - you begin it the night before, and it takes about 7 to 8 hours to rise and bake the next day. Also, it is a very ‘slack’ dough - there is a lot of water in it, so you don’t use regular kneading techniques, but instead fold the dough. It’s easy, and I’ll walk through it below.
I usually mix up the starter one evening, then start the final dough late the next morning (rolls will be ready for dinner) or around 3pm (rolls ready for a snack before bedtime).
For the bread flour, I’m currently using (horrors) ConAgra Harvest bread flour, which is what I can get at Costco in 25 lb bags. I’m currently looking for an alternative that doesn’t cost an arm and a leg. I’ve also used Gold Bond and King Arthur all-purpose flours, both work equally well.
Makes around 30 rolls
Starter:
¼ teaspoon active dry yeast
1 ½ cups cool water
1 cup dark rye flour (I use Bob’s Red Mill)
1 cup bread flour
Dissolve the yeast in water. Mix flours together in large (i.e., 5 qt) mixing bowl. Cover bowl with a plate, towel or saran wrap and put in a cool (around 60 degrees) place for 12 to 18 hours. I toss it in the basement.
Dough:
1 2/3 cups warm water (less in a more humid climate - prob. around 1 1/3 cup)
2 teaspoons kosher or sea salt (if using table salt, use perhaps 1 ¼ teaspoons)
3 ½ cups bread flour
1 cup raisins
1 cup golden raisins
1 ½ cups walnuts, chopped to ¼ to ½”
Add the water to the starter in the bowl. Use your hand to mix the water in thoroughly with the starter; a spoon won’t do it, and a whisk will get all stringy, so use your hand and squish away. Sprinkle on the two teaspoons salt, and stir in 2 cups of the flour. Stir in the other 1 ½ cups flour. Let sit 20-30 minutes.
Using a flexible spatula, pour the dough on a lightly floured countertop, giving yourself lots of space, or it will find its way over the edge of the counter and on to your floor. Leave the dough on the counter, and wash and dry the bowl. I find that a paper towel works very well in lieu of a sponge in scrubbing the dough off the bowl, and you don’t have to worry about the dough stinking up your sponge or gunking up a scrubber.
Turn back to the dough. It will be an unsighly, oozing mess on your counter, looking more like oatmeal than dough. Don’t worry, this is how it should be.
Pour the raisins and walnuts on top of the dough, spread them around, and press them gently down into the dough (you don’t have to be thorough, just pat them down a bit).
So how to deal with this mess? You fold it, rather than knead it. I’ve seen people fold dough by hand, but I use a 6” spackle knife. (I have ancient formica counters; if you want to be more gentle, I’d use a plastic spackle knife or some other tool actually intended for working with bread.) Here’s the technique. Slide the spackle knife under a corner of the dough, lift up and pull to stretch the dough out, and fold the dough over on itself. Repeat every 90 degrees around the dough, for a total of 4 folds. If you can’t feel the dough starting to firm up, do a couple more folds. After the folds, lift up the dough as best you can with your chosen tool and plop it back in the (clean!) bowl.
Now, this first fold after you add the raisins and walnuts will be a bit of a mess. Make that a total mess. The walnuts will tear through the dough and raisins will be spilling all over. Don’t worry, it will be much better next time.
Cover the dough and let rise in a warm place until roughly doubled, about two hours, depending on the air and water temperatures. Using the spatula, turn the dough out again onto the lightly floured counter, and wash the bowl. Fold the dough again - it should be a little more like what you’d hope now, in terms of texture - and return it to the bowl.
Let rise again until it reaches that same “doubled” size - it will take perhaps an hour - and fold one last time, for a total of three folds. Return to the clean bowl, let it rise again, about an hour.
Very heavily flour the counter this time, like 1/8” deep, and make a pile of extra flour off to the side. Turn the dough out onto the counter, and sprinkle a bunch more flour on top. Take your spackle knife and cut the dough into quarters. Separate the quarters and work some flour onto the cut edges to keep the quarters from sticking back together.
Grab a quarter, and cut off a good-sized chunk. Then cut off a roll-sized piece - around a third to a half cup. Drop it in the flour to seal the raw edges, and form it into a roll. My method for doing this is to push on what will be the bottom of the roll with my thumbs and stretch out the top with my fingers, then seal the bottom by “strangling” the bottom with the thumb and index finger of one hand.
Put the rolls on a cookie sheet covered with parchment paper (my preference) or corn meal. The raisins will stick to an uncovered cookie sheet. Leave ½” - ¾” between rolls. When done forming the rolls, cover them and let them rise in a warm place for about an hour until they’ve risen noticeably. Pre-heat the oven to 400 degrees.
At this point, I recycle the unused flour by running it through a fine-meshed strainer and back into the flour container.
When the rolls are done rising, slash the tops with a razor or serrated knife and toss them in the oven for 30 minutes, turning once halfway through. The tops should be notably browned when done, but do not scorch the loose flour on the tops of the rolls.
I put a cast-iron skillet on the bottom rack when I pre-heat the oven, and pour a third of a cup of boiling water in after putting the rolls in the oven. This definitely helps the rise when I bake bread, but is probably optional for these rolls, where there isn’t much ‘spring’ in the oven. But I do it anyway, just in case.
Let the rolls cool on a rack. You can eat them while still warm. I freeze most of them after they’ve cooled, and toss them in the microwave for 20-25 seconds.
Some of the variations I’ve tried and rejected: more rye flour: doesn’t change the flavor much, and makes the dough stickier and harder to work with. Less water: makes the rolls too dense. Higher oven temperature: scorches the rolls. Letting the starter ferment longer: the rye gets funky after 24 hours. Some recipes say to add the salt later in the process; I find it makes no difference, and I'm more likely to forget to add it if I wait. I’ve also tried mixing the dough in a Kitchen Aid with the dough hook, but have not gotten results I like. That said, I hardly ever use the dough hook (I like to knead!), so someone with more experience may have better results. If you do, let me know!
Successful variations: substituting chopped apricots for the golden raisins. I've also scaled the recipe up by 50%, but for some reason you need to add more water - perhaps 1/4 cup extra.
Variations I’ll try someday but haven’t yet: black olives and rosemary; substituting sunflower seeds for the walnuts.
This recipe actually started as a Pain de Campagne, that I believe I based on Joe Ortiz’ recipe, or maybe Hamelman’s. To make the pain de campagne, substitute 1 cup sifted whole wheat flour for the rye flour, let the starter ferment 36-48 hours (!), omit the raisins and walnuts, and preheat the oven to 500 degrees, turning it down to 400 when you put the bread in. Bake for 1 hour, turning a few times, until the bread sounds hollow when you tap it on the bottom. Leave in oven with door open and heat off for 5 to 10 minutes, then put on a rack to cool. Do not cut until completely cooled.
I form the bread into one large batard loaf (football shaped, or, in my case, kinda rectangular, so I can get more slices out of it), and bake the loaf on a pizza stone, using a piece of parchment paper to transfer the loaf to the oven and removing the paper after 15 minutes. Definitely use the steam method (put in a cast iron pan or other durable pan during the pre-heat, put in ½ cup or so hot water when you put in the loaf), as the loaf springs considerably in the oven. I freeze most of the bread and it microwaves nicely. Great for toast.
Bon appetit!
Ian


ianb_coOriginal Author
windwhipped
Related Discussions
Request for Don_R - OT
Q
Need T&T Oatmeal Raisin Cookie recipe
Q
Sort of off topic rant
Q
Off Topic..Wanted to share a few pic with my friends..
Q
Skybird - z5, Denver, Colorado
ianb_coOriginal Author
Skybird - z5, Denver, Colorado
ianb_coOriginal Author
Skybird - z5, Denver, Colorado
jclepine
ianb_coOriginal Author
jclepine
Skybird - z5, Denver, Colorado
ianb_coOriginal Author
ianb_coOriginal Author
jnfr