


How can I add photos to my posts?
merryheart
17 years ago
Featured Answer
Sort by:Oldest
Comments (15)

rjj1
17 years agookcdan
17 years agoRelated Discussions
Help! I can't figure out how to post a photo!
Comments (13)I did follow your instructions and used photo bucket and did manage to post some photos last night. I couldn't figure out how to get a link to my entire album on photo bucket, though. I did see how to get the links for each individual photo. Buel- the instructions I was having trouble with were the ones at the bottom of the forum page: "instructions how to use this forum" and its associated linked help pages. I realize that the link you posted for me above, to your "new to this forum" message post, does have good instructions on how to post photos. Sorry, I had read that post a few weeks ago, and didn't remember there was anything about posting photos in it. Your instructions are clear. Thanks again....See MoreHow do I include a photo in my post?
Comments (0)It's frustrating to many newcomers to see all the posts with photos included in the text and have no idea how it's done. With this FAQ I'm attempting to explain the process so posting photos will not only be possible, but will be easy. The first one is the hardest; after you've got the method in hand, posting photos will be routine. The FAQ is excerpted from a series of threads where various forum members contributed valuable information and commentary. The threads got heavy with discussion, all of it useful but maybe hard to wade through if you just want to get a photo included in your post and don't really want to know the nitty-gritty. I'll give the SHORT and the LONG of it so you can take what you want and ignore the rest. ------------------------------------------------------------------------------------------------------------------------------------------- THE REALLY REALLY SHORT OF IT: 1. Get the photo onto your computer desktop, by digital camera or scanning or whatever. 2. Upload the photo to a web-hosting site; either by opening an account (Picasa, Photobucket, etc.) or by using a site that doesn't require an account (such as TinyPic or imgur). Pick a reasonable size for posting like 640 X 480 pixels. 3. From the list of codes on the website, pick the HTML code and copy it. DO NOT copy the IMG code. It won't work on GW. 4. Paste the HTML code into your message. 5. Preview should show the photo included in your post. ------------------------------------------------------------------------------------------------------------------------------------------- THE LONG OF IT FOR THOSE WHO WANT TO KNOW MORE: 1. OVERVIEW To post a photo you need a digital camera that you can connect to a computer or a smart phone with internet access. Using a digital camera you transfer the photo to the computer, then you upload that photo to the internet using your browser. You can either upload to a photo hosting website and then post a link to that site on Garden Web, or you can upload directly on some forums. If you have an iPhone you can email a photo directly to the internet, without using a computer. PDF files on your computer can also be uploaded to the web. In a pinch, you can always photograph a set of drawings and then upload those photos. Once you have the photo somewhere on the internet, you have two choices for Garden Web. You can post a link to the website URL in the Optional Link URL box at the bottom of your message (don't forget to name it in the Name of the Link box), or you can post a link in the text of your message that links directly to your image on that website. The website URL is on the top of the page; the image HTML code is somewhere on that page. ------------------------------------------------------------------------------------------------------------------------------------------- 2. WEB HOSTING SITES, ETC. These are the most commonly used methods to get a photo on the internet: You can use a web hosting site where you can set up your own photo albums (there are many, such as Photobucket, Picasa and Picture Trail) or you can use or , which are basically web photo transfer sites, Some forums allow direct upload to GW, but the size is limited. *An advantage of the hosting site is that you can set up a page with many photos on it and organize them by topic. A great example is sedum37's site on Picture Trail (see the Flora in Winter thread). *A disadvantage of the hosting site is that you have to set up an account, which some people may be reluctant to do. *An advantage of and is that it's very easy to upload one photo and link to it, and you don't have to set up an account. *A disadvantage of and is that you can only upload one photo at a time, which is not useful if you want to show many photos. *An advantage of the hosting site is that you can post thumbnails (a thumbnail is a small pic that is clickable and the click directs you to the full-size pic in the album on the hosting site). This is good if you want small details like dimensions to be readable. *A disadvantage of is that you can't post a thumbnail or click on the pic and get directed to a larger file. If you do click on the pic, you'll just get directed to the main TinyPic site. If this really annoys you, you can use the "direct link for layouts code" or go to . You still won't get a clickable pic, but you'll avoid the advertising. Thanks to wendyb for this tip. Whatever method you use to get your photo on the internet, you still have the options of posting a link to the website (in the Optional Link URL box) or posting a link to the image in the body of your text. ------------------------------------------------------------------------------------------------------------------------------------------- 3. DOES SIZE MATTER? It's important that the photo be within a certain size range by the time it gets to Garden Web. In a previous thread, DtD mentioned loading time as an issue, and mad_gallica explained it thus: "When talking about 'size' of a digital photo, it can refer to two separate, though often related things. The physical size of the picture on the screen, and the file size of the information necessary to show the photo. Physically large pictures mess up the thread formatting. Large file sizes are the ones that take forever to download." She gives some good examples in the 7/10/11 thread. Summarizing, there are two effects related to the size of the photo as posted. 1. Physically large photos mess up the readability of the thread - you have to scroll back and forth and back and forth to see both text and image. 2. Big photo files with lots of information load slower - you have to sit around tapping your feet (or go wash the dishes) waiting for the pic to show up. Somewhere along the way when you're moving that photo from your camera to the internet and then to GW, you will be given a choice of resizing the photo, which is usually huge as it leaves the camera. Way too big for the forum. Desirable sizes are either "thumbnails" which some hosting sites provide, or something close to 640 X 480 pixels. "Medium" or "Small" varies from program to program, so don't rely on it. (see corunum/Jane's discussion in the previous thread). Thumbnails are small pics which will link to a full-size pic in an online album. You may incur the wrath of other Garden Web members if your photo is larger than 640 x 480 pixels and thus becomes very difficult to read. Remember that your post may look fine in Preview in the window on your monitor, but others may be using computers that show a very different view. If it becomes too difficult to read, people just give up and they'll never see your images. ------------------------------------------------------------------------------------------------------------------------------------------- MORE FORUM COMMENTS diggingthedirt (on an earlier thread) adds this reason for using Picasa: "Here's why I like google's picasa web more than the option: If I select a small size for my photos when I post them via picasa, you can click on them and be taken directly to the larger size photo in the picasa album. If I click on a small tinypic photo, I end up at a page that offers me an account at tinypic; the original photo is nowhere to be found. The small size Carol used (320px x 221px) seems really useful for threads where there are a lot of images. I often use an old laptop with limited graphics memory, and loading an image-heavy thread takes a VERY long time, and makes my computer behave badly. So, yes, the photo-hosting site is a personal choice, but there are a lot of details to consider when you choose!" In previous threads wendyb gives good tips on HTML code and the use of and . One such comment is: "The reason upload does not take you to the picture if you click on it is because using the HTML code that they provide, sets it up that way intentionally to bring you to a new account page. I never use their html code. I use the "direct link for layouts" code and add the required html img src= around it." ------------------------------------------------------------------------------------------------------------------------------------------- 4. EASY WAY TO GET STARTED That said, I use TinyPic myself to include an image in the body of the text. I suggest you try TinyPic at first so that you can work out the bugs and get confidence that it will actually happen. Once you've mastered this, you can explore hosting sites to find whatever suits you personally. You don't have to set up an account at a hosting site if you use . 1. Transfer the photo from your camera to your computer desktop. 2. The photo files on your computer must be in a format such as jpg, png, gif, base 64 encoded image, or bmp. 3. Using , you hit the "Choose File" button and it searches your computer desktop. 4. Choose one then select a size (640 x 480 is good)("Resize" button). Note that choosing Thumbnail (160x120) just gets you a small pic; it won't be clickable. 5. Hit the "UPLOAD NOW" button. Before it will upload, you will have to enter the annoying scrambled code, then upload will proceed. When the file is uploaded, click once on the top code (labeled 'HTML for websites') and it will automatically be copied to your clipboard so you can paste it. Don't use the IMG code, it doesn't work on Garden Web. 6. Paste the HTML tag in the text message of your post, not in the "optional link URL". This is the easiest way I know. Claire...See MoreHow Do I Add Pictures to My Posted Messages?
Comments (0)Adding pictures to posted messages may be easier than you thought. Some forums allow you to add a picture directly from your computer. Those direct upload forums are listed under GardenWeb Galleries, and display a camera icon by their name in the main forums list. All other forums require you to store the image elsewhere on the web, then link to that image using html codes in your posted message. The Short VersionAdding a picture on any forum Upload your image (60K or less in size) to somewhere on the web for storage. Type codes into your forum message to add the image. To create a link to the image: <a href="insert image address here">insert image description here</a>. To display the image inside the posted message: <img src=” file location and name”>. Submit the message. Adding a picture on forums allowing direct upload from your computer Type your forum message and select Preview. Select Browse button to locate and add the image file on your computer. Submit the message and image file. &nbspTIP &nbsp To simplify entering codes and other repetitive phrases, consider using a macro program. I use ShortKeys Lite because it’s free, tiny, easy to use, and works in any program. I’ve set up macros for commonly used coding like image and page links. I copy a URL, then type in my shortcut “xim” and ShortKeys Lite inserts <img src=””>, or “xu” inserts <a href =””></a>. I then paste the URL in between the “”and add a descriptive phrase between the ><. Fast, easy, and no typos! Many macro programs offer similar abilities. The Detailed VersionAdding Pictures to Messages on Forums Without Galleries (Like Hot Peppers Forum) Step 1: Prepare your image for uploading Make sure your image is in either JPG or GIF format (with .jpg, .jpeg, or .gif file extension), and is no larger than 60K. If your file is larger than 60K you will need to reduce the file in your photo editing software. The software’s help files will give specific instructions. You can also add any image copyright or text desired using image editing software. Save the file to a new name before reducing it so you retain the original version. Step 2: Upload the image from your computer to somewhere on the web Option 1: Use the free space provided by your ISP. Most ISPs provide free space for their subscribers. Check their support website for instructions on setting up and using your personal web site space. This is a great option because you normally have plenty of storage space and the images will always be available for viewing. Option 2: Use image hosting websites such as FotoTime, WebShots, PictureTrail, or Yahoo Photos. There are many image hosting sites on the web. Follow the uploading instructions provided for the particular image hosting website. Some services do not allow displaying images stored on their site on other pages (like GardenWeb posts), some charge an annual fee, and most limit the amount of images stored, so be sure you choose a service that fits your needs. Image hosting sites mentioned are examples of possible options, and not endorsed or recommended by GardenWeb. WebShots does not allow displaying images in other sites (even with a paid membership) so you are not able to show images from WebShots in GardenWeb posts. You can add a link to your WebShots page that contains the image. FotoTime allows displaying images stored on their service only for paid subscribers. Option 3: Use Hortiplex. Hortiplex is a database of plants which is part of the GardenWeb family of websites. It allows GardenWeb users to post pictures by scientific name. For specific instructions, see Hortiplex help pages. Option 4: Use the GardenWeb galleries available on other forums. You can post images to other GardenWeb forum galleries, but these images are not stored for long, so this is not always the best option. For example, your posted message on Hot Peppers forum may stick around for a couple of months, but the image on the Garden Photo Gallery may disappear after two weeks so you’re left with a “broken” image link in your forum message. Always make backup copies of any images stored online! Step 3: Add your image into your gardenweb message Copy the image address (URL). Go to the web page displaying the image you uploaded in Step 2. In Internet Explorer, Right-Click on the image and select Properties to show the image address. Select the entire URL (including the second line if necessary), then select “Ctrl C” to copy it to the Windows clipboard for the moment. Cancel the properties window. Switch back to the Post New Message form. Paste the image address into the message as a link or a displayed image. Option 1: Make a link to the image using the URL space in the New Message form. Select “Ctrl V” to paste the URL address into the Optional Link URL space provided at the bottom of Message Preview. Add a Name of the Link to show a descriptive phrase for the image instead of the link address. Option 2: Display the image in the message itself using formatting codes (an html image “tag”). Type <img src=” file location and name”> in the body of the message. For example: If your graphic is at wherever/~smith/garden/habanero.jpg, you would insert <img src=” //wherever/~smith/garden/habanero.jpg”>. Add an extra return above or below the image to group it with the appropriate text. Step 4: Submit the message Adding Pictures to Messages on Forums with Galleries Some forums allow uploading pictures directly from your computer to the forum's Image Gallery. Forums with Image Galleries display a small camera icon next to their name on the main list of GardenWeb forums. Step 1: Prepare your photo for uploading See instructions in Step 1 above. Step 2: Type your message into the New Post form and select Preview This is the usual message posting procedure. Be sure to add a subject that clearly describes the image. Step 3: Add the image from your computer Select the Browse button and locate the file you wish to upload. Once the file name has been added, select Submit to post the message and image. Step 4: Submit the message...See Morewell,I had a post ready with one photo and clicked for my next photo
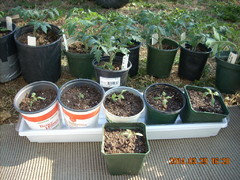
Comments (8)That's a great pic of Woman at the Well. I think it's Stumbling Stone, and I've never seen the contrasting colors so clear. Korth cultivars can vary in their coloration quite a bit. Yes, Wind on Water is a lovely soft apricot. Pandora's Treasure has good color here, but lacks substance....See Moremerryheart
17 years ago
Lisa_H OK
17 years agomerryheart
17 years agoLisa_H OK
17 years agoLisa_H OK
9 years agoLisa_H OK
9 years agoLisa_H OK
9 years agoLisa_H OK
9 years agoslowpoke_gardener
9 years agosoonergrandmom
9 years agoLisa_H OK
9 years agoslowpoke_gardener
9 years ago
Related Stories
KITCHEN DESIGNTrending Now: 25 Kitchen Photos Houzzers Can’t Get Enough Of
Use the kitchens that have been added to the most ideabooks in the last few months to inspire your dream project
Full Story
WORKING WITH PROSInside Houzz: What You Can Learn From a Houzz Photo
Get access to the designer's info, product names, other photos in the project and much more by clicking on a Houzz image
Full Story
DECORATING GUIDES10 Ways Photos Can Make a Room
Keep your favorite views forever with a fresh take on a photo wall
Full Story
REMODELING GUIDES9 Ways Grout–Yes, Grout–Can Add to Your Design
Choose From a Palette of Grout Colors for a Warm, Unified Look
Full Story
LIFEThe Polite House: How Can I Kindly Get Party Guests to Use Coasters?
Here’s how to handle the age-old entertaining conundrum to protect your furniture — and friendships
Full Story
THE POLITE HOUSEThe Polite House: Can I Put a Remodel Project on Our Wedding Registry?
Find out how to ask guests for less traditional wedding gifts
Full Story

LIVING ROOMSIdeabook 911: How Can I Make My Living Room Seem Bigger?
10 Ways to Make a Small Space Live Large
Full Story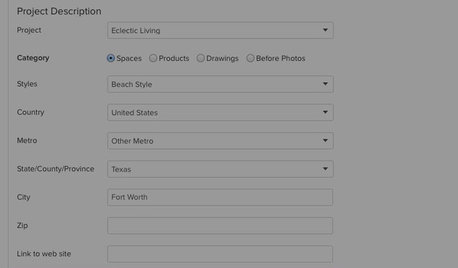
INSIDE HOUZZPro Corner: Add Keywords to Your Photos
Make your photos searchable by Houzz users by adding keywords for style, product descriptions and more
Full Story
COLORHow to Add Just the Right Amount of Dramatic Black
Done right, black can add punch and personality to just about any room. Here’s how to go over to the dark side in style
Full Story
ddsack