


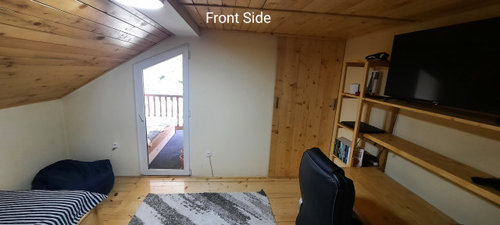
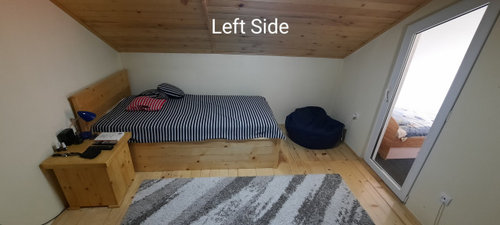
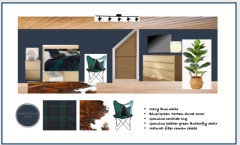
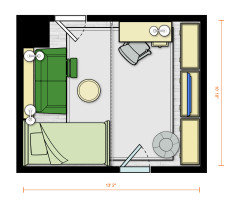
Reorganizing my bedroom, need some advice
Darko Kuzmanovic
18 days ago
last modified: 17 days ago


Featured Answer
Sort by:Oldest
Comments (18)
 PRO
PROJAN MOYER
17 days agolast modified: 17 days agoRelated Discussions
Need some help/advice on my old house
Comments (12)Removing Paint from Siding. There are two tools that, in our experience, are very good at taking paint off siding, and a lot better than the traditional heat and scrape, or scrape and sand methods.. 1. Silent Paint Remover is one. This tool is a GIANT STEP above heat guns and the dangers they cause. The other is 2. Paint Shaver. This is a mechanical, high speed stripper that uses replaceable carbide blades. Which one we use depends on the paint to be removed. Silent Paint Remover is slower, but does a very neat job requiring very little sanding. Paint Shaver is faster, but takes a bit of practice to remove the paint without putting a lot of crescent-shaped divots in your siding that require a lot of sanding out. One mistake to guard against using this tool is setting the depth adjustment for too-aggressive a cut. You don't need to remove all the paint, just the loose paint, so don't try to get down to bare wood in one pass. When you are removing paint, you hope the original painter did a lousy job so it will come off easily. If he was good at his job, it's going to come off hard no matter what tool you use. Keep in mind that the EPA lead abatement rules govern the safe removal of any exterior lead paint. As a homeowner, they may not apply to you, but follow them anyway for everyone's safety. Both of these tools are commonly available at a deep discount over retail from e-Bay and Graig's list. We have used and cannot recommend the Metabo or Wagner machines. They don't work nearly as well as the suggested machines. Repairing Plaster To repair cracked or falling-off true plaster you need to reattach it to the wood or metal lath underneath. The traditional way is with screws and plaster washers. These usually extend proud of the wall, making them difficult to conceal except with thick coats of patching plaster. The better way is to glue the plaster to the lath. There is a commercial kit to do this called Plaster Magic which we like, but which we also think is pretty expensive. We just use our own, locally available materials, that work just as well and are a lot less expensive. Here's what to do: 1. Using a concrete bit, drill about 3/8" holes in the plaster until you hit the lath -- do not drill through the lath. You will feel it when you reach the lath. You will want to drill about 1" on both sides of any crack, putting a hole about every 4-6" along the crack. Its a judgment call. Drill as many holes as you think you will need. If in doubt, more is usually better. For large loose areas, drill about every 4"-6" in the field and every 4" around the perimeter of the loose plaster area. Sometimes you will hit the gaps between lath strips. Don't worry about it. Just move about 1" away and drill again. 2. With your trusty shop vac, suck the plaster dust out of each hole. This is important, plaster dust interferes with the adhesive. 3. Using your caulk gun and a good construction adhesive (we like Power Grab, but any quality adhesive should work. In a pinch, we have used most of them at one time or another and none have failed.) squirt a good glob of adhesive into each hole. This will probably be messy, so have some mineral spirits and rags around to cleanup any drip-out. 4. Make a bunch of 4" square wood washers. You can make them out of job scrap. We use 1/2" or 3/4" OSB most of the time just because it happens to be around. Drill a hole in the center of each washer - 3/16" or 1/4" ought to do it. 5. Line the washers up with the holes you drilled earlier and, using a drywall screw, attach the washer to the wood lath beneath the plaster. You don't need to screw into every hole, about every 4-6 holes is a good rule of thumb. What you want to do is put even pressure over the loose plaster area and draw it back to the lath. This will allow the adhesive you just applied to bond the lath tightly to the plaster once again. As you tighten the screw, you will feel the plaster draw in. DO NOT try to sink the screws all the way in one go. Draw them in gradually moving from screw to screw. This lessens the risk of cracking the plaster further. When all the screws are sunk, you are done until tomorrow. Go have a beer. 6. After 24 hours, remove the screws, put them back in the box (they can be reused) and throw the washers away. The plaster is now stuck solidly to the lath once again. There are no screws or washers in the wall - so finishing the plaster is much simplified, and this fix is strong. The adhesive sticks like, well, like glue. 7. Using patching plaster, a setting joint compound, or even regular joint compound, patch the screw holes, cracks and fill in any missing plaster. The purists will tell you that joint compound has a different texture than real plaster and is softer, so you should not use it. It does have a different texture and is softer, but so what? The paint will hide any differences. 8. We recommend against paper tape on cracks. What we use is nylon screening -- the stuff in screen doors. buy a role from your hardware store and cut it into 6" strips while it is still rolled up -- its easy to cut with normal shop shears or even your utility knife. Use this in place of nylon mesh tape -- it works better. We embed it in a thin coat of joint compound, then, when the first coat of mud has set, mud over it. Its wider footprint is better at stabilizing cracks than narrow nylon mesh tape. In fact, we have never had a repair fail using this method. Removing Layers of Paint from Interior Trim Definitely use a commercial stripping service if you have one in your area. At $1.00 - $2.00 per linear foot, the price is well worth not having to deal with the mess of stripping in place or on saw horses in your garage. After stripping be sure to sand with a fine sandpaper to remove the fuzzing that stripping causes. Good luck....See MoreHelp, I need some advice on my Family rm
Comments (31)First a HUGE THANK YOU TO ALL OF YOU. Omg I can not imagine my life with GW. Everyone here is beyond kind helpful supportive and understanding. NO one has ever judged me on GW. And this was hard for me to post images of my home. Insecurity is my middle name. I wish I could change this room this second. Like betwitched. Nose twitch done!!! I have no magic. I am going to really study all your suggestions and implement them. Stir the pot and see what works and does not. Truly GW is full of amazing minds, voices, ideas, inspiration and supportive people. Les917, Only in the heat of the summer do we like those windows covered. We have electric controlled blinds. Right now they are closed but I love them open. Everything you describe is exactly as I have been thinking I plan to paint the rest of the built ins White. I have thought about moving the cornice all the way up. It should have been done years ago. But the red sofa may be going to another room along with the chair. My DH has suggested we either buy new leather pieces for this room or we move brown leather from the basement up to this room. We use the red in the kids media room and figure out that space later. We could move the TV to one of those adjustable wall mounts. My best friend said I need to reconfigure the fireplace mantle and mount the tv there. I need to convince DH on this one. Loribee, YES, I love stripes too. Kiko, Yes, I do like the drama in those drapes. And I love the cute pooch on the porch. Vampiressrn, Wow, I feel so honored to have you respond to me. I think your style is amazing. I read all your posts like a groupie. I love your posts. I do like brown. I used to have my kitchen painted this medium brown color called Camel coat. The slight problem with the brown walls is do I paint everything? Or only the brown on the wall with the built ins or maybe three walls, all the walls move open to other areas. Something to consider. Paintergirl, Great ideas. I do need to embrace the space. I need to frame more art. I rarely paint my dogs. Too Hallmarky. I love those images you suggested. Especially the paint color. Notice how much in the image above. Gwbr54, Thank you for your sweeet words. I get very confused with the terms modern and contemporary. I wish the term Modern did not connote the style in the 70s with plastic, metal and clean lines. Or maybe I am a complete idiot and the term is Modernism and I am getting that confused. Send me back to class. And is it possible that we change our style as we grow up? Which means some of this rubbish about me was bought with the understanding I was a French provincial girl. I could flush that style. It is not me at all. But the table in the kitchen so French, I like it painted white. Organic modern or contemporary look? I like it. I have never been a fan of Bamboo or even natural fibers but the images you posted could work for me. I love the chunky candle sticks the rich rug and the drapes over shades. It is ironic you have the Ethan Allen image, years ago my DH and I got into a huge fight because I wanted EA sofa and chairs for the same room. He felt is was too fussy, This coming from a guy who would be happy eating off a dog crate. SandyP, I agree more in the fireplace area. Definitely need to hone in on that space with drama My budget is maybe a few $1000, yes I am limited in this frail economy. I have sentimental only to the vases and the vase picture. I could toss out everything. Including the floors. But that would be a $100,000 budget. Gosh, I wish I were a Rockerfeller or Kennedy or even Gates. I do not like black rod iron, never did and never will. I am searching today for some better tables. As for Naked windows. I love naked veggies, never thought about the windows. I think for this room to come together the windows will be a key to pulling the room together. Ideas so far and feel free to add any more... Option 1: Sell the red and repaint the kitchen. Buy something in brown leather, bag the hideous end tables and put up drapes from ceiling to floor. Repaint the built Ins too. Option 2: Keep the red sofa, paint the walls, , bag the hideous end tables and put up drapes from ceiling to floor. Repaint the built In. Option 3: Get lazy and hire someone which in turn angers the DH as he thinks I should be able to do this. It would anger my oldest daughter as she says I am constantly changing all the rooms in the house I would need to hire a designer on retainer. And that could only happen if my last name were Rockefeller. Rooms I love and maybe I could make my own, but how? Yes, Plants, Trees that is it I can see this could help along with repainting the walls to a possible white color... The rug helps too but I have a similar rug. I think I even saw chairs like these at Marshalls I like what they did with making a corner conversation area. I like the drama on the wall. I might be able to borrow these ideas.. Why does this room work? Could I paint one wall like this? Or is this a bad, bad decor plan? I like these colors but the wing back chair is not me, I wonder if I use more crisp white with navy blue could that be a direction. And the kitchen could be painted the navy blue... would this work with the dark floors?...See Moreneed advice on desiging my super small bedroom
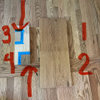
Comments (6)Put bed on drawers like a captain's bed and lose the dresser. Not quite enough room for chairs but you could put bolsters to make it into a daybed. Make/buy a wall bed and buy folding chairs to use during the day. You could lean your bed up against the wall and secure it with a strap to see if that's something that works for you. If you are tidy this is how I'd go. Buy a daybed. Put bolsters around to make it into a sofa for the day and shove them under the bed at night. Everybody gets to be on a sofa together, not the best. I've got a 11x9,5' room I'd like to serve as library/office/sewing/exercise/guest room. Gave up and it will have an air mattress when we have guests. Didn't want to lose the wall space for a wall bed and putting shelving around a daybed made books difficult to get to. Just been through some redesigning of my own closet. Suggest dropping the hanging rod so clothes just clear the floor and putting up more shelves to regain prime real estate and keeping the floor clear....See MoreI need some design advice for my front yard beds
Comments (24)The "before" picture showing shrubs lining both sides of the walkway should be enough to permanently scare you away from reverting to that scheme. As Bio says, it will make the walk look narrower. It will look less inviting and feel it, too. You definitely need to extend the walk to the curb as it has the look of an abandoned, unfinished project. Try to find the best match to the stone as possible. You'll be forgiven that there will be a "shadow" where the new meets the old. Over time, it will lessen. You could widen the walk a little (8" each side) by bordering it with brick laid sailor course. Or by using a plain concrete band if that's your preference. If you're going to include a bed around a tree, don't make a little bed around a large tree as the proportions will be way off. Tree beds are not good for annuals (which must be changed out periodically. They are better for permanent groundcovers or perennials that serve as groundcovers. When you have a lot of grade change, shrubs below windows do not need to be matched kind. What's important is that they have the same relationship where they meet the window. What everyone said about deepening the bed ... for sure. Instead of 2, 3, or 4,' it should be 6' at the shallowest and flare to meet any deeper bed configuration. The house could use another tree off of it's right corner to balance the picture. Color is always nice by the entrance. Colorful perennials wrapping the corners is another way to interject some seasonal color. It would be good to someday replace the lamp post with a taller one....See More
Darko Kuzmanovic
17 days agoDarko Kuzmanovic
17 days ago PRO
PROlisedv
17 days agoDarko Kuzmanovic
16 days ago- PRO
lisedv
16 days ago Darko Kuzmanovic
16 days ago- PRO
lisedv
16 days ago - PRO
lisedv
16 days ago Darko Kuzmanovic
16 days agomilana Miss
4 hours ago


Related Stories
APARTMENTSHouzz Tour: Reorganized Tribeca Penthouse Suits a Family Well
An architect redesigns her New York City apartment to create a warm and functional home for her family of 4
Full Story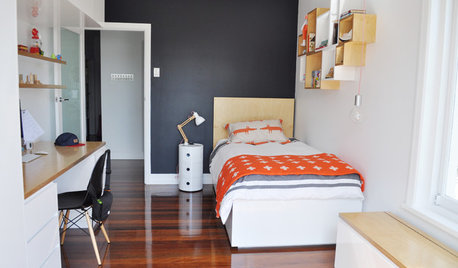
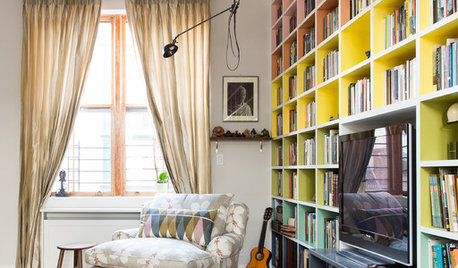
BEDROOMSRoom of the Day: A Boy’s Bedroom to Move Through Tween and Teen Years
Reorganizing the space with a new study desk, bed, seating and storage gives him room to grow
Full Story
LIFEImprove Your Love Life With a Romance-Ready Bedroom
Frank talk alert: Intimacy and your bedroom setup go hand in hand, says a clinical sexologist. Here's her advice for an alluring design
Full Story
DECORATING GUIDESHow to Lay Out a Master Bedroom for Serenity
Promote relaxation where you need it most with this pro advice for arranging your master bedroom furniture
Full Story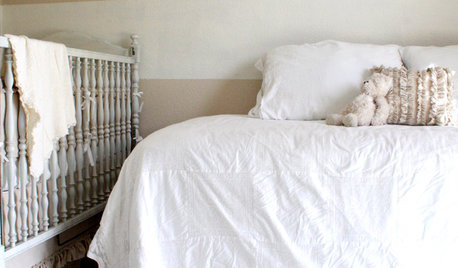
BEDROOMSCatch Some Zzzs in Your Baby's Nursery
Outfit your nursery with a cushy sofa or cozy daybed, and you'll be drifting off to dreamland right along with your little one
Full Story
LIFEYou Said It: ‘Some Ask Why, Others Why Not?’ and Other Houzz Quotables
Design advice, inspiration and observations that struck a chord this week
Full Story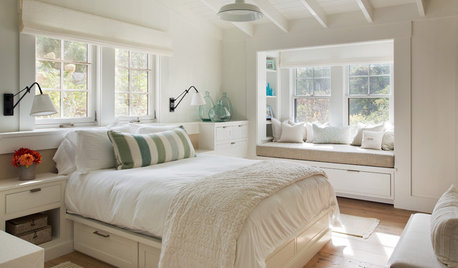
BEDROOMSTrending Now: 25 Bedrooms We’d Love to Fall Asleep In
Looking for a comfortable and calm space? Consider some of the most popular new bedroom photos on Houzz
Full Story
BEDROOMSIdeabook 911: Desks in the Bedroom — Yea or Nay?
Does a Desk Belong in Your Sleeping Quarters? 14 Reasons to Say Yes
Full Story
BEDROOMSDesigner Tips for Creating a Better Bedroom
In the dark about bedside lamps? Waffling over pillows at the store? Try these ideas for a more comfortable bedroom
Full Story
LIFEGet the Family to Pitch In: A Mom’s Advice on Chores
Foster teamwork and a sense of ownership about housekeeping to lighten your load and even boost togetherness
Full Story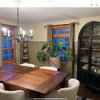


lisedv