


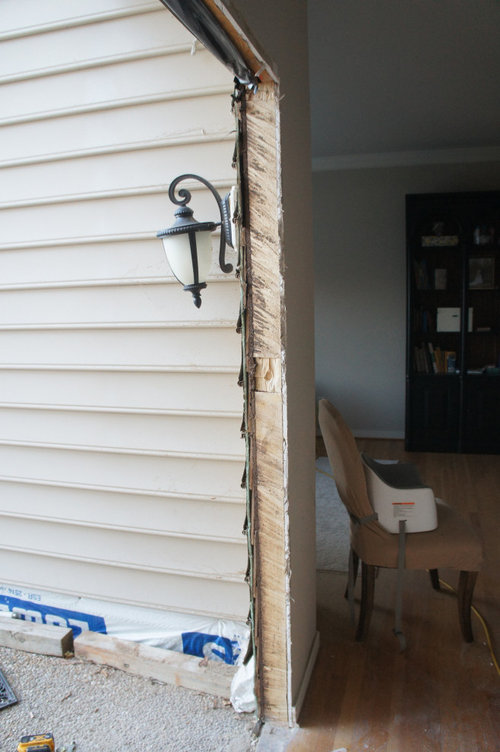
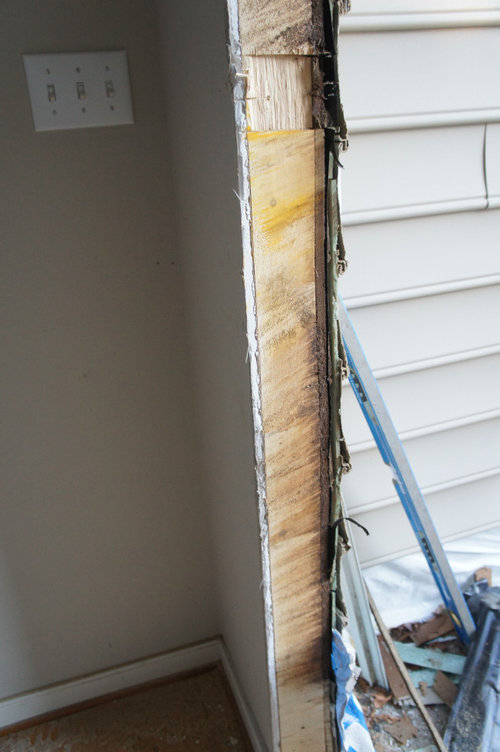
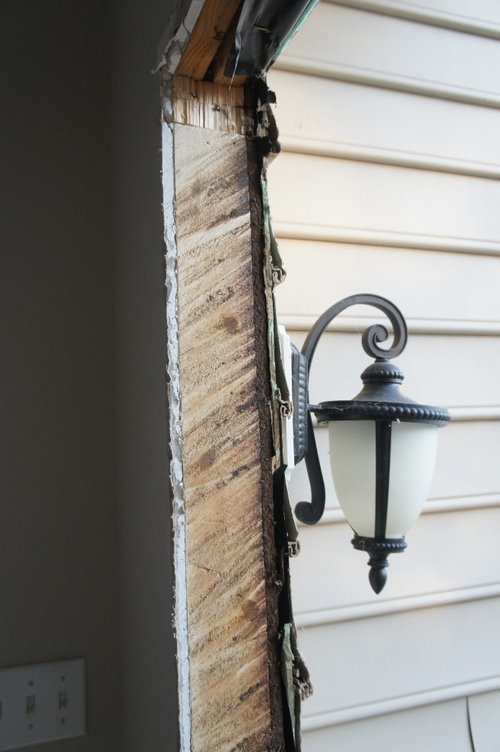
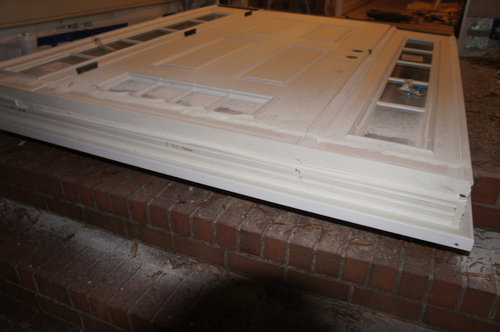
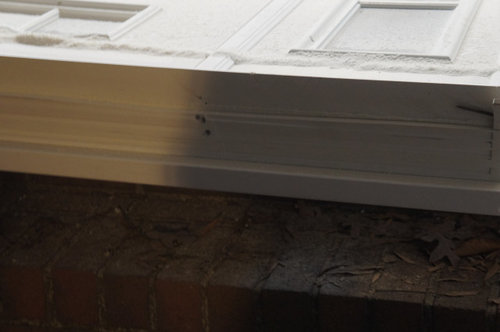
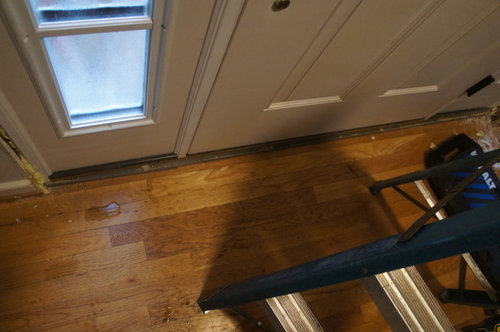
Is it a problem that a door installer cut out most of the trimmer stud
HU-874248819
2 months ago
last modified: 2 months ago


Featured Answer
Sort by:Oldest
Comments (6)
 PRO
PROWindows on Washington Ltd
2 months agoRelated Discussions
UPDATE: Now Cut That Out! (bulbs and cuttings swap) #9
Comments (150)Kim - Won't have them for the summer swap, but I'll have plenty of all blue and all red to share, come the fall or spring swap. Plus Purple Majesty. Just remind me when it comes around. After the swap my initial shipment came in so my garden is like a forest of spuds. I ended up with 5 lbs of seed spuds in all blue. I'll also have LOADS of J-chokes if anyone wants any. We're still keeping you and hubby in our prayers. Stay strong! Doors are opening and I pray they bring a miraculous outcome...I know it's hard....but know you have many here pulling for the two of you. Wanted to post a quick update. As I've been posting, I've been experimenting with the grape cuttings, to see how late they would root. I've been told they have to be taken in the late fall or winter and I've been told they won't root any time but early Spring, before they come out of dormancy, so I decided to prove that to myself....I took a few cuttings on Easter, April 12th and they have rooted beautifully, but also took cuttings on April 26th and they are beginning to root like crazy too. I'm not sure, at this point, what kind of success rate the 26th cuttings will have, but they are beginning to shoot roots everywhere. Had a 9-1 rate with the 12th cuttings, so I'll keep track of the 26th cuttings. This was the bagging method AND I pinched off any larger leaf growth to force energy back down in the stem. They are now starting new leaf growth. Did the same with some new kiwi cuttings. Had to pinch out new growth from the kiwis, but they appear to be pushing roots. I don't know the success rate, but they all look good so far. I'll post again when I know. Oh bless her heart, I was in a swap with another GW'r and she sent me some REALLY Special cuttings. She started them before she sent them, so I walked her through the process, but she did such a great job! When I received the packages of cuttings, one of the cuttings already had roots over 1/4 inch long. If that isn't just amazing!!!!!!!! I love cuttings!!!!!!! I'M HOOKED!!!!!! THANK YOU FOR OPENING THIS DOOR MARK!!!!! If a new thread is opened I'll post some more pics... Oh I want to see more pics of others roots and successes. If anyone needs help posting pics, please let me know, it's very easy, I'd be happy to help. Toni...See MoreBluestar Installation Question/Problem
Comments (37)Hello and thanks for all the information in this thread. I've been researching trying to get the area prepped for my 48" Bluestar Platinum. I wanted to share these pictures to help out and share some advice that I was given by installers and Bluestar. The most useful picture I found in my research was the back of the range posted in this thread by parrym but my 48 was a little different. First, the installation documents showing where the gas connection and clearances are does not imply that it is where you should installed your recessed gas box. In fact, what you want to do is run the gas hose underneath the unit and up the clearance to the gas connection. This is what Bluestar support recommended. So some of the people who are putting the gas boxes directly behind the gas connection will have a hard time getting the hose to curl up in that area. Mine will actually be on the opposite side and while pushing the range in, we will pull on the hose to get it under the unit and into the recessed area on the range. Probably the easiest way to move the unit would be air sleds/air dollies. But the delivery guy from Universal Appliance recommended that we remove all the grates on top, then remove the doors. The doors he claimed are almost 1/4 of the weight and at that point you can pick it up. I have a restaurant and I like to clean up behind the ranges sometimes so I'm probably going to pick up a Dormont flexible gas hose and find some casters for this range. If installing a backsplash, they recommend the backsplash be below the top of the range and actually push the range out the depth of the backsplash because there are vents on top for the island trim. That is if you have the space for not having to mount it flush. Finally, be careful that your electrical outlet if mounting below is not obstructed by the middle leg....See Moreinstalling prehung doors
Comments (3)Brickeye is right. Cutting into a wall should not be taken lightly. If you have any doubts, contact a structural engineer or good GC for advice. I'd buy the door first, then make the opening as per the manufacturer's instructions, including the header. This is not any easy job for the average DIY'er; the first one I installed, 'bout 20 years ago, I messed up badly. You have to install the header using jam and trimmer studs, place the door frame into the opening and center it, plumb one side using shims, and put in one nail on that side. Then plumb the other side and check for square, and make sure the casing is flush with the wall so your trim will sit flush, before securing (some people attach the trim to the casing before installing it). Keep checking that the door swings freely after each step. That's it in a nutshell, but if you are determined to do it yourself, you may want to get a good book that explains it all in more detail....See MoreEntrance Door Problem /caused by roof work
Comments (3)Thanks so much for your thoughts. The door (and door jamb) was finished on all exposed surfaces. But not on the side butted up to the wall studs. It may straighten itself out. I opened up the wall yesterday. Took out slightly wet (definitely not soaked, mostly dry - just 'slightly wet or damp) insulation. Whole thing is my fault of course. Didn't get the plastic far enough down from the roof - so water dripped onto the door. And the top of the door was 'open' since I am making that area be taller... Noticed yesterday that the actual door jamb seems to be 'soft'. No longer believe it is true wood. This is a fiberglass door, purchased from HD; and the door jamb seems to possibly be some sort of particle board. Might have to replace the Jamb, or just plane it down; or possibly might replace the door. AAAARRRRAGGGGGG!! Not pleased with what I did... Anyway - removed drywall, removed insulation, and am hoping for the best. Got to go, since I have to finish the roof! Thanks again to you both....See More
mojavemaria
2 months ago- PRO
None
2 months ago - PRO
Windows on Washington Ltd
2 months ago

Related Stories

DOORS5 Questions to Ask Before Installing a Barn Door
Find out whether that barn door you love is the right solution for your space
Full Story
KITCHEN DESIGNThe Most Common Kitchen Design Problems and How to Tackle Them
Check out these frequent dilemmas and expert tips for getting your kitchen design right
Full Story
DOORSDiscover the Ins and Outs of Pocket Doors
Get both sides of the pocket door story to figure out if it's the right space separator for your house
Full Story
KITCHEN STORAGEGet the Most Out of Your Kitchen’s Undersink Area
Clever solutions can turn this awkward space into a storage workhorse for cleaning supplies and more
Full Story
DOORS10 Ways to Work Screen Doors, Inside and Out
Take this functional feature up a notch with one of the many alternative door styles available
Full Story
GARDENING GUIDESGet the Most Out of Your Daylilies
With some extra care, daylilies can look good throughout most of the summer
Full Story
FENCES AND GATESHow to Install a Wood Fence
Gain privacy and separate areas with one of the most economical fencing choices: stained, painted or untreated wood
Full Story
PETSHow to Install a Dog-Washing Station
Find out the options for pet showers and bathing tubs — plus whom to hire and what it might cost
Full Story
KITCHEN BACKSPLASHESHow to Install a Tile Backsplash
If you've got a steady hand, a few easy-to-find supplies and patience, you can install a tile backsplash in a kitchen or bathroom
Full Story
DECORATING GUIDESQuick Fix: Find Wall Studs Without an Expensive Stud Finder
See how to find hidden wall studs with this ridiculously easy trick
Full Story


Windows on Washington Ltd