


Advice needed - Looking to buy a 1970s one story home with no basement
William Dedula
3 years ago
Featured Answer
Sort by:Oldest
Comments (13)

orangecamera
3 years ago
Seabornman
3 years agoRelated Discussions
sealing ductwork in 1970s Seattle home
Comments (18)nah..lets stay on the same thread. I wouldn't put R-6 unfaced ductwrap. without a vapor barrier. the vb is to keep the insulation clean & dry. wet insulation loses it's R-value. hold out for the 4' wide R-8 usually 50' long. (R-4 is 4x100'. R-6 is 4x75'. R-8 is 4x50') keeping it all the same shipping rate. don't buy the unfaced. even if they have to order the R-8 faced wrap...its worth the wait. and if you have unopened roll they should take it back. on the bag the wrap comes in is the lenghts you cut for what size ducts. usually adding 4-6" including the lap (without insulation to fasten) will work. but check the bag, incase I don't find my table for that. materials you need from supply house are: wrap fsk tape (foil scrim kraft) to seal stapled seams duct stapler (a must have) duct staples duct strap & sheet metal screws paint mastic & brushes mastic tape. keep the length of each install the width of the roll 4'. that the ends butt and overlap is very important. I usually have a roll of duct tape handy (don't tell!) when first putting the wrap on the duct, you'll need something to hold it in place. use 5-6" lengths of duct tape to tape start end of wrap to duct, then wrap the rest of the wrap around the duct, overlap..staple, fsk tape, staple tape. staple overlap over butt end..staple, fsk tape, staple fsk tape. move to next 4" section. once you've worked you way back to main supply (where all ducts are taken off) add screws to make sure all is attached well. keep strapping to sheet metal you'll cut the wrap to go around this as you wrap. the take offs on the supply is where I find the mastic tape to be most useful. sticks well to clean dry surfaces, and once pressed into place will last as long as paint mastic. that it makes sheetmetal to wood, paper, foam sheathing..and many materials makes it worth the cost. sometimes ease of install is what you need, and Hardcast #1402 Mastic Tape is the best product. cut your wrap to lenghts needed. you'll cut out for ducts once wrap is in place before securing. make sure that wrap is cut to fit tight to the duct take off. the wrap on the duct itself should be in contact with main supply duct and wrap for main supply goes over the supply duct wrap. staple & mastic seal. where the supply duct meets the equipment..this should be mastic sealed as well. then use the mastic tape to seal both supply & return ducts (if this applies). two things... you may hesitate at forking out $50 for a duct stapler..but the wrap will NOT stay in place long term without it. also strapping ducts is very important. you want this job to last 30+ years, gravity is the enemy. the mastic you bought dries fairly quickly? run the heat..it will help it. any questions? and btw...if you can learn to do this correctly do a job for someone else..pay for all your materials (the duct stapler) & make a few bucks. I usually charge $2k for 9 supply ducts supply plenum & return. let me know when you are ready for the sealing of the supply box from inside the house. if y'all have questions..just post. best of luck....See MoreI need help renovating this 1970's living room!
Comments (28)I agree that the ceilings are beautiful, unique, and cozy. You could really incorporate them into a very interesting modern farmhouse look. However, A. I really feel for your husband who is 6 feet tall, and B. I think the beams contribute to the congested feeling of this space. The beams, the columns, the trim, the multiple levels of tray ceilings, and lighting fixtures trapped between the lanes of beams make this space feel jumbled and confined. There are many things you can do to make this space feel more streamlined, open, and airy without removing columns. (Though I would still explore what is inside those columns and why they were added to this house. It looks like the recessed and tray ceilings were there before the columns because the columns so strangely protrude out into the recessed areas. 1. Remove the beams Check to be sure they are not structural. Yes, they are beautiful, but they really confine the space and narrow the lighting. They would be great in another house but not in this one. If you must keep them, paint them the same color as the ceiling and walls to help them disappear. Again, they are beautiful, but not in a room with a low ceiling, 4 brick columns and a tall guy. 2. Consider recessed lighting. These round light fixtures are awkward to look at and bring the height of the ceiling down when you want it to feel more vast and open. 3. Remove and reduce as much ceiling trim as possible. There is way too much trim happening here: odd trim spanning opening to dining room. The trim at column tops are over the top, and trim around the columns at the front door overlaps oddly with the tray ceiling. There may be some areas where trim cannot be moved. In those areas reduce it's appearance: Replace with a trim that has fewer ridges, a lower profile that protrudes less from the wall, and paint it the same white as the walls and ceiling. 4. Consider switching layout How do you all spend your time together? Do you eat at the table a lot or more so at a counter? When you eat at the table is it dark out? Do you spend time together in a formal living room setting? Do you need an area to play with toys? Does much TV watching happen nearby when someone is in the kitchen? I don't understand the layout here or your usage needs, but for the sake of your husband's height and potentially maximizing light, can you make the current dining room be more of a living room / family room space and put the dining room where the current sofas are? If the dining room with all of those open windows is not being heavily utilized during daytime hours, then you are not utilizing the sunniest part of this first floor....See MoreHVAC System for a large one story home?
Comments (16)JD, first I should state that I am not a pro. My husband and I have lived in several states in the south, always in humid climates that presented challenges to keeping indoor humidity within a healthy range. While I have a great deal of respect for the folks at Building Science Corp, it's important to consider when their reports were written and to see what they've learned in the years since before following their advice. For example, Footnote 4 of the linked article states, "It is important to note that an ERV can never, under any circumstances, dry the indoor air. It only reduces the humidity load due to ventilation, it can never eliminate it." I think they'd agree that an ERV cannot reduce the humidity load in much of the southeast for most of the year and particularly during the shoulder seasons. We had an ERV installed years ago thinking it was the answer to our problems. Due to there being several months each year when there's no demand for cooling we were increasing indoor humidity at times when we most needed to decrease it. The better solution for us, and perhaps for you in Atlanta, has been a whole house ventilating dehumidifier. I'm partial to the Santa Fe brand but no doubt there are others just as good. These days I think they can handle houses up to 5K sq. ft. We are getting ready to have a house built (yet again) and are looking at two stage variable speed systems plus a whole house ventilating dehu. Our architect is in the early stages of the house design, but we expect we'll end up with about 4K sq.ft. on one floor. Whether that will be served by one system or two, we don't yet know. The only thing I'm confident of is that we'll only use a company that can provide a Manual J and not just size based on square feet, which is all too common here. It's typical for builders to install over sized systems that may quickly cool the house but will never adequately control humidity since they short cycle. FWIW, in a previous house with a walk-out basement, we handled it similarly to David Cary's approach. It was semi-finished and we put in a return and two vents from the main floor system which was likely too big to start. Once in a blue moon, we ran a portable dehu during a week of heavy rain just as a precaution and that helped the floor above, too. Our current home has three systems for the first floor (>4K SF) plus a separate one for the basement and more upstairs. I've wondered if zoning could have worked just as well, but we bought the house after it was 99% complete and had no say. One nice thing is that we keep the system serving the master suite set cooler than the rest of the house, summer and winter, which we prefer for sleeping comfort. Our son and his wife live in NC and had a zoned system for a two story house which was okay, while their current house, approx. 3600 SF, has separate systems for each floor which they prefer. I think the cost for replacing the two systems a couple of years ago was $16K, which did not include replacing ducts. We replaced a small heat pump system in a suite over a garage around the same time and the cost was about $5K. No doubt costs have risen. Good luck!...See MoreAdvice Please: 2 Story Garage Addition to 1 Story Modular Lake House
Comments (20)What about something like this? I cut and paste within the context of a two stall plan with a one bedroom apartment along the back. The apartment was a bit convoluted, but left the entry bath and storage as is. I am assuming this was to give visitor access to the bathroom without going through the bedroom. And the kitchen was on the exterior back which buried the LR in the middle so I juggled that. I also think this is two small for a two car garage, I would want it several feet wider and deeper. I feel like this sort of reiterates your house, this also could be mostly glass along the lake view...See More
sktn77a
3 years ago
maddielee
3 years ago
mtvhike
3 years agomaifleur03
3 years agoWilliam Dedula
3 years agomaifleur03
3 years agoceilsan32
3 years agomxk3 z5b_MI
3 years ago
Valinta
3 years agoWilliam Dedula
3 years ago
Related Stories
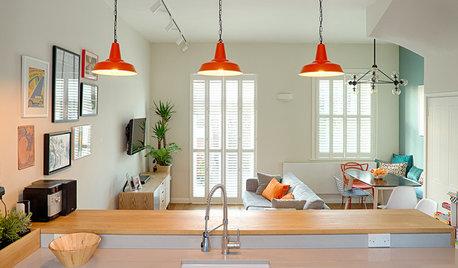
HOMES AROUND THE WORLDHouzz Tour: 3-Story 1970s House Gets a Cheerful Update
A full remodel of this London home packs in storage, retro style and a home office for a growing family
Full Story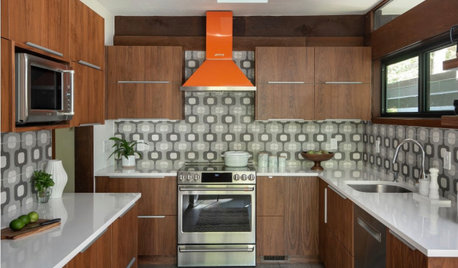
KITCHEN MAKEOVERSKitchen of the Week: Preserving a 1970 Home’s Modern Flavor
The kitchen’s walnut cabinetry, funky backsplash tile and bright orange vent hood complement the home’s architecture
Full Story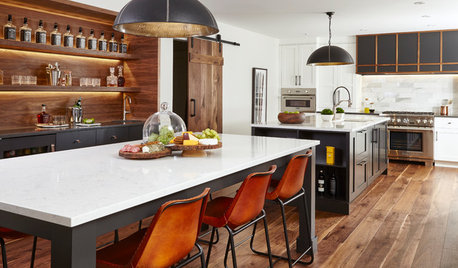
DREAM SPACES20 Dream Home Ideas From This Week’s Stories
Let’s play a little make-believe and imagine a home in which the sky’s the limit
Full Story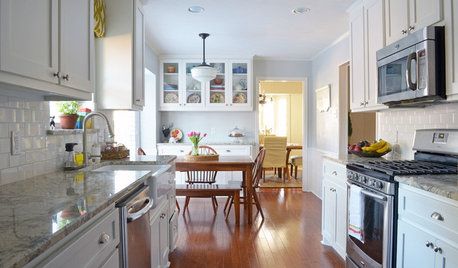
HOUZZ TOURSMy Houzz: ‘Everything Has a Story’ in This Dallas Family’s Home
Gifts, mementos and artful salvage make a 1960s ranch warm and personal
Full Story
TINY HOUSESHouzz TV: Step Inside One Woman’s 140-Square-Foot Dream Home
You may have seen the story on Houzz — now check out the video tour of Vina Lustado’s warm and welcoming tiny house
Full Story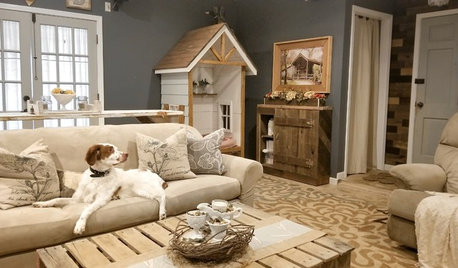
PET PLACESPet’s Place: A DIY Doghouse Blends Into This Home’s Decor
An Alabama couple builds an indoor farmhouse-chic abode for their friendly Brittany spaniel
Full Story
TRANSITIONAL HOMESHouzz Tour: 3-Story Design Extends a Bungalow’s Living Space
A couple stays within an approved footprint and gets more room by adding a basement and a loft to a new home’s design
Full Story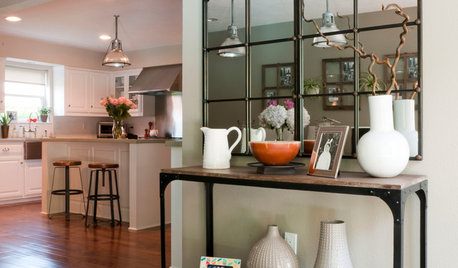
HOUZZ TOURSMy Houzz: Elegant DIY Updates for a 1970s Dallas Home
Patiently mastering remodeling skills project by project, a couple transforms their interiors from outdated to truly special
Full Story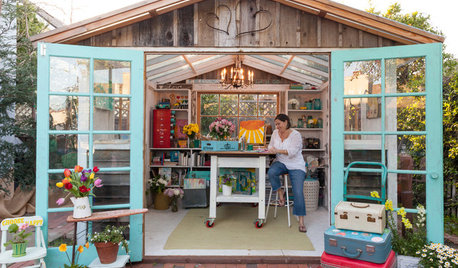
STUDIOS AND WORKSHOPSA New Book Offers Ideas for a Garden ‘Room of One’s Own’
Practical advice and enviable inspiration sheds are all you need to start planning your own backyard getaway
Full Story
MY HOUZZMy Houzz: Bohemian Home Inspired by Organic 1970s Design
The turn-of-the-last-century home of a creative Portland couple becomes an extension of their art
Full Story
functionthenlook