


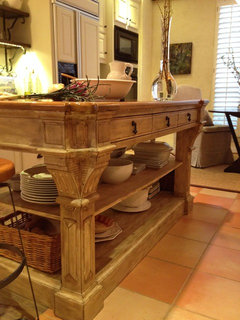
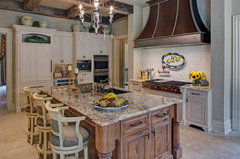
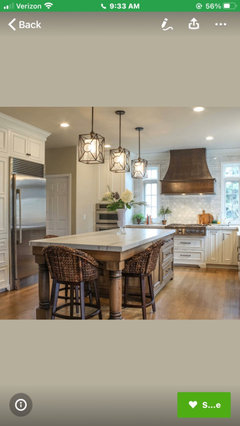
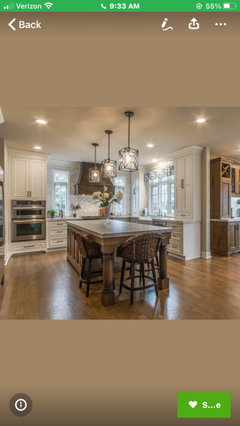
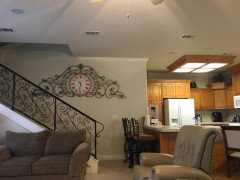
Gm! I WOULD APPRECIATE suggestions on redesigning my kitchen. i like
Dcstudio
3 years ago


Featured Answer
Sort by:Oldest
Comments (17)
Related Discussions
I Would Like To Dry Some Herbs -- Suggestions on How To??
Comments (4)I'm lucky to live in a climate where I can have fresh herbs all year round, so I rarely dry them. But when I do, I simply spread them over a paper-towel-covered cake cooler and leave them on my dining table - which is near my back door, so it gets a good air-flow. It can take several days for some herbs to dry to crispy stage, so for the first couple of days I change the paper-towelling, which in the early stages can get very moist. You can also dry your herbs in the oven. Heat the oven to lowest possible temperature, spread the herbs onto a baking tray in a thin layer, and leave in the oven until the herbs are crispy-dry. It is important to leave the door of the oven ajar throughout (I use a thick oven-mitt to prevent the door closing), and to check the herbs and given them a stir, from time to time. Then there's the microwave oven. This can take a bit of practice. Place some paper-towelling (3-4 thicknesses) onto a suitable flat dish, cover it with herbs (piled up is OK), then zap for about 1 minute on HIGH. Check the herbs, and stir them around. Change paper towel if very wet. Repeat, reducing the time gradually between checking, until the herbs are nice and crispy-dry. Once they're out of the microwave, stir them around while the excess steam evaporates, to help them cool quickly. When quite cold and still crispy, bottle and seal (and date!). OR you can tie your herbs into small bundles and hang them in a cool, well-ventilated, dry place. OR you can put your bunches/herbs into a brown paper bag and hang the bag in a cool (etc) place. Pierce the bag in several places to make small holes for air-flow. This is a good way of keeping both dust and bugs off your drying herbs, and the bag prevents any bits and pieces dropping to the floor....See MoreAny feedback on my kitchen plans would be appreciated!
Comments (5)This is stage 2 of an extensive reno. For this stage we're pushing out 2 kitchen walls 6' each and turning the existing breakfast area into a mudroom with a new entrance off the driveway. The laundry/pantry is space we took from a landing to the left of the stairs going down into the family room surprisingly the family room looks larger after the reno :) I got the idea for the dishwasher in the hutch from http://consciouskitchenremodel.blogspot.ca/ I don't think I'll be painting mine red, but I love the idea of having the dishwasher up 6" higher so I don't have to bend so far down (we're a family of tall people). All the dishes are them stored in the hutch. I do have room to make it wider, but the symmetry seems okay in the inspiration pics. The wall oven is out of the way, but the M/W is also a convection so unless I'm cooking a turkey I'll be using the small oven on the south wall. I'm not exactly sure what you mean by zones? The far right of the south wall has a small pantry (laundry room/panty is for overflow and large items), then the fridge followed by the cooking/prep areas and prep sink (in the 4x7 foot island), and last is the main sink and dishwasher hutch on the east wall. The space to the right of the oven on the north wall is being left open for a free standing piece of furniture. As for the laundry: I can't decide what would work best - stack laundry with shallow shelves around or side by side with deep shelves above and shallow shelves around the remaining walls. Here's the pics of the hutch: Thanks...See MoreI would like to stagger my cabinets but need suggestions.
Comments (14)I wouldn NOT want to make the cooking center such a focal point with an OTR microwave there. It just doesn't look appropriate. I'm not a fan of OTR micros in general, as they are ineffective and a safety hazard. Is there some place else for the MW so that you can have a real hood? You are venting externally at least, aren't you? With 9' ceilings, you can use 96" as your upper alignment height with a substantial crown molding and still have room for the staggared height and depth with a display space above all of the cabinets. For your fridge "box", if you are using a regular depth fridge and not counter depth, use blocking to have them pull the over the fridge cabinet out by at least 6" and order extra deep side panels and trim it out to really and fully conceal the sides of the fridge. If you don't do this, you'll have 6" or more of the side of your fridge exposed outside of the box, which really defeats the purpose of creating it in the first place. Be sure to work with your designer about the proper support of such a large cabinet if you don't have a wall next to the fridge with which to attach the cabinet to....See MoreI would like suggestions for light gray Sherwin Williams Paint Color.
Comments (10)Yes I did and while it is beautiful I do have to “baby” it! I have 4 marble look cutting boards on it to handle all cutting and hot pans. Tea stains are the most challenging to get up so if anyone says it doesn’t stain that hasn’t been my experience....See More PRO
PRODcstudio
3 years ago- PRO
Dcstudio
3 years ago - PRO
Dcstudio
3 years ago - PRO
Dcstudio
3 years ago - PRO
Dcstudio
3 years ago 
lucky998877
3 years ago- PRO
Dcstudio
3 years ago


Related Stories
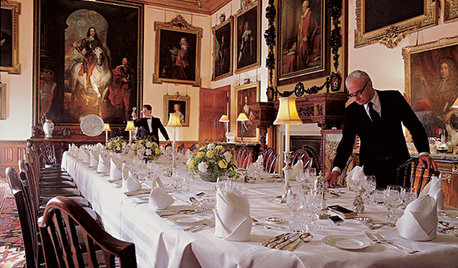
FUN HOUZZEverything I Need to Know About Decorating I Learned from Downton Abbey
Mind your manors with these 10 decorating tips from the PBS series, returning on January 5
Full Story
LIFEYou Said It: ‘Just Because I’m Tiny Doesn’t Mean I Don’t Go Big’
Changing things up with space, color and paint dominated the design conversations this week
Full Story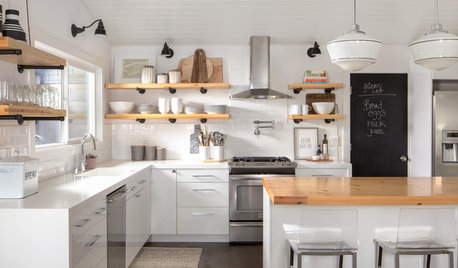
KITCHEN CABINETSWhy I Combined Open Shelves and Cabinets in My Kitchen Remodel
A designer and her builder husband opt for two styles of storage. She offers advice, how-tos and cost info
Full Story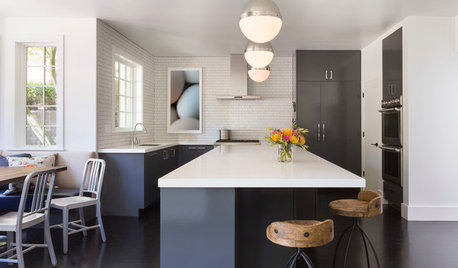
KITCHEN COUNTERTOPSWhy I Chose Quartz Countertops in My Kitchen Remodel
Budget, style and family needs all were taken into account in this important design decision
Full Story
LIFEYou Said It: ‘They Looked at Me Like I Had 10 Heads’
Design advice, inspiration and observations that struck a chord
Full Story
KITCHEN DESIGNSingle-Wall Galley Kitchens Catch the 'I'
I-shape kitchen layouts take a streamlined, flexible approach and can be easy on the wallet too
Full Story
BATHROOM MAKEOVERSWhat I Learned From My Master Bathroom Renovation
Houzz writer Becky Harris lived through her own remodel recently. She shares what it was like and gives her top tips
Full Story
LIFEInviting Kids Into the Kitchen: Suggestions for Nurturing Cooks
Imagine a day when your child whips up dinner instead of complaining about it. You can make it happen with this wisdom
Full Story
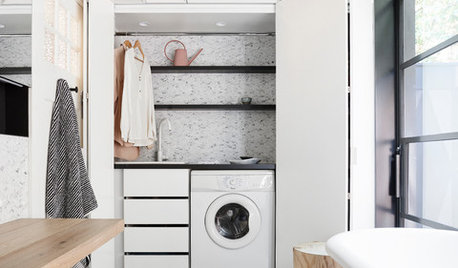
LAUNDRY ROOMSWhere Can I Hide My Laundry Area?
It’s a case of now you see it, now you don’t with these 10 clever ways of fitting in a laundry zone
Full Story


chicagoans