


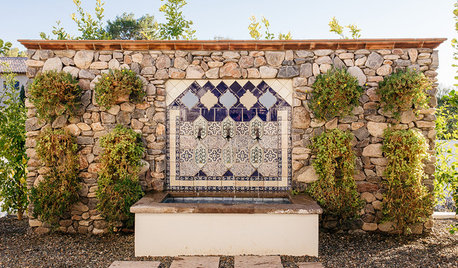
Building a large hypertufa rock that includes a water fountain
Roseann Dashkowitz
3 years ago
Featured Answer
Sort by:Oldest
Comments (6)
Related Discussions
wip: indoor hypertufa fountain with led lighting
Comments (54)Hey, thanks! Good to be back. I'm hoping to get things rolling again...maybe even sell a thing or two (just to make room for new projects). I think I've finally tipped that mental scale where I can appreciate my own stuff more without so many of the "should have done this" or "next time I'll do that" type of thoughts. Not sure if that makes sense? Maybe I'm finally just too busy to think about it :)...See MoreHypertufa Rocks????
Comments (45)I'm not Wendy but It's just as simple as she says! In answer to your question about sand. I use play sand from one of the stores mentioned. I sift it for for turfa. Some people use white sand but more for speciality things probably because of the cost. I'll share what I do. I use plain quickcrete and mix it with water like it comes out of the bag in the wheelbarrow. It is alot less work. I put a shovel full in a bag tie the top, flip it so the top is underneath and bunch or shape it. Don't put the markings on the bag to the inside because they will mark the concrete. Or you may have Wal Mart on your rocks. Try not to get the bags in the concrete because it makes it harder to get them off. I usually put them so they are touching each other so they look like they belong together. And I just put them where I want them in the yard. I have stacked them 2 high also. I just leave them on until I get back out to take the bags off. There isn't any set time as long as they are solid. After they have been out in the yard they take on their own charactor. Not sure if I'm reading the last question right but you mix the turfa in a container, wheelbarrow or bucket. Yes you can put in in other things too. Just be sure to use a release or somthing you want to destroy getting the bricks out. The options are only as limited as you make them. Just ggo for it and have fun! Kathy...See MoreHypertufa for large above ground pond? Advice please
Comments (2)I think it's a marvalous idea! You are right by taking the time to think it out. If I were going to attempt this, I would build it on the site I wanted it, make the mesh form, use cement for the basin and seal it well. Yes be sure to put in a drain or two, then I would finish anything above water with hypertufa. As long as you can wrap it with some wet sheets, and cover with plastic, you can cure it well. Just a thought...if you want it on a patio, you could build a large platform dolly, and build on it. & Make it a permanent part of the structure. Plant hostas or other plants around it, or place some 'loose hypertufa rocks' around the base. Then drain and move it in winter and spring. Would be like a huge birdbath on wheels. lol You would be able to move it wherever you want, if you change your landscaping. (even take it with you if you move) lol How deep do you want to make this? Are you adding a fountain feature? Neat idea, keep us posted Marcia...See MoreMaking Large Hypertufa Millstone?
Comments (9)well, here, don't know why the link isn't active. Here is what I wrote. "I just completed my first hypertufa project and it was a big one. A 32x6 inch millstone I'm turning into a fountain. It was both harder and easier than I expected. I wanted a larger piece than the concrete one I just finished. It was 32x3.5 inches and weighs about 250 pounds best I can figure. The hypertufa millstone is still curing, but I estimate it will probably weigh about 250 pounds also. I made the mold out of a piece of plywood for a base and used a 25' piece of 6" flashing for the circular mold. The center hole was a piece of PVC pipe wrapped with wax paper. The formula I used was 2 ninety pound bags of Portland cement (2cf), 2cf of medium vermiculite, and 2cf of strained peat moss. For reinforcement I mixed in a good bit of polyester fibers, for color I added dry brown tint, and for additional strength I added a gallon of acrylic fortifier to the water. I rented a small cement mixer and thoroughly mixed all dry ingredient before adding the water. The hard part was getting it mixed right. When I started adding the water it really started to ball up but I had read someplace that just means you needed to add more water. We played around with it for quit a bit before I decided we had to start putting it in the mold even though it really wasn't runny at all. ( Note: after the fact it was clear I just needed to add a bit more water and it would have been a lot easier. ) We dumped the mix in the mold and I pounded it tight with an old brick and then used a cement trowel to smooth the surface. Let it sit for about 15 minutes and then put some grooves in the top for realism. On the second day I pulled out the PVC pipe in the center. On the third day I took the mold off and it was perfect as you can see in the pic. I kept it covered for three days After four days it already felt hard as a rock. I waited a week and then mounted the fountain on it's base. She came out really nice. I'm playing around with the idea to stain it a little darker, don't know yet."...See More
Roseann Dashkowitz
3 years agoRoseann Dashkowitz
last year
Related Stories
LANDSCAPE DESIGNHave Your Garden Fountain and Be Water Wise Too
Learn which water features are more suited to conservation, and get strategies for placement and use
Full Story
GREEN BUILDINGWater Sense for Big Savings
Keep dollars in your pocket and preserve a precious resource with these easy DIY strategies
Full Story
LATEST NEWS FOR PROFESSIONALSArchitects Build Sustainability Into an Island Vacation Compound
Project priorities included reducing the carbon footprint, improving shoreline health and creating energy efficiency
Full Story
VACATION HOMESHouzz Tour: 3 Small Buildings Maximize Nature Views
This Washington artist's island trio treads lightly on the land, opens up to water and forest vistas, and offers privacy
Full Story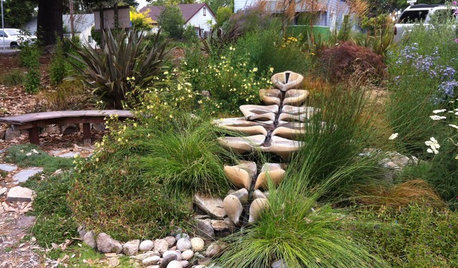
LANDSCAPE DESIGNNew Ways to Design With Water
Go beyond 3-tiered fountains and faux waterfalls to discover water's architectural possibilities
Full Story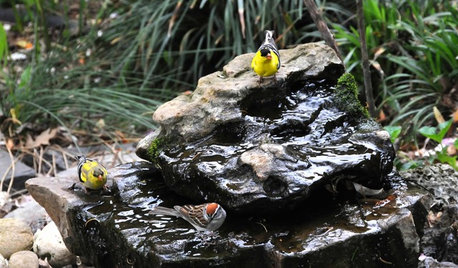
OUTDOOR PROJECTSBring In the Birds With a Homemade Bubble Rock
An avian expert from Southern Indiana shows how to make a burbling fountain that migrating birds will love
Full Story
GREEN BUILDINGJust Add Water: Rain Barrel Magic
Take your rainwater storage from practical to beautiful with a new breed of design-friendly rain barrels
Full Story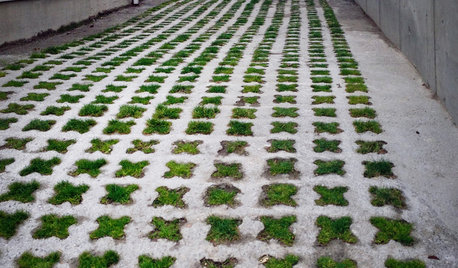
EARTH DAYHow to Build a Greener Driveway
Install a permeable driveway to keep pollutants out of water sources and groundwater levels balanced
Full Story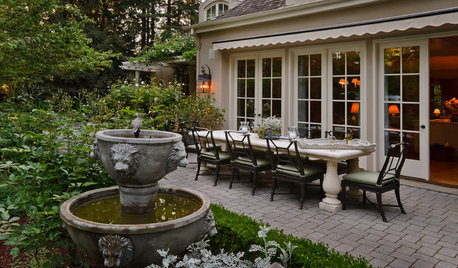
OUTDOOR ACCESSORIES10 Fountains to Bring Your Garden to Life
Water elements can be a dynamic focal point in your outdoor room
Full Story
BATHROOM DESIGNHow to Build a Better Shower Curb
Work with your contractors and installers to ensure a safe, stylish curb that keeps the water where it belongs
Full Story


Jj J