


Making Large Hypertufa Millstone?
splats
11 years ago
Featured Answer
Sort by:Oldest
Comments (9)

splats
11 years ago
Mike Larkin
11 years agoRelated Discussions
Making a Concrete Millstone Fountain
Comments (6)I might try this near my entryway on a slightly smaller scale so I wouldn't have to run a another large pond pump either this or a small Japanese maple, maybe both!:) thanks for the idea; i love the sound of running water. Does it sound like rain/gutters overflowing? Just wondering, so long as it doesn't sound like a bathroom stall I'm good....See MoreMaking a Hypertufa Millstone Fountain
Comments (10)This is great! I'm wanting to make one of these as well and wondered if you considered making it hollow. In other words, I'm wondering if I could make it like a very large pot. So the top would be the part against the plywood and then you would place something in the middle to fill the empty space like you would if you were making a pot, still keeping the PVC pipe in there of course. I'm not sure yet what I'd use for the middle part, but I'm sure I can come up with something. The main reason I'm thinking of making it hollow is simply to make it easier for transporting. Any thoughts on that idea?...See Morehypertufa millstones
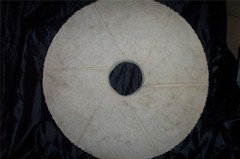
Comments (7)These are approx 26 inches round, 4 inches thick. I used a length of vinyl landscape edging, you can buy this in longer packaged rolls. I fashioned the vinyl into a circle, used a clamp, some duct tape. Also placed into a round plastic pan, the kind you use to place underneath of a water heater, the pans are metal or plastic. The pan keep everything together. This project I used this recipe, a five gallon bucket for measure, one part each, 1 portland cement, 1 perlite or vermiculite, 1 peat moss (sifted or broken up fine as possible). Mix all the dry stuff in a wheel barrel, mix it dry before adding water. As they say "the mixture consistency of oatmeal". I used a piece of 4x4 wood for the center. And within the first day, used a yardstick and screwdriver, scraped the lines onto the top. I had placed several pieces of regular hardware cloth (wire screen) into the project as I went along dumping in the cement mixture. This adds some inside strength. Pat in down, use a piece of 2x4 in your hand, pat to work out the air bubbles. One very important thing is to keep the project covered with some plastic, keep it moist with a water spray bottle, letting it cure very slowly. I let these cure for a month! but the slow curing is how it stays hard, solid and not brittle. These have been out in the garden for 3-4 years, year round, even in the midwest freezing temps. These probably weigh about 50 pounds, so not too hard to lift for moving. I made three of these, and I am ready for a new project soon. These have been so pretty setting in the garden, and most rewarding to make. Thanks for your interest and good luck with your project. Doug...See MoreWhat are some recipes or mix designs for making hypertufa?
Comments (0)Mix Designs & Recipes These mix designs and recipes were kindly submitted by members. Thanks to all who contributed! There are numerous recipes! The heavier your ingredients the heavier your final project. When reading a recipe for concrete or hypertufa, cement should be the first ingredient listed, e.g.; 1:1:1:1 for a hypertufa mix would look something like this 1 part (cement) 1 part (peat) 1 part (perlite) 1 part (sand). In general, most recipes have a 1:3 ratio. They can be as diluted as a 1:7 ratio (I would not recommend this) and can be as rich as a 1:1 ratio, depending upon the application. To clarify and to prevent purchase of an unwanted ingredient because the name was misunderstood, remember the following: Portland cement is NOT concrete it is an ingredient of concrete. Concrete, loosely defined, is mortar with gravel aggregate added. When in doubt, read the ingredients listed on the label. The first recipe was submitted by several members, so it is listed first. Recipe #1 (1:1½:1½) 1 part Portland cement 1½ part peat 1½ part perlite I personally like the results of this hypertufa recipe when I want to be able to carve fairly soon while the form is still "green" (not dry and certainly not cured). I use grey Portland cement in most of my mixes; you can certainly use white if you wish. Turns out looking like granite provided the perlite used is small to medium grade. Recipe #2 (1:1½:1½) 1 part Portland cement 1½ part peat 1½ part vermiculite Nice fawn coloring without adding any colorant. Vermiculite adds a sparkle. Still very carvable, this mix is heavier, as vermiculite is denser, so a part will weigh more. Recipe #3 (1:1:1:1) 1 part Portland cement 1 part peat 1 part perlite or vermiculite 1 part sand Much more durable; heavier, yet still lighter than concrete. This will be lighter in color than any of the above, dependent on what type sand is used. Recipe #4 2 containers Portland cement 2 containers perlite 1½ containers peat moss ½ container coarse sand 1 large handful fibre mesh 1½ 2 containers water Recipe For Hypertufa Using A Pre-Mixed Sand Mix The use of a pre-mix allows the beginner an opportunity to try hypertufa without a large investment in materials. Portland cement comes in 94 lb bags. Quikrete, a concrete product manufacturer, does sell a smaller bag of Portland cement, but few stores carry it. Some home improvement stores do, however, carry small bags of pre-mixed concrete mixes, such as sand mix, mortar mix, high-strength concrete mix, etc. I encourage anyone who is STRUCK by the hypertufa bug and unsure if this is for them, to seek out the pre-mixed sand mix. Lowes (in my area) carries the Quikrete sand mix in the smaller 10# bags; they also carry a 60# and 80# bag. If you get the smaller size, you can try it without a huge investment in supplies. Dependent on the size of the bag, you may actually be able to carry it! Once home with the bag, put the mix (still inside the bag) into a heavy hefty bag and push it around a bit. Mixes do tend to settle and you want the ingredients evenly distributed. Then take the pre-mix bag out of the hefty, and follow the directions below. Recipe #5 1 part pre-mixed sand mix 1 part peat moss 1 part perlite or vermiculite Mix the dry ingredients first, then slowly add water so that you can gently squish the mush with little water coming out. Now add a little bit more water and walk away for about 10 minutes. Check your mold set up or think about your next project. Then, back to the mix. Check it with your hands (of course they are gloved!) and add a bit more water, if needed....See Moresplats
11 years agoUser
11 years agosplats
11 years agoUser
11 years agoewan54
11 years agoewan54
11 years ago
Related Stories
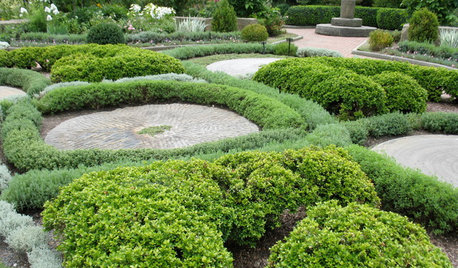
LANDSCAPE DESIGN5 Great Garden Uses for Granite Millstones
Give your yard character and history with a salvaged circular stone used as a patio, seat, fountain or focal point
Full Story
CONTAINER GARDENS3 Steps to Creating Quick, Easy and Colorful Succulent Containers
Take a bright container, add a colorful succulent or two and have a professional, summery design in minutes
Full Story
GARDENING GUIDESAlpine Plants: High Performers at Low Altitudes Too
So Heidi and the goats aren't your neighbors. Alpine plants can be lovely and low maintenance on difficult sites beyond the mountains
Full Story
GARDENING GUIDES10 Solutions for Soggy Soil
If a too-wet garden is raining on your parade, try these water-loving plants and other ideas for handling all of that H2O
Full Story
LANDSCAPE DESIGNEnergize Your Landscape With Masses of Grasses
Create year-round interest with waves of attention-getting grasses for all kinds of yards
Full Story
HOUSEPLANTS8 Essentials for Healthy Indoor Plants
Houseplants add so much to our homes — and can thrive when grown in the right conditions. Keep these tips in mind
Full Story
KITCHEN DESIGNWorld of Design: Global Foodies and Their Kitchens
Join us as 11 food lovers tell us about their kitchens and give us a taste of their culinary heritage
Full StorySponsored
splatsOriginal Author