


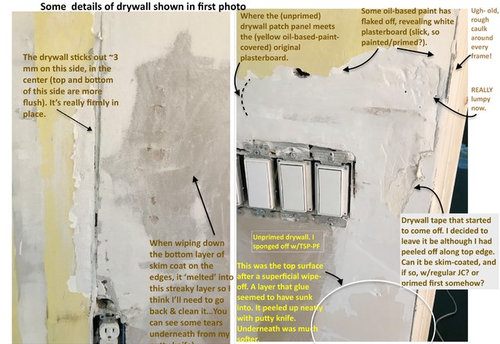
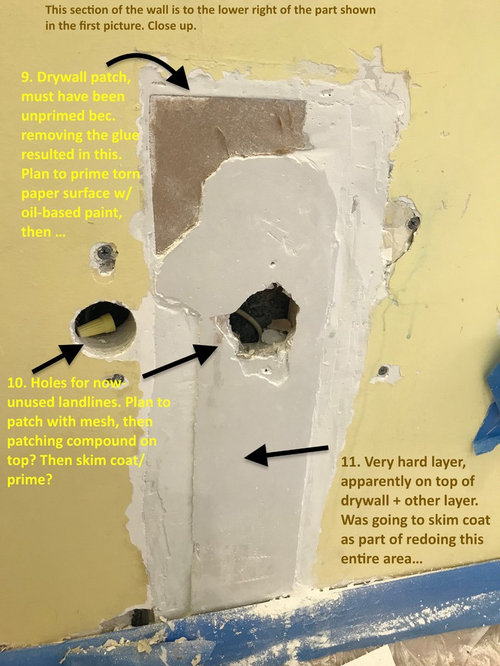
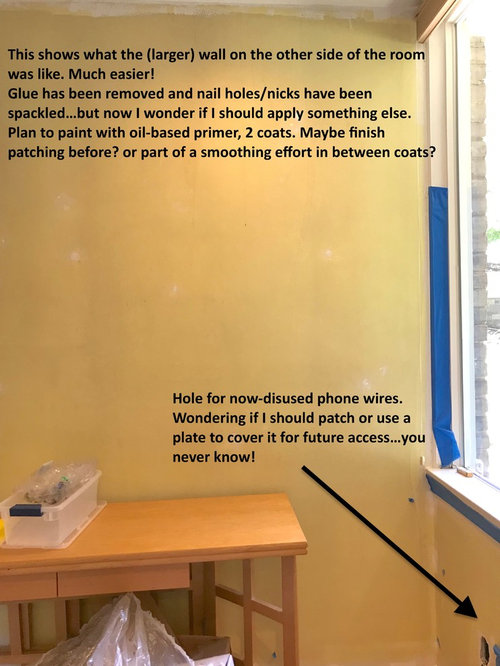
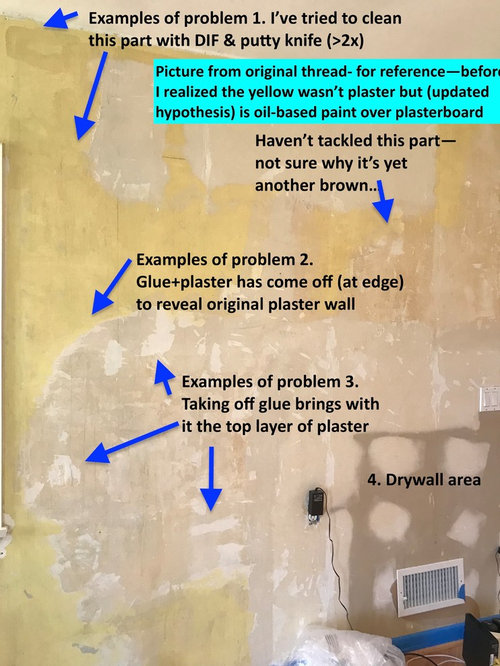
Repairing & priming "nightmare" wall --what materials?
SunshineX
4 years ago


Featured Answer
Sort by:Oldest
Comments (6)

Sammy
4 years ago
SunshineX
4 years agoRelated Discussions
How to prime/paint problem walls
Comments (10)I had problems with getting paint to adhere to a calcimine coated bathroom ceiling, but the paint would fail almost immediately, not years later as you state yours has, so I wonder whether your issue is the same. There was a simple test to see if it's calcimine, because it rubs off on your wet finger (chalky appearance). That's definitely what ours was, I followed (exactly followed) the instructions for a paint/cover agent that was specifically intended for covering calcimine -- I believe it was called Kal-kote. It's worked like a charm, paint has been up there for 5+ years and still looks great. This post was edited by kris_ma on Fri, Mar 8, 13 at 8:47...See MoreIs priming after drywall repair still needed?
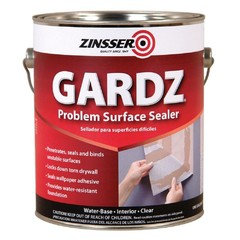
Comments (6)Well, for the last 10 years at least, I have been saying that you do not need a primer to spot prime patches. I have also said that using an actual primer can be a bad choice to spot prime with because those spot primed areas can flash. This would be due to the primer doing a better job at sealing (or worse) than the actual paint does so those areas that are more sealed will look different in critical light (like when you have a window casting light down the wall). About 8 months or so ago, I did a huge job for very picky customers with BM's Regal eggshell and one of the rooms was a well lit foyer with high walls and lots of critical light. I painted like I always do and had huge issues with patches flashing through. I spot primed all my patches twice (with the Regal eggshell) and then double coated all the walls and I was still having problems. I complained to Benjamin Moore and I think they gave me a refund and allowed me to upgrade the remainder of the job to Aura at the Regal price. Since then, I have had flashing problems with both Regal and the newer Regal Select lines and really Aura as well. So. I will no longer be claiming that you do not need to use a primer. I don't have these flashing problems with Sherwin Williams Cashmere...that's for sure. I will say though that if you want a perfect paint job, prime the whole wall, not just where there were patches. Also, primer is no longer made? Come on. Primer will always have it's place, especially since primer like Zinnser 123 is $15 per gallon and most decent finish paints are $45 per gallon or more....See MoreStem Wall Repair Material to Stop Water Infiltration
Comments (1)I decided to go with a polyurethane kit from Emecole for the vertical crack. For the cavities left by the forming stakes I decided the hydraulic cement would not meet my requirements because I need a product that will flow and not set up so quickly. I called Quikrete and they think their Sand/Topping Mix combined with their Concrete Acrylic Fortifier is my best choice. We have very heavy rains starting tomorrow that will last 5 days and I finally got the attention of the HOA management company and they installed a berm with leaders to carry the storm water away from the foundations. I also had them fix the downspout that was the main source of the storm water that infiltrated 4 properties. Hopefully we can get through this storm without flooding again....See MoreOpening up wall to add floorspace - Nightmare or Totally worth it?
Comments (6)Its really hard to know about flooring, etc. until you open it all up. That doesn't really help you much because by then you're pretty well committed. Take photos as best you can with measurements of the boards. Also pull up a register cover to see the cutaway of the flooring. Take that info to a couple flooring showrooms or lumber yards to try doing some homework ahead of time. You will also need to repair the ceiling. IMHO that extra SF is worth it. Another thought. If you procede, Perhaps you could bump out the back of the fireplace through the outside wall so that it is flush with the current wall. Probably needs a footer, but relatively straighforward framing and frees up even more room....See MoreSunshineX
4 years ago

Related Stories

MATERIALSRaw Materials Revealed: Drywall Basics
Learn about the different sizes and types of this construction material for walls, plus which kinds work best for which rooms
Full Story
UPHOLSTERYSeeking a Quiet, Relaxed Spot? Try Upholstering Your Walls
Upholstery can envelop an entire room, a framed panel or a single wall. See some design options and learn what to expect
Full Story
DESIGN DETAILSDesign Workshop: The Modern Wall Base, 4 Ways
Do you really need baseboards? Contemporary design provides minimalist alternatives to the common intersection of floor and wall
Full Story
INSIDE HOUZZWhat’s Popular for Kitchen Counters, Backsplashes and Walls
White is the top pick for counters and backsplashes, and gray is the most popular color for walls, a Houzz study reveals
Full Story
WHITEWhat to Know Before You Paint Your Walls White
A coat of white paint can do wonders in one room and wreak havoc in another. Here are tips for using the popular hue
Full Story
MOST POPULARYour Guide to 15 Popular Kitchen Countertop Materials
Get details and costs on top counter materials to help you narrow down the choices for your kitchen
Full Story
KITCHEN DESIGNHouzz Quiz: Which Kitchen Backsplash Material Is Right for You?
With so many options available, see if we can help you narrow down the selection
Full Story
MOST POPULARPros and Cons of 5 Popular Kitchen Flooring Materials
Which kitchen flooring is right for you? An expert gives us the rundown
Full Story
KITCHEN COUNTERTOPSKitchen Countertop Materials: 5 More Great Alternatives to Granite
Get a delightfully different look for your kitchen counters with lesser-known materials for a wide range of budgets
Full Story
MATERIALSAn Architect Shares His Go-To Materials
Aluminum doors, porcelain tiles, polished concrete. Here are the features and finishes this professional returns to time and again
Full Story


remodeling1840