


Novice looking to get serious
Cassie J.
5 years ago


Featured Answer
Sort by:Oldest
Comments (19)

Tiffany, purpleinopp Z8b Opp, AL
5 years agoRelated Discussions
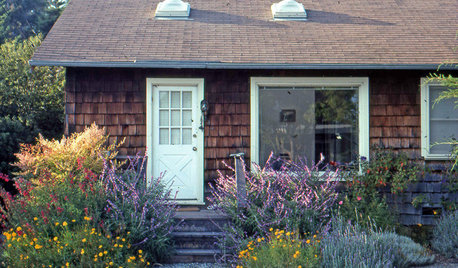
Novice gardner looking for woodland ideas help
Comments (8)Congrats, bsilberz, on your new purchase! Your property looks like a really nice setting! We have been DIY'ers on our wooded lot and, our yard and projects have provided us many, many hours of weekend projects, planning and, now, finally, 7 years later, some weekends of just pure enjoyment (no work and just hammock time!). We are not done by any means, but that is part of the overall process! Here are my thoughts that I wish I had been told when I started to tackle our woods: 1-Unless you have a specific project in mind (eg, creating a little sitting area in a special spot or something), I would highly recommend living with your year for an entire year. Take notes, take pictures (lots and lots of pictures!) at all times of the year, times of the day, and take note of what you like and don't like about certain areas. 2-Visit as many gardens similar to your terrain as possible to get ideas. The best way for this specific purpose is through the Garden Conservancy Open Days. For $5, you can go into gardens of people in your "neck of the woods". I look at the descriptions of the gardens in my area for key words like woodland, deer resistant, water feature, rocky, etc. These are all things of interest to us. Again, take notes and ask questions. Many times the owner is on site to answer Qs. You are not supposed to take photos, but I sketch a visual reminder for myself on my notepad. And I have found this site, Gardenweb, to be an invaluable source of advice and information! :-) 3-Speaking of notes, I keep a notebook and files of pictures from magazines. Some of these pages are so tattered at this point! Anyhow, It's funny how I think I have a great idea, but then after thinking on it a little more I will think of a modified way to do something or come across a better idea for an area altogether. I guess it's similar to the "measure twice, cut once" theory of sewing or woodworking. 4-Consider what you can truly do yourself, or what you need to hire out. This will help in budgeting. We needed to address some drainage from the start, and since large machinery was involved, I am so happy I hadn't planted a pretty garden area that got run over. Consider what needs to be done in what order, again not only from an access perspective, but also budget. 5-Speaking of order, I mentioned drainage. Our first project wasn't really landscaping, but rather, having a french drain installed along the back of the house, between the woodlands and the yard. This led to the next project of adding a swale to catch the water run-off from the hill. This led to a water feature being made from our original DIY dry creek bed. It evolves, you see! This allowed us to get the "bones" in place to work around in key areas. Admittedly, it was completely overwhelming trying to plan things out before we had our water feature installed. It really anchored our whole plan. 6-And, more "bones": We created paths from smaller trees that we thinned out. These also provided a lot of structure and allowed us to address smaller areas where we could see true progress when planting out. Some good advice we got from a fellow gardener was to situate the paths to point toward key focal points...a really pretty rhodendendron, a bench, etc. 7-Definitely consider where you will create your compost or brush pile early on! It needs to be accessible but hidden :-). We are lucky that we can take our brush to our town dump, especially since we had so much, more than we could compost on site. One summer when we were thinning the smaller trees, that was our sole task....cut trees, use loppers to clean of small branches from big trunk, take brush to dump. Literally, all summer! 8-Regarding your weed question,I echo what adidas said: what someone may consider a weed, may in fact, turn out to be a native. This goes back to the "live with it awhile" advice from earlier. It will allow you to study and monitor. I have become a novice weed expert and would never have guessed I would become so obsessed on that front! You will see a lot of the posters on this site will be conservative in their use of weed killers, and rightly so. The wildlife in the woods don't need poison :-). Get a good weed whacker, clear areas of weeds and plant natives that work in your plan and future weeds should stay at bay! We love ferns because they are free since we can transplant from other parts of our yard, and they multiply nicely on their own. Which brings me to the last bit of advice.... 9-Timing is everything! You asked about when to plant, and no matter what you do, work WITH Mother Nature instead of against her. :-). Usually, you hear "Fall is for planting" as plants set roots then; however, in the case of ferns, you need to transplant them when they come up as little fiddleheads in the spring. Dividing perennials will also vary, some do better when divided before they out new growth in the spring. I always keep notes of what I need to do in the current season, and the next year during the same season. 10-OK, one last bit of advice, promise...If you have deer, don't even consider trying to plant anything they like, and think you will be able to spray to deter them. That, my friend, is a losing battle from the start! :-) Good luck! Please keep us posted on your progress! This is an exciting adventure you are going to start....oh, and make sure you have plenty of pain reliever pills on hand! :-)...See MoreTime to get serious on the world's worst kitchen
Comments (41)Thanks for posting that photo. Here's my idea: I moved the fridge to the inner wall, recessing it enough so that its case (not the doors, just the body of the fridge) extends 16.5" into the room. I made the lower cabs next to it 15", with the counter at 16.5" deep so that they dead-end into the side of the fridge cab. That few extra inches of depth will make it easier to make coffee, toast, etc in this area. There are upper cabs above this shallow counter for more storage, something like what you see in the left side of this photo: [[(https://www.houzz.com/photos/contemporary-kitchen-contemporary-kitchen-toronto-phvw-vp~100348) [Contemporary Kitchen[(https://www.houzz.com/photos/contemporary-kitchen-ideas-phbr1-bp~t_709~s_2103) by Thornhill Interior Designers & Decorators Avalon Interiors Moving the fridge and recessing it into the laundry/utility room gives you the wider aisle you want plus it moves the fridge out of view from the front door. I moved the range to the opposite end of the counter run and sited it next to the window. The hood will run up against the window molding like this: [[(https://www.houzz.com/photos/kitchen-traditional-kitchen-detroit-phvw-vp~1872661) [Traditional Kitchen[(https://www.houzz.com/photos/traditional-kitchen-ideas-phbr1-bp~t_709~s_2107) by Ann Arbor Interior Designers & Decorators Laura Zender Design, Allied ASID Judging by your plan posted above, you should have 12-15" of counter to the left of the range. I moved the sink down the wall, nearly to the opening with just enough room for an 18" DW. 18" European DW hold as much as US 24" DWs so you're not giving up function but you are gaining more space in your small kitchen. Panel the DW to make it disappear. Check the selection of panel ready 18" DW at AJ Madison (see link). You will need to do some trenching in your slab to make this work but you gain a large amount of prep counter between sink and range with a window above. IMO, that is worth the expense. To the right of the DW is a china hutch that looks like a piece of furniture but is built in, something like this: [[(https://www.houzz.com/photos/monteverde-residence-traditional-kitchen-los-angeles-phvw-vp~57288) [Eclectic Kitchen[(https://www.houzz.com/photos/eclectic-kitchen-ideas-phbr1-bp~t_709~s_2104) by Pasadena Design-Build Firms HartmanBaldwin Design/Build That gives guests a nice view when they come in the door. You could opt to put shelves above the sink and DW like this: [[(https://www.houzz.com/photos/flea-market-trixie-shabby-chic-style-kitchen-phvw-vp~134754) [Eclectic Kitchen[(https://www.houzz.com/photos/eclectic-kitchen-ideas-phbr1-bp~t_709~s_2104) You could also hang artwork, decorative plates, wine rack etc on the wall above the sink and DW: [[(https://www.houzz.com/photos/charmean-neithart-interiors-llc-traditional-kitchen-los-angeles-phvw-vp~886242) [Traditional Kitchen[(https://www.houzz.com/photos/traditional-kitchen-ideas-phbr1-bp~t_709~s_2107) by San Marino Interior Designers & Decorators Charmean Neithart Interiors, LLC. Wrapped around the corner on the wall facing the front of the house is a tall shallow pantry that looks like furniture, something like this: [[(https://www.houzz.com/photos/showroom-display-traditional-kitchen-boston-phvw-vp~96086) [Traditional Kitchen[(https://www.houzz.com/photos/traditional-kitchen-ideas-phbr1-bp~t_709~s_2107) by Boston Kitchen & Bath Designers Venegas and Company Perhaps you can re-purpose the armoire cabinet that's in the front room already. I put the bench/couch that is in your front room to use, making it a bench for a rectangular table. The two chairs can be placed against the wall next to the china hutch cab when not needed. My goal was to give you a better functioning kitchen while maintaining the charm of your home. In other words, I tried to reduce the utilitarian nature of a kitchen extended into the front room. Here is a link that might be useful: Panel ready 18...See MoreTotal Novice, Looking to start grafting fruit trees. Advice needed.
Comments (6)Well for apples and pears which are pretty foolproof to graft, a lot of people bench graft. Eg. graft directly to the rootstock prior to grafting. I have no experience nor have done any research for peaches, apricots, ect. I have heard that they are more difficult. I know for large volume grafting the nurseries usually bud graft because their scions then go a lot farther as a scion with 3-4 buds can be grafted to 4 rootstocks instead of just 1 as as a cleft graft. It is also faster for multi-grafting as you place all 3-4-5 buds on the same rootstock at the same time. I think they usually do 4-5-6 buds with expectation that 1-2 will fail but they still end up with a 3-4 variety tree....See MorePlease look at my new recessed lights...is it just me? serious regrets
Comments (27)Jan Moyer, thank you! Tems, I can't speak for others, but I've only had recessed lighting (in our now demolished kitchen) and would never consider not replacing it. I need a bright kitchen. Recessed lights help illuminate the floor/walkway, as well as add light to the countertops. I'd noticed mine did cause a slight shadow in the front, but not so detrimental to my cooking. However, the addition of 2700 LED's will now (hopefully) remove that, and further brighten my future workspace. I do not find them to be harsh or busy, but again, for the kitchen (and utility/laundry room) I need 'brightness'. Are you suggesting only undercabinet lights, and pendants or a center light in a kitchen? I want to see in my cabinets, my counter tops, my sinks, see where I'm walking, see my entire kitchen. Without the recessed lights, I'd have a dark kitchen....See More
Marcy
5 years agoDave
5 years ago
Alanna R
5 years agoDave
5 years agoAlanna R
5 years ago
socks
5 years ago
tapla (mid-Michigan, USDA z5b-6a)
5 years agoCassie J.
5 years agoCassie J.
5 years agotapla (mid-Michigan, USDA z5b-6a)
5 years agoCassie J.
5 years agotapla (mid-Michigan, USDA z5b-6a)
5 years agoCassie J.
5 years ago
Karen S. (7b, NYC)
5 years agolast modified: 5 years agoCassie J.
5 years agotapla (mid-Michigan, USDA z5b-6a)
5 years agoKaren S. (7b, NYC)
5 years ago
Related Stories
KITCHEN DESIGNDark Kitchen Gets a Bright New Look
When a graphic designer and an architect put their heads together on a kitchen redesign, the result is a stylishly simple space
Full Story
DECORATING GUIDESGet the Look: Naturally Modern Design Keeps Things Casual
This contemporary rustic style pulls together textured fabrics in neutral colors, clean-lined furnishings and more
Full Story
KITCHEN CABINETSGet the Look of Wood Cabinets for Less
No need to snub plastic laminate as wood’s inferior cousin. Today’s options are stylish and durable — not to mention money saving
Full Story
DECORATING GUIDESGet the Look: 'Scandal' Style for a Sensationally Chic Home
Model a room after the compelling TV show for all the visual drama with none of the conflicts
Full Story
BUDGET DECORATING8 Cost-Effective Ways to Get a High-End Look
Don’t discount that expensive material yet. By using a small amount in a strategic way, you can get a luxurious look without the expense
Full Story
BATHROOM WORKBOOK12 Ways to Get a Luxe Bathroom Look for Less
Your budget bathroom can have a high-end feel with the right tile, stone, vanity and accessories
Full Story
REMODELING GUIDESLaminate Floors: Get the Look of Wood (and More) for Less
See what goes into laminate flooring and why you just might want to choose it
Full Story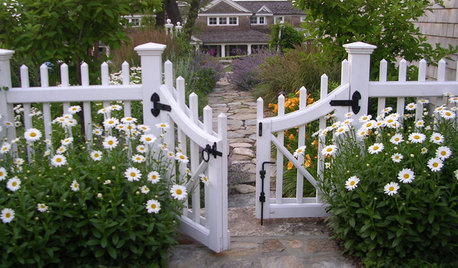
LANDSCAPE DESIGNGet the Look: New England Garden Style
Stone walls, clipped hedges and flowering borders contribute to this traditional look
Full Story


Cassie J.Original Author