


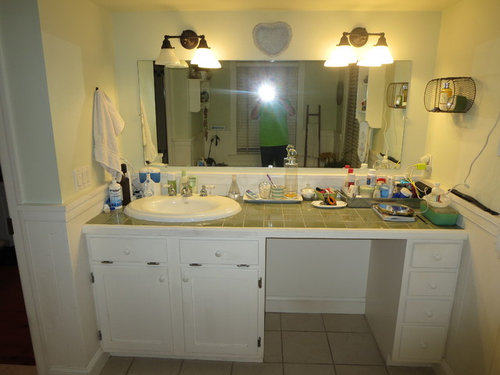
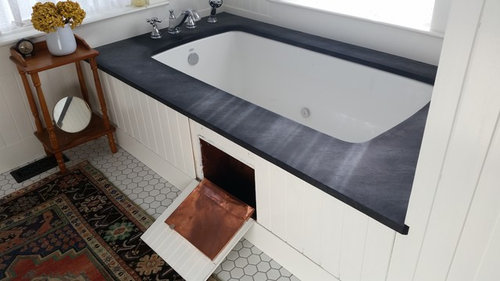
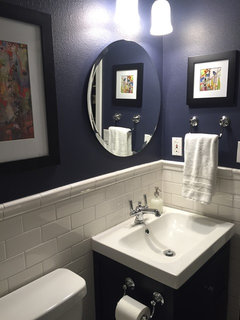
Master bathroom reveal - cottage/farmhouse/vintage style
lkplatow
7 years ago


Featured Answer
Sort by:Oldest
Comments (11)
Related Discussions
Vintage bathrooms
Comments (16)Rosemary, love your bath! The lights you added are a bit like mine--being the only lights in the room. When I first bought the house, it had similar ones but without capability to have shades: each had a pull chain to turn it on, and a plug at the base--they were rectangular porcelain with the bulb in a semicircular extension on the front, and had three horizontal ribs across the middle. Before really thinking about it--I got tired of crossing the room to turn on the lights, so upgraded them to two colonial style sconces activated from a switch by the door. Silly me! Anyway, I tossed the old ones, and ten years later, I realized the error of my ways and searched for true period (1908) lights; as fate would have it, I went to a local salvage/antique mall and found a pair--exactly like the ones I had thrown out when first getting my house! I paid $35.00 for something I had already had--now, the only thing that gets taken out of my house is the daily trash! I bought some small shades hoping they might fit over the bulbs, but there just isn't room between the bulb and the porcelain back of the fixtures. :)...See MoreGutting farmhouse master bath --- keep the original closet?
Comments (12)Hmmm... given that you don't use the linen closet now and that if you relocate it to the right of the window you'd bump your knees on it, I do think I would just remove it and restore the window trim. It is kind of shoe horned in there as it is and even though it is old, it isn't that aesthetically pleasing. Keep the boards and hardware for use elsewhere. The wallpaper is truly hideous, so the first thing I'd do is remove it. Then you'll know what's going on with the wall. You could have a leak or an ice dam on your roof if there is a valley where the addition was added on and water running down the walls. Or, as you say, it could be from shower steam. Or, it could just be failed wallpaper paste! We removed old wallpaper, added two fans with vents to the outside and all new wiring in our 1913 bathroom without removing the old plaster. It can be done. What is in the space above the bathroom? Is the bathroom on an exterior wall? Do you have balloon framed walls? Gutting the walls and installing drywall creates an horrific mess and if you can repair and preserve the plaster while still obtaining the new vent and wiring, I'd do that. Actually, your shower tile looks to be in pretty good condition and (on my monitor) more beige than pink. I attached a link below to a kitchens thread that contains a link to antique baths about a quarter of the way down... those ugly tiles were in vogue back in the old days because people knew what colors to put with them. But, boy I see what you mean about the leaking. Looks like the floorboards under our old leaky toilet that kicked off our bathroom remodel. I'm no expert on showers, but it does look like you are going to have to tear it out and start over. Have you visited the "bathrooms" forum? It is very active and Kerdi is a frequent topic over there. A wooden bath tub. Not my cup of tea, but interesting. Everyone needs to have a way to soak. Our bathroom spaces were so small, and we don't intend to sell our house until we are ancient, so we just have two showers and we soak in our spa. Works for us. Cheers. Here is a link that might be useful: quirky kitchens thread w 1920s bath link...See MoreAt long last - my cottage/farmhouse master bathroom reveal
Comments (58)Haha. Funny that this thread resurfaces today. I am STILL dealing with the grout issue, though I think I am at the tail end. I have not done anything about the door because I was waiting to see what happened with the grout. Basically, original tile guy kept pushing us off and pushing us off til he started ignoring us altogether. Took me some time to find a few other tile guys to come out and have a look. The two tile guys who came out had differing opinions on what to do - one guy said use it, it's fine (which I didn't think it was because gritty bits of grout were running down the wall after every shower!). The other guy recommended painting this sealer on that the grout company sent -- it had to be hand applied -- two coats! -- with a freaking artists' paintbrush (only on the grout lines, not on the tile at all!) so I didn't want to do it myself and he would have had to charge a lot for his time. I decided to test out the sealer to see if it would even help in a few different spots -- some of the threads on the internet from fellow suffferers of this problem said they had spent the time to carefully paint on the sealer and it didn't fix the problem! So the testing took a while cause I kept getting sidetracked (plus I was dreading what I was going to find at the end of the testing so I was kind of procrastinating -- a lot.) But when I finally buckled down and focused on it, I discovered that while the sealer didn't seem to fix the problem, the areas that I had scrubbed really hard (while trying to see where the grout was "loose") weren't running down the wall anymore -- I guess I had gotten off the loose stuff that didn't cure right. So I tested a small area last week by scrubbing the crap out of the grout lines with a stiff grout brush and letting it dry. I rechecked it today - all good! So just this morning I embarked on the process of super-scrubbing every grout line to get off the loose surface stuff -- so far underneath everything seems ok though I'm expecting that I might find a few spots that need touching up as I go -- which will involve getting a tile guy back again - ugh. It's slow going -- all that hard scrubbing is kind of tiring so I can only do so much at a time - I did maybe a quarter of the shower this morning and now my arm is killing me, LOL! But it's better than tediously painting two coats of sealer with a tiny paintbrush!!! Anyhow, thanks for the compliments! I have not hung any towel hooks either, though I did replace the stand with one that has towel bars on the side -- I thought that would work at least for my sink (the one on the end closest to the stand) but since the towel bar is behind me, I didn't end up using it. We've just been folding the towel up on the counter. I'm such a slacker LOL!...See MoreFarmhouse style eat in kitchen/dining table hutch decor
Comments (22)Me again, Tammy. Thanks for sharing all the photos of your cozy home. If you like it the way it is, just enjoy it. If you're wanting a more modern look, start two Ideabooks on Houzz, one "Transitional" and one "Modern Farmhouse." Save photos of houses you like that seem realistic with the style of your house--the "bones" of it, and what you already have. Look up something called "negative space." Here's an article on it in Houzz. It's about the nice sense of space and flow you get when your eye can rest on empty space. Not every wall has to have some little object on it. More space means you focus on a few nice pieces, an art work, some photographs, plants, etc. so your eye doesn't get too overwhelmed at taking in too many small things. That's why I suggested removing your metal shelves in the dining room to focus on your lovely hutch, whether it has a top on it or not. [https://www.houzz.com/magazine/the-power-of-negative-space-in-interior-design-stsetivw-vs~97343035 [(https://www.houzz.com/magazine/the-power-of-negative-space-in-interior-design-stsetivw-vs~97343035) Consider removing nearly all of your "signs" -- not all of them -- and other objects from walls, cabinet tops, etc. Put the stuff in a box for a while and see if your rooms seem simpler and spacious. Comments on your photos: --The bathroom is really nice--great paint choice; not too many knick knacks; nice shower curtain. --Sun porch: take off everything from the walls behind the corner wicker chair. If you want, add a little modern-ish reading light over the chair to suggest a cozy reading corner. One pillow--tops-per chair! How can you sit down otherwise? --Daybed/office room. If budget allows, a simple blue tailored print or solid cover would work better than the ornate spread on there now. Get a nice horizontal painting for over the daybed and remove the other little painting entirely and take off the metal thing. --Bedroom with brown tufted headboard. Hang the mirror and get yellow and blue curtains with coordinating yellow and blue shams and bedding. --Den with big brown couches. Move the sofas about a a half foot from the wall to add some visual space to the room. Move the the horse art to the window wall with nothing else--zero. That way, they'll be the first thing you see when you enter the room. Get a ledge shelf for the other wall and arrange JUST A FEW PIECES YOU LIKE ON IT! Negative space is a positive! Get a round tray for the ottoman in an accent color and leave it empty for people to put down drinks, food, etc. No pillows would be better than the floppy oversized ones on the couch that just look kind of sloppy. Less is more. --Fireplace room and everything that can be seen looks nice. If you have doodads hanging elsewhere in that room, take them down, so the focal point is that lovely fireplace. --The big bedroom. Move the mirror elsewhere. Center the dresser. It'll have more impact by itself. Again, doodads off the walls. Remove the little chest from the window. It's just another piece of visual clutter. You want a sense of the windows and light uninterrupted by that piece. Get some great curtains for this room and bedding that goes with them. With all the bitty things removed, these full curtains, hung very high and right to the floor, will have an impact. So will your nice bedroom furniture....See More
cpartist
7 years ago
User
7 years ago
Nancy in Mich
7 years agolast modified: 7 years agoNancy in Mich
7 years agolast modified: 7 years agoHuntingflower
7 years ago
Errant_gw
7 years agoErrant_gw
7 years agoErrant_gw
7 years ago
enduring
7 years ago

Related Stories
HOUZZ TOURSMy Houzz: Vintage Style for a Musician's Cottage
Music meets the West in an eclectic Seattle home filled with guitars, antiques and personally meaningful art
Full Story
BATHROOM VANITIESAll the Details on 3 Farmhouse-Style Vanities
Experts reveal dimensions, finishes, paint colors, hardware, faucets and more
Full Story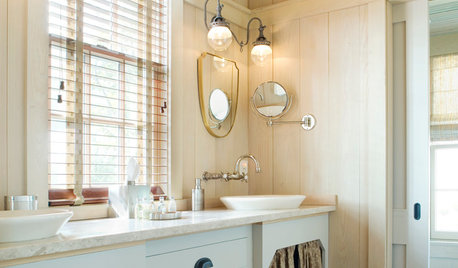
BATHROOM WORKBOOK8 Elements of a Farmhouse-Style Bathroom
Go simple, repurposed and vintage for a farmhouse-style bath with the comforts of today
Full Story
TRADITIONAL HOMESHouzz Tour: New Shingle-Style Home Doesn’t Reveal Its Age
Meticulous attention to period details makes this grand shorefront home look like it’s been perched here for a century
Full StoryREMODELING GUIDESBathroom Remodel Insight: A Houzz Survey Reveals Homeowners’ Plans
Tub or shower? What finish for your fixtures? Find out what bathroom features are popular — and the differences by age group
Full Story
INSIDE HOUZZA New Houzz Survey Reveals What You Really Want in Your Kitchen
Discover what Houzzers are planning for their new kitchens and which features are falling off the design radar
Full Story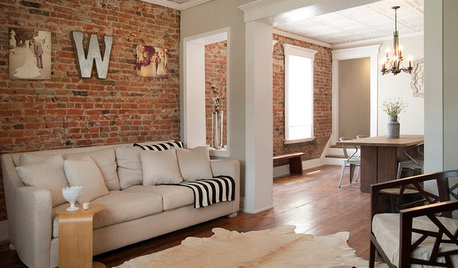
MY HOUZZMy Houzz: Surprise Revealed in a 1900s Duplex in Columbus
First-time homeowners tackle a major DIY hands-on remodel and uncover a key feature that changes their design plan
Full Story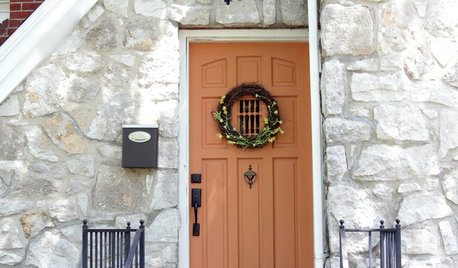
HOUZZ TOURSHouzz Tour: Vintage Style With a Fresh Twist
Heather and Stu Freeman embrace the style and quirks of their 1940s Missouri home
Full Story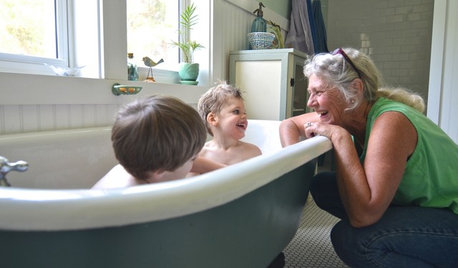
BATHROOM MAKEOVERSFrom Canning Porch to Beautiful Vintage Bath in Oregon
Thrifty finds and DIY labor transform a cramped space into a serene hotel-style bath on a budget
Full Story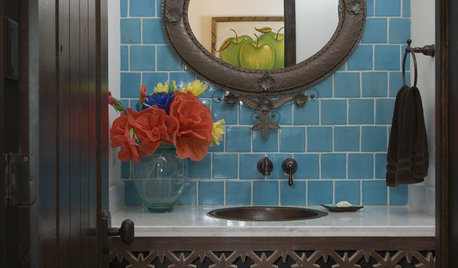
BATHROOM DESIGNConsole Sinks for a Vintage Style Bath
This Sink Style Gives a Bath a Light, Open Feel
Full Story
kats737