


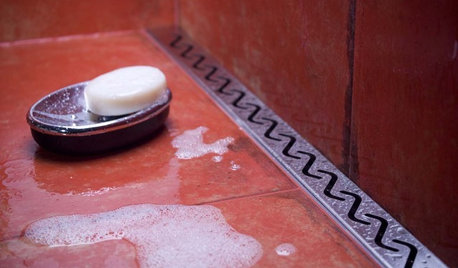
School me on drain boards and runnels!
Annette Holbrook(z7a)
7 years ago
last modified: 7 years ago
Featured Answer
Sort by:Oldest
Comments (13)

palimpsest
7 years agoNothing Left to Say
7 years agolast modified: 7 years agoRelated Discussions
Runnels or drain grooves in wood countertop
Comments (1)Yes I have them. Five years and no issues. I love them! I do take care to stick the corner of a dishcloth in them and run the excess water into the sink, if they get super full. Otherwise, zero maintenance other than oiling once a year when I re-oil the counters. I don't use my counters for cutting, so can't help you on best finish. Seems to me Waterlox would be the worst for that. We have it on our floors. Our tung oil/citrus solvent treatment I am sure would do well to help cover up scratches from a knife visually....See Moredrainboard/ runnels behind the faucet - crazy idea?
Comments (11)Ooh! You are reading my mind! Runnels behind the sink: something I had thought about, found tantalizing, but never did anything about. Your drainboard idea is even better; it would funnel the water back toward the sink and be subtle enough not to be noticed much. OTOH, depending on the patterns in your granite (and elsewhere in your kitchen), your sink style, and so forth, runnels in a starburst pattern might look really cool. (Though maybe not so much if you have a formal kitchen.) Runnels could be spaced to accommodate a faucet hole -- even a soap dispenser hole. We have granite and the fabricator drew the sink cut out area on the slab and then we drew different lengths, widths, and spacing of runnels before making a final decision. Could you do the same with soapstone, as a way to determine if you liked runnels behind the sink? I'll be very interested in what you decide to do....See MoreTake me to school on shower construction . . .
Comments (9)"Best form of shower construction..." That will lead to personal opinions, and oh my gosh, I just happen to have one! 1) Walls? 1a) Tile Backer Boards? I prefer to use a true cement board (Durock or Wonderboard) as the tile backer board. I'm not a fan of fiber-cement due to the moisture wicking nature of that product. Nothing horribly wrong with it. You can build a fine shower with it. I'm simply a cement board person. I'm against the "latest-greatest" tile backer boards that have waterproof skins protecting a core material of who knows what. Sure, those "latest-greatest" products are better than their predecessors, which were the "latest-greatest" in their day. But they're essentially the latest renditions of products that have failed in the past. I avoid them. Cement board? I know what it is. I know how it handles, how it performs, how it acts with repeated wet-dry cycles, etc. It's what I use. Waterproofing? I prefer waterproofing or a drainage plane of some sort in the wall. If it's within the budget, I highly recommend a topical or surface applied membrane on the face of the backer board. Topicals can be liquid (Hydroban, RedGard, etc) or sheet (Kerdi, Hydroban sheet, Nobel, etc). Some liquid topicals are waterproof but not vaporproof (Hydroban). RedGard is waterproof and vaporproof. All sheets membranes are WP and VP, though with varying thicknesses from one product to another, the perm rating (how vapor proof it is) can vary from product to product. But even with different perm ratings, they all work perfectly well in residential construction. For a basic shower you just need waterproof (Hydroban liquid) but you can also use a WP/VP product. For a steam shower you also need vaporproof (RedGard or any sheet membrane). Drainage plane? If you don't want to go with a topical membrane, there's nothing wrong with just using a drainage plane behind the cement board. Drainage planes can be #15 tar paper, or more commonly 6-mil polyethylene sheeting. They get stapled to the shower wall studs with the bottom edge of the material overlapping the flange of the tub, shower, etc. The cement board covers the drainage plane, getting screwed into the studs. If moisture gets through the tile/grout/cement board, it'll hit the drainage plane. The drainage plane generally holds the moisture until the shower is over and a drying cycle begins. As the shower dries out, the moisture usually travels back into the shower space by going back out through the path that it entered. I recommend topical membranes because you can tie a topical membrane on the wall to the topical on the floor. And speaking of floors... 2) Shower pans... First, the membrane on the floor needs to be sloped. No flat-on-the-floor membranes are allowed. Ever. Period. Manufactured pans? You mentioned Kohler Cast iron trays. I love them. They're well built, they look fabulous, they're durable, blah blah blah. It's all in the eye of the beholder, but to my eye, they are transitional in style in that they can cross styles. The negative? You pick a base and build your shower to that size. So they aren't customizable so to speak, but you can usually find a size to suit your build. There are not many other manufactured pans that I like. I don't do plastic/acrylic/fiberglass pans. Personal preference. Some are sturdy. Some are flimsy. Doesn't matter to me, as I avoid them. The foam pans like Kerdi Trays, that get covered with a membrane? They're good. They're actually pretty good. If your shower doesn't fit the size of a foam tray, with thoughtful consideration they can be cut down to a smaller size. On the same note, you can fill in around the foam tray with deck mud if your shower is a little larger than the foam tray. But as to my personal preference, because I don't generally build standard-sized showers, I usually do a deck mud base. I can make it whatever size I choose. Deck mud base. My favorite simply because of its versatility. Very seldom do I build a standard size or standard shaped shower with a standard location or a drain. Deck mud can pretty much be shaped to any shower geometry, and with though it can accommodate a non-centered floor drain location. So yeah, deck mud is my first choice in a shower. Pan membranes? Same as walls in that you can have a membrane buried within the floor, or you can have a topical membrane. Again, for moisture control, I prefer a topical membrane. For a topical membrane, you'll use a drain that matches the membrane you're using. Example, for a Hydroban Liquid or Sheet membrane, you use a Hydroban Flanged drain. For Kerdi membrane you use a Kerdi Flanged Drain. You set the drain. You pack sloped deck mud on the subfloor. You then apply a continuous topical membrane that goes from the drain, across the sloped mud floor, and up the walls. Muy Bueno. With a topical membrane, all that can get wet in a shower it the tile, the grout, and the thinset. That's it. Topicals are great for moisture control. Sheet PVC or CPE membranes? These are the thick membranes that get sandwiched between two layers of mud on the floor. With these membranes, you use a clamping drain. You pack sloped deck mud on the floor. You then install your membrane over the sloped mud, clamping it at the drain, folding the membrane neatly at the wall corners, and running the membrane up the walls 8-10" or so. You then pack another layer of deck mud on top of the membrane. you then tile on that top layer of mud. That's about it for now. Plenty of words. Plenty of option. My recommendations? Again, these are my preferences. For DIY ease? If you like the Kohler cast iron pans, get one. Set the pan. Use Durock on your walls, with the Durock overhanging the pan's flange. We can talk about furring strips later if you're interested. Then cover the Durock with a topical membrane. Then tile. For a non-CI base, using deck mud on the floor? Then I recommend cement board on the walls. Set a flanged drain (I prefer the Kerdi Drain, even if using Hydroban membrane) in the floor, then pack sloped deck mud from the drain to the walls. Then use a topical membrane (Kerdi or Hydroban) of your choice from the drain, across the floor, and up the walls. Geez. I just scrolled up. A LOT of words. Hopefully it makes sense....See MoreKitchen sinks and drain board help please
Comments (17)As for the Kohler prolific, I don't know how this would work for us since we need to have the draining trays in place which would cut into the work space of the sink bowl. We run the dish washer in the night. So most dishes and plates will be put into the DW right after use. But the cups, mugs and cutlery tends to be used and rinsed and goes on the draining rack all the times, large pans are washed and goes on the rack too. Since the Prolific has the 3 ledges and comes with 2 drying racks, you get more draining room than just the width of the rack. With the racks to the side, the sink is still 21.5" wide, and it is very easy to use to clean things on one side, while other things are drying on the racks. I don't find that it cuts into the workspace at all. I have even cleaned large pans on the bottom of the sink while things were drying on the racks higher up. I can move the rack to the middle of the sink and dry a big pan there if necessary. It is very flexible and big at 33". You might try to see it in a showroom so you can see if it could work for you. If you don't like that sink, I think there are some posts here talking about how people fit the Stages sink into their cabinets and that might help you figure out how to use one of the larger sinks with an integrated drainboard. I agree with Stan that you need to figure that all out carefully before you do anything....See Morecevamal
7 years ago
oasisowner
7 years agopractigal
7 years ago
ravencajun Zone 8b TX
7 years ago PRO
PROJoseph Corlett, LLC
7 years ago
Annette Holbrook(z7a)
7 years ago PRO
PROAnglophilia
7 years agooasisowner
7 years ago- PRO
Anglophilia
7 years agolast modified: 7 years ago Lisa
7 years ago
Related Stories
BATHROOM DESIGNHow to Choose the Best Drain for Your Shower
Don't settle for a cheap fix when you can pick a shower drain that suits your style preferences and renovation codes alike
Full Story
TINY HOUSESAdventure Seekers Hit the Road in a Cozy School Bus Home
Wood floors, butcher block countertops, custom furnishings and LED lights make life on the road feel like just another stylish day at home
Full Story
ORGANIZINGGet Your Home Organized With This Back-to-School Checklist
Follow these tips to help your family start the school year right
Full Story
HOME TECHCook Smarter With New Wi-Fi Kitchen Gadgets
Whip up meals with high-tech help, thanks to a phone-connected oven and teakettle, plus a web-surfing cutting board
Full Story
HOUZZ TOURSMy Houzz: Converted Victorian Schoolhouse Looks to the Past
A 19th-century school is transformed into a spacious home with lots of natural light, vintage finds and restored period features
Full Story
KITCHEN DESIGN8 Kitchen Organizing Ideas for Messy Cooks
Not the clean-as-you-go type? Not to worry. These strategies will help keep your kitchen looking tidy no matter what your cooking style is
Full Story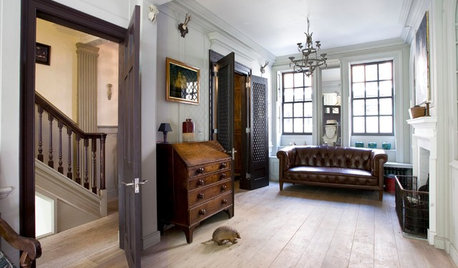
TRADITIONAL HOMESHouzz Tour: Redo Brings a 1720s London Home Into the Present
Skillful renovation and an eclectic mix of art, antiques and furnishings update an 18th-century townhouse
Full Story
MOST POPULARFirst Things First: How to Prioritize Home Projects
What to do when you’re contemplating home improvements after a move and you don't know where to begin
Full Story
LAUNDRY ROOMSThe Cure for Houzz Envy: Laundry Room Touches Anyone Can Do
Make fluffing and folding more enjoyable by borrowing these ideas from beautifully designed laundry rooms
Full Story
ORGANIZINGDo It for the Kids! A Few Routines Help a Home Run More Smoothly
Not a Naturally Organized person? These tips can help you tackle the onslaught of papers, meals, laundry — and even help you find your keys
Full Story

mama goose_gw zn6OH