


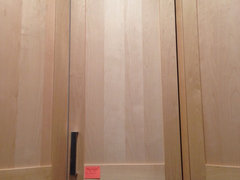
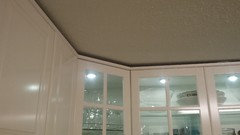
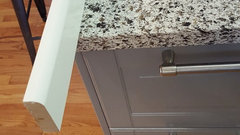
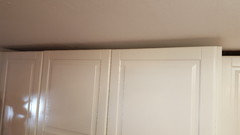
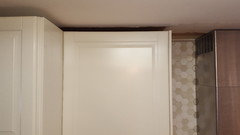
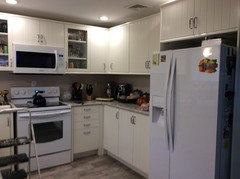
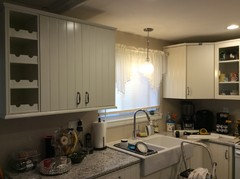
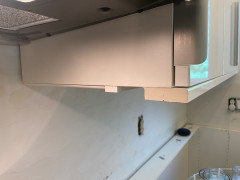
Help please: How to install IKEA deco strip at top of cabs
J C
7 years ago
Featured Answer
Sort by:Oldest
Comments (52)
Related Discussions
Frustrated...How to install multi-outlet strips
Comments (31)Our plugmold was installed without the end fitting. I can see how that extra space could have made it easier. It was a PITA to get it back up when we had to pull the plugmold down to install our backsplash, then put it back up a little bit further out. Extra hard because one of my runs of plugmold is 3 sections for a total of 13 feet long. Either there already is a punchout in the side of the plugmold for the wires to be pulled through, or our electrician cut a hole for them. The punchout is in both pieces - the base and the cover. Our plugmold faces down towards the counter, and the wires come in from the side. The wires come out of the wall just under the bottom of the cabinet, similar to yours. So basically, if you imagine the cover of the plugmold is shaped like a U, with the open top of the U wrapped around the base part of the plugmold and the bottom of the U is where the receptacles are, the wires come in from a punchout in the side of the U that is next to the wall. Our plugmold is mounted to the bottom of the cabinet, not to the wall. However, I have frameless cabinets, so the bottom of my cabinets are flat, they do not have the short piece of cabinet that comes down under the cabinet. Does that make any sense ? As far as the tamper resistance goes ... do you have the option to NOT have TR ? I find the TR outlets through the rest of my house *extremely* hard to plug into. I can't imagine trying to force a plug into an outlet when the receptacle is mounted facing down (or even angled) up under the bottom of the cabinet....See MoreThose using IKEA cabs: how did you upgrade the look?
Comments (35)Dawn, I was just admiring your kitchen plan, and I noticed something on it you may want to double-check. If you are planning on doing IKEA doors (didn't you say Lidingo?), I am fairly certain that the 3-drawer base does not come in 24", and the corner cabinet does not [yet] have a glass door, though I believe I read that there will be one in the future, and that can always be changed out. (A very nice thing about IKEA cabs!) Anyway, I just wanted to pass that info on to you....See MoreTrying to dress up my Ikea cabs - opinion?
Comments (12)Dawn, Please share more of your kitchen and then I will be sure to help you. I loved the white color and the look of the door your chose for your Ikea Cabinets. I brought home 6 doors and that is the door that looked best with my tiles. I think the warm but very white color is a match to BM Simply White. I missed the sale and was not able to price out the cabinets to compare with the other manufactures I was looking at and since I would have to hire someone to install them and put the cabinets together, I needed to see the whole price. I do think light rail and crown molding will look great!...See MoreGranite guy says can't install on ikea cabinets?!? HELP!
Comments (45)Hi we have just installed IKEA cabinets and are now faced with how to install the quartzite slab (not quartz which is man-made material but quartzite the natural stone). It’s a leathered black stone with few veins and we were told it appears hard by the fabricator. It‘s 2 cm thick and from Brazil. Our problem is we want no edging. We like the thin modern look of the natural 3/4” and do not want 1.5” required to hide plywood subtop. We have given thought to thin metal sheet support under all but the fabrication costs were almost as much as the stone and we’d have to be exact with the measurements. Now the fabricator is saying it may be fine just to lay on top of the cabinets with no typeof subtop. Where as before he was insisting we needed something. Our peninsula will be a 24” dishwasher, 36” sink cabinet (undermount), 36” cabinet with a waterfall down the edge and an 8” island overhang off the back (no support other than the waterfall at end and the wall next to the dishwasher as he plans to sink it into the wall. The stovetop wall has 24" cabinets on either side and will have stone going up the back too. Does anyone have experience with this? The cabinet installer currently has the flimsy bracket that came with the cabinets on it. I went to Ikea and bought the SEKTION reinforced ventilated top rail which are stronger but have that lip on them so I can't use them on the front of the drawer cabinets. Should I switch out the flimsy ones for these and perhaps add another support along the middle of the cabinet instead of just the ends? I think the flimsy ones may be OK because it is about weight distribution. My partner thinks different. I also bought the FIXA countertop support and realize if I use that, I can’t add an extra bar in the middle. Any advice on what to install where or anything else I should buy to help our situation. Any advice appreciated, Joseph Corlett you seem very knowledgable and experienced with IKEA cabinets and stone and would value your input too. We are torn between the look we want and not wanting this stone to break. We have no kids and are really careful with what we own...See More
Charlie O'Brien
7 years agolast modified: 7 years ago
m_gabriel
7 years agotheemikeb
7 years agoCharlie O'Brien
7 years agoCharlie O'Brien
7 years ago
bbtrix
7 years agolast modified: 7 years agoCharlie O'Brien
7 years ago
Annette Holbrook(z7a)
7 years agobbtrix
7 years ago
Kathryn P
7 years agoAnnette Holbrook(z7a)
7 years agoCharlie O'Brien
7 years ago
Ken Adessa
6 years ago
Janie Gibbs-BRING SOPHIE BACK
6 years agolast modified: 6 years agoKen Adessa
6 years ago
CEFreeman_GW DC/MD Burbs 7b/8a
6 years ago
Desiree Montejano
6 years agoCharlie O'Brien
6 years agolast modified: 6 years agoCharlie O'Brien
6 years agotalonakk
6 years ago
Malcolm Murray
6 years agobrittanymoon24
5 years agotheemikeb
5 years ago
Alison Fitzgerald
5 years ago
Terry Funk
5 years agobbtrix
5 years agobbtrix
5 years ago
Caro'line Francis
5 years agoblondelle
5 years agoUser
5 years ago
Steve Kupin
3 years agojawbreak23
3 years agolast modified: 3 years agostevekupin
3 years ago
Joe Franks
3 years agoChy B
3 years ago
sparkshooter
3 years agorm101
3 years ago
Katie Wallace
2 years agoJoe Franks
2 years agoKatie Wallace
2 years agotc9876
2 years agolast modified: 2 years agowiscokid
2 years agolast modified: 2 years ago
Heather
2 years agodebora speese
2 years ago
Sandra Stewart
2 years agoMatthew Ireland
2 years agowiscokid
2 years ago


Related Stories
MOVINGRelocating Help: 8 Tips for a Happier Long-Distance Move
Trash bags, houseplants and a good cry all have their role when it comes to this major life change
Full Story
COLORPick-a-Paint Help: How to Create a Whole-House Color Palette
Don't be daunted. With these strategies, building a cohesive palette for your entire home is less difficult than it seems
Full Story
ORGANIZINGDo It for the Kids! A Few Routines Help a Home Run More Smoothly
Not a Naturally Organized person? These tips can help you tackle the onslaught of papers, meals, laundry — and even help you find your keys
Full Story
WORKING WITH PROS3 Reasons You Might Want a Designer's Help
See how a designer can turn your decorating and remodeling visions into reality, and how to collaborate best for a positive experience
Full Story
BATHROOM MAKEOVERSRoom of the Day: See the Bathroom That Helped a House Sell in a Day
Sophisticated but sensitive bathroom upgrades help a century-old house move fast on the market
Full Story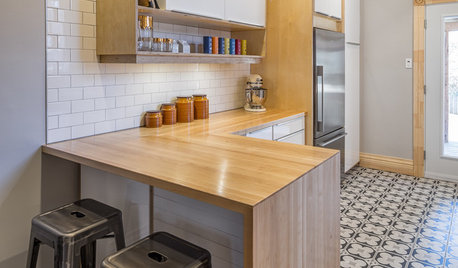
KITCHEN OF THE WEEKKitchen of the Week: Ikea-Hack Cabinets and Fun Floor Tile
A designer turns an uninspiring kitchen into an inviting and functional contemporary space
Full Story
KITCHEN DESIGN10 Gorgeous Backsplash Alternatives to Subway Tile
Artistic installations, back-painted glass and pivoting windows prove there are backsplash possibilities beyond the platform
Full Story
BATHROOM DESIGNShould You Get a Recessed or Wall-Mounted Medicine Cabinet?
Here’s what you need to know to pick the right bathroom medicine cabinet and get it installed
Full Story
KITCHEN DESIGN8 Top Tile Types for Your Kitchen Backsplash
Backsplash designs don't have to be set in stone; glass, mirror and mosaic tiles can create kitchen beauty in a range of styles
Full Story
KITCHEN DESIGN8 Top Hardware Styles for Shaker Kitchen Cabinets
Simple Shaker style opens itself to a wide range of knobs and pulls. See which is right for your own kitchen
Full Story

theemikeb