

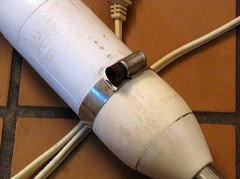
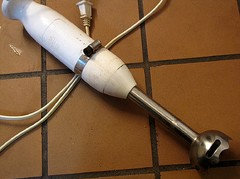
Is there a way to fix my immersion blender?
10 years ago
Featured Answer
Sort by:Oldest
Comments (9)
 PRO10 years ago
 10 years ago
Related Discussions
Best gadgets?: knife sharpener, garlic press, immersion blender
Comments (26)To the OP - the reason you never found the sharpening steel very effective is because a steel does not sharpen, it hones; there's a difference, and its simple and important to remember. Basically, the edge of a knife is very very thin. German knives, in particular, use *relatively* soft metal in their blades (compared to modern Japanese knives, especially). Just in normal use, the edge deforms on a microscopic level, interfering with cutting ability...when you hone using a steel, you are essentially bending the edge back into shape. You are not, however, removing any metal at all. You should hone often. Doing it everytime you start a job is not too often. If you do this, you will maintain your initial sharpness much much longer. Note that on many of the manual pull-through systems, and some electric, the "final" sharpening level is actually a honing level, so you can use that instead. Note also that "diamond steels" are a different beast entirely; they are much more abrasive, and are best treated as true sharpeners. Regardless of how often and religiously you hone, however, at a certain point the edge will still get dull...and at that point, you need to sharpen by actually removing some metal to reshape and sharpen the edge. To do this, you need something more abrasive than a steel - a diamond rod, ceramic rods, stones, a mechanical sharpener, etc. Practically speaking, this is something you probably only *have* to do once or maybe twice a year. Learning to use sharpening stones is relatively easy, and they can be relatively affordable, but it does take some commitment and a bit of practice to be able to hold the correct angle. The systems like the the EdgePro and Wicked Edge get you the same results consistently without requiring as much user skill/commitment, but they are a bit expensive initially. For a cheaper option that still requires less commitment/skill than flat stones, and is very well reviewed, you might look at the Spyderco Tri-Angle Sharpmaker. Note, however, that all of these methods take a while to use - they aren't a quick 5 minute task. The electric sharpeners are quicker and have almost no learning curve. The downside is they are harder on your knives (removing more metal more quickly), and the edges they produce are serviceable but not at the same level a skilled manual sharpener can achieve. For many people, the tradeoff is worth it. Do you live close to a Williams Sonoma? I believe they are currently offering to sharpen one knife free, with an electric sharpener (Chef's Choice, I think) on Saturdays. I would recommend you take one in to them and get a hand's on demonstration, and then you will have an actual edge on your own knife to test with. If possible, I would also take another of your knives to a good professional hand sharpener (will probably cost between $1 an $2 per inch). Then, I would see whether the difference is worth it, to you. I'd also second the recommendation for the "An Edge in the Kitchen" book. There is also a book you can get a Sur la Table called "Knives Cooks Love" which is a good overview and is currently on sale for $4.99....See MoreImmersion blenders--what's worthwhile, what's needless expense?
Comments (22)I have the KA with all the attachments, and I have to say that for me, it's just okay. It's certainly powerful and reliable and all that, but there are certain things about the attachments that don't suit me, but may not be an issue for you. For instance, the blade in the chopper has a fairly high clearance from the floor of the container, so it's not much good for nuts or herbs or other small items. I don't love mine nearly as much as I had expected to do, but a lot of that is just because of the way I cook. I don't make many thick soups, for instance, so while it's splendid for those as others here have said, that doesn't matter much to me. I think I only paid about $69 for mine from amazon, though--KA regularly has a biggish discount once or twice a year (usually after the holidays, alas), and then there was some kind of limited time amazon special running, too. But they are often available for less than retail, although never during holiday gift season....See MoreWhat combo of bamix immersion blender, food proc and stand mixer?
Comments (5)I wouldn't worry about the cakes. Maybe, you could make one in a processor. I've never done it but I don't lean towards using my Cuisinart for "floury" types of things. I have a stand-mixer for bread. I mix cakes by hand & have for 35 years. Don't know why...they're just quick & easy and it seems faster to just mix it than drag out the mixer, I guess. I do think every kitchen should have a quality mixer of some sort though. Egg whites, for example, can actually be better done by hand in a copper bowl but it's a lot of work. A hand-mixer fits that bill fine. Stand-mixers are expensive pieces of equipment. It's similar to Le Crueset cookware........they're beautiful & do a great job with many types of cooking. But, they're expensive & you could accomplish the same thing with a $20 Lodge cast iron pot. So, while I own & enjoy LC...I wouldn't necessarily recommend it to a relatively new cook or inexperienced cook. My recommendation to you would be to look at Kitchenaid hand-mixers. They are inexpensive (under $100, I think) and would handle most anything you are going to need for a while. I prefer Cuisinart but I think food processors all perform pretty much equally well...it's just a matter of personal choice. As an experienced bread baker, and former teacher of bread-making...I'd strongly recommend you get your hands in the flour to start. That way, you'll learn how the dough "feels" going through it's various stages of development. A mixer does not understand how to make bread. It's just a workhorse, so to speak. What I'm saying is that a $500 mixer won't turn you into a bread baker. You'll still have to learn technique and the life-stages of yeast as well as how to manipulate time & temperature to create that perfect loaf of bread. You have the boat motor which is a handy little gadget that you'll use frequently for making soups, sauces, etc. With the addition of a new hand-mixer you should be in pretty good shape for some time. And, maybe, your Sunbeam is working fine and you don't even need that. Eventually, your experience in the kitchen will clarify for you what tools you need to improve your skills. And, again, remember our moms/grandmoms didn't have any of these fancy tools & they were excellent cooks....See MoreBlender, food processor, or what?
Comments (36)To dehydrate kale: Wash thoroughly. Remove stems (save to use in another dish, stir-fry, or soup). Cut the kale leaves (kitchen scissors work well for removing the stem and cutting the large leaves into smaller portions) or tear the kale into manageable-sized pieces. (After you've made dried kale once, you will decide what size/s of pieces work best for you and fit in your dehydrator.) Dip the cut pieces in an acidic water bath (1 t. citric acid powder, OR vitamin C powder,OR Fruit Fresh per quart of water). This aids in preventing bacteria growth, helps maintain color, and adds a little vitamin C. Drain (I give the cut pieces a gentle spin in my salad spinner). Place same-sized pieces together in a single layer on a dehydrator tray - or on one side of a tray if you mix sizes on a single tray. Equal-sized pieces will dry in approximately the same amount of time. If you put a combination of large, medium, and small pieces together on the same tray, the small pieces will finish drying first, and you will need to remove them so they don't over-dry - so keep the same sizes together as much as possible. Dry between 105-120-degrees F. until crispy dry (or about 4-6 hours). When crispy, allow the kale to cool to room temperature while on the trays (20-30 minutes). Don't let the dried kale sit in high humidity or it can rehydrate, and if enough moisture is absorbed, it can mold in storage. As soon as it is cool, store in an air-tight container and keep in a dark, cool place. This is a great way to "save" some less-than-perfect kale you forgot in the crisper drawer. -Grainlady...See More- 10 years ago
 10 years agolast modified: 10 years ago
- 10 years ago
- 10 years ago
- 10 years ago
- 10 years ago
Related Stories

KITCHEN DESIGNKitchen Design Fix: How to Fit an Island Into a Small Kitchen
Maximize your cooking prep area and storage even if your kitchen isn't huge with an island sized and styled to fit
Full Story
BATHROOM TILEQuick Fix: Repair Cracked Bathroom Grout
Banish an eyesore and safeguard your bathroom from water damage in 30 minutes or less with this DIY repair
Full Story
DECLUTTERINGFoolproof Ways to Declutter Your Kitchen
If you find yourself fumbling through cupboards to find what you’re looking for, it’s time to take action with these simple steps
Full Story
LIFE10 Beautifully Simple Ways to Go Greener in the New Year
You may just find more green in your wallet along the way
Full Story
FEEL-GOOD HOME21 Ways to Waste Less at Home
Whether it's herbs rotting in the fridge or clothes that never get worn, most of us waste too much. Here are ways to make a change
Full Story
THE HARDWORKING HOMESmart Ways to Make the Most of a Compact Kitchen
Minimal square footage is no barrier to fulfilling your culinary dreams. These tips will help you squeeze the most out of your space
Full Story
KITCHEN WORKBOOKNew Ways to Plan Your Kitchen’s Work Zones
The classic work triangle of range, fridge and sink is the best layout for kitchens, right? Not necessarily
Full Story
KITCHEN CABINETS9 Ways to Save Money on Kitchen Cabinets
Hold on to more dough without sacrificing style with these cost-saving tips
Full Story
KITCHEN CABINETS9 Ways to Configure Your Cabinets for Comfort
Make your kitchen cabinets a joy to use with these ideas for depth, height and door style — or no door at all
Full Story
MOST POPULAR7 Ways to Design Your Kitchen to Help You Lose Weight
In his new book, Slim by Design, eating-behavior expert Brian Wansink shows us how to get our kitchens working better
Full Story

cloudy_christineOriginal Author