


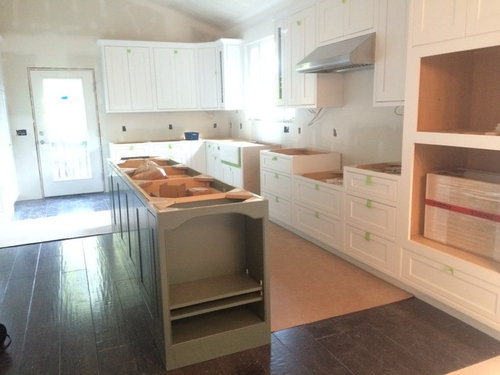
Island bookcase is all wrong - right?
slk7e7
8 years ago
Featured Answer
Sort by:Oldest
Comments (80)

romy718
8 years agolast modified: 8 years ago
llucy
8 years agoRelated Discussions
Your ideas about how to arrange this built-in bookcase, please?
Comments (34)This is probably way too late, but if not....I was flipping the channels the other night (be so glad when the writer's strike is over) and came upon the last few minutes of HGTV's Color Splash, with that David guy. (He's very talented, but can only take so much of him.) The segment was "Dramatic Den Makeover" - (the number for the episode is HCLRS.304 and it will be aired again on January 28 at 8:30 ET. Anyhow, he transformed this space to a gorgeous libary setting. Took prefab bookcases and added crown molding and it was phenomenal! You might find it interesting....See MoreBookcase on end of island?
Comments (13)I love what shelves filled with books do for a room! Bookshelves filled with books so they're not leaning and laying all over the place are nice and tidy, and rich, and exciting, and...whatever. However, bookshelves do look sloppy and cluttered when they're only partly filled with books that are slopping around like a bunch of teenagers who need some chores to do. They also tend to look cluttered and messy with fewer books interspersed with a variety of other stuff, which is a too-common practice that tends to gives bookshelves a bad name. People with this have to keep "designing" a nice layout, not always easy to achieve, then beating their family away from it to keep it from disintegrating into chaos. Since that last is what you're considering, including specifically the hands-on chaos, I agree that you'd probably be happier with covered storage there. Glass doors that could have fabric panels or frosted plastic sheeting added jumped into my mind, too, since that would allow you to do practically anything you want....See MoreHelp with custom bookcase design
Comments (3)Thanks. We thought about shelving under the windows, but in order to make a windowseat it really would have to be 18" high and probably more than 14" deep, so it doesn't help with tranistion to the bookcases on the side walls. If we went 18.5" deep we could get the outlet inside the cabinet (top would still be higher than windowseat) but really too close to floor vent which cousin says is too hard to move rigid ductwork in basement and patch the carpet. I think we'll be fine with the outlet just in front of the cabinet so we can recharge Game Boy, cell phones. We may try to put outlets on the walls behind the bookcases (full basement) but since they're exterior walls I don't know if that's going to be hard - would need 90 degree drill bit to drill through sill plate? The walls are just barely 24" so builder didn't put outlets there. Not sure if we could squeeze one on the same wall, right in the corner. I want to add another one at the next stud location so it's more behind the sofa/end table - I hate having the lamp cord trailing over to the side. Plus if we went with the windowseat we would have no place for the new loveseat we bought last summer (thinking it would be a while before we would put in windowseat). It's just in front of the slider now b/c we had the Xmas tree in the bay, and now the bay is a play area. We'll move the LS back to the bay later this year. I guess we could just do shelves and no door/drawer, put the board games in the extra-deep coat closet (when I get the French doors, short pieces of baseboard and casing out of it). But I really need drawers for pens, pencils, markers, paint pens, glue sticks, and pads/coloring books. I don't think chests or cabinets or bins on shelves would work for those. Unless I store them in my kitchen island after I get 2 new drawers in there (used a bath vanity in center of island for baking center, still trying to get Merillat to give me part number for drawer boxes that will fit - might have to do custom). Oh, and the color of the baseboard (and window trim when we put it up - Honey Maple) is pretty close to my kitchen cabinets (Oak Cider). The furniture is a mix of golden and mission oak. Do you think a floor poly or varnish (Waterlox?) would be a good choice for horizontal surfaces (vertical I'd probably do the satin poly I did the baseboards in so the sheen would match)?...See MorePlease HELP: Nightmare Bookcase-Stain Project
Comments (12)Hi mamaloukos. I feel your pain, as I have stained projects only to realize the color was all wrong. My solution was to start with the ROS, usually back at 150 grit, and continue back up to 220. Then do a final hand-sanding with the 220 in the direction of the grain. So the pictures aren't showing the finish really well, and you didn't say exactly what the problem was. Is the color wrong? Is it too light or too dark? Is the texture wrong (i.e., is it 'fuzzy' to the touch)? Is it too blotchy? Or some combination of these problems? And you said you used a GF water-based gel stain? I wasn't aware that they made a water-based gel - if that's what you used, it might be a relatively new product that behaves differently from its oil-based cousins. I use oil-based GF gel stains regularly for easy-to-match colors and typically find them easy to use. For things that aren't so easy to match, I use water-based custom dyes (I mix the colors myself, but I don't recommend mixing water-based dyes for the novice). Here's how I apply the oil-based gel stain: First, use a rag or a sponge. Make sure the gel is stirred well with no separation of thicker and thinner parts. It should be the consistency of pudding. Dip the rag/sponge into the can and wipe the stain onto the wood, going with the grain of the wood. Just do a small area at a time. Then wipe again with a different, clean, dry rag. Not dark enough? Wait longer before wiping with the clean, dry rag. Each time you re-dip and apply to another area, overlap with the previous area. If you find yourself waiting a very long time between application and swiping, and you like the color, you may be able to apply stain to an entire surface (e.g., the inside of the cabinet) before wiping it off. Keep in mind that if you plan to put a clear coat over the stain, the topcoat will make it look slightly darker. With gel stains, it's pretty easy to make it darker (even a week later) but it's tough to make it lighter. However, while the stain is still fairly wet, you CAN lighten it a bit by wiping with a different rag dipped in mineral spirits (IF and ONLY IF it's the oil-based gel stain). One other consideration: If the problem is splotching, or blotchy appearance after staining, which is common with soft woods like pine and alder, I apply a very thin coat of dewaxed shellac (Sealcoat - NOT regular shellac - made by Zinsser) before staining. Wait until it's dry to the touch, give it another very light hand-sanding at 220-grit, and proceed with the stain. That's a ton of info - hope some of it is helpful. Good luck. That will be a gorgeous cabinet....See More
sas95
8 years agozwizzle1
8 years agomermanmike
8 years agolast modified: 8 years agoUser
8 years agoUser
8 years ago
edwina 1330
8 years agoartemis_ma
8 years ago
eam44
8 years ago
beth09
8 years ago
Bunny
8 years agolast modified: 8 years agoAliceinjersey
8 years ago
Meganmca
8 years ago
enduring
8 years agolast modified: 8 years ago
rebunky
8 years ago
Jeannine Fay
8 years agoJillius
8 years ago
Lily Spider
8 years ago
cookncarpenter
8 years agolast modified: 8 years agogwlake
8 years agoromy718
8 years ago
cpartist
8 years agohjs
8 years ago
CEFreeman_GW DC/MD Burbs 7b/8a
8 years agofatherdowling
8 years agoOaktown
8 years agolast modified: 8 years agomrspete
8 years agosjhockeyfan325
8 years ago
starnold
8 years agoenduring
8 years agonosoccermom
8 years agobeth09
8 years agobeth09
8 years ago
slk7e7
8 years agobeth09
8 years agokpcogs
8 years agolast modified: 8 years agoUser
8 years ago
My3dogs ME zone 5A
8 years agolast modified: 8 years ago
Lavender Lass
8 years agonosoccermom
8 years agoromy718
8 years ago
straikar
8 years agostraikar
8 years ago
mama goose_gw zn6OH
8 years ago
Related Stories

LIFEYou Said It: ‘The Wrong Sink Can Make You Hate Your Kitchen’
Design advice, inspiration and observations that struck a chord this week
Full Story
KITCHEN DESIGNKitchen Islands: Pendant Lights Done Right
How many, how big, and how high? Tips for choosing kitchen pendant lights
Full Story
PENDANT LIGHTINGChoose the Right Pendant Lights for Your Kitchen Island
Get your island lighting scheme on track with tips on function, style, height and more
Full Story
LIGHTINGHow to Get Your Kitchen Island Lighting Right
Here are some bright ideas on when to use chandeliers, pendants, track lights and more
Full Story
DECORATING GUIDESSet the Right Mood With the Right Lines
Soothe with curves or go straight-up efficient. Learn the effects of lines in rooms to get the feeing you’re after
Full Story
DECORATING GUIDESDecorating 101: How to Use White Right
If you’ve ever been in white-paint-swatch limbo, you know white can be tricky to work with. Here’s how to get the fresh look you’re after
Full Story
DECORATING GUIDESHow to Get Your Furniture Arrangement Right
Follow these 10 basic layout rules for a polished, pulled-together look in any room
Full Story
LIGHTINGGet Your Home's Recessed Lighting Right
Learn the formula for how much light a room needs plus how to space downlights, use dimmers and more
Full Story
KITCHEN DESIGNHow to Choose the Right Hood Fan for Your Kitchen
Keep your kitchen clean and your home's air fresh by understanding all the options for ventilating via a hood fan
Full Story
KITCHEN DESIGNIs a Kitchen Corner Sink Right for You?
We cover all the angles of the kitchen corner, from savvy storage to traffic issues, so you can make a smart decision about your sink
Full Story
nosoccermom