


Vintage Camera turned Night Light
justgotabme
9 years ago

Featured Answer
Sort by:Oldest
Comments (16)

bbstx
9 years ago
jlc712
9 years agoRelated Discussions
Camera Reviews
Comments (7)Joe is probably right, but you could try this. Get out of sports mode. Use aperture priority mode (AV) (you choose the aperture, cam chooses the shutter speed). Set the aperture to f2.8 (that is the widest that camera will go which is good). Bump the ISO up to 800 (that camera goes that high it says at steves), and see what happens. ISO 800 usually means noise on a p&s but it doesn't show that much in 4X6 prints and you could look at some noise reduction software like Noise Ninja or Neat Image if you get that far. If that doesn't do it, you can set the camera to full manual, choose f2.8 for aperture, start choosing some higher shutter speeds and watch your lcd. I don't know if bumping the ISO up in full manual does any good or not, but you could try that, too. You could do a little experimenting at home just to see what happens. Maybe you will end up with dark photos the same as you would get in sports mode. Your on-board flash will be practically useless, turn it off. People with more expensive cameras do use an external flash, and there are some faster lenses for this type of shooting that are very pricey. If they aren't way too dark, you might be able to lighten them up some using levels in Photoshop, but you will be battling noise, hope I'm not talking over your head. I fear it is not going to work for you unless your subjects are still, you have to have a high enough shutter speed to freeze the action. I see when I shot in sports mode outside, 1/400 shutter speed stopped the action with some runners; usually I like to get a little higher. The only other answer is to buy a dslr and a very fast lens and learn the right settings. My Canon sometimes I have to bump the ISO up to 1600 (some noise) or 3200 (a lot of noise), but sometimes it's better than not getting the photo at all. I haven't started with indoor sports yet, but know it can be done because I've seen lots of indoor shots by people who have the right equipment and know what they are doing....See Moreturning off lights
Comments (49)zeebo, On re-reading, I think that I overdid the issue of getting back at your stepdad. The point that I meant to make, was that thermostats, etc. don't bite. It was stepdad that took a bite out of your psyche, years ago and the scars remain. It isn't thermostats that bite - it's stepdads (and others). Now - don't let a simple little thing like a mechanism, electronic device like a thermostat continue to get you all bent out of shape - the real biter is long gone. So - bury him, O.K.? Teach yourself, well, re-teach yourself, that thermostats aren't to be avoided/feared/whatever. I'm pleased that you have managed to get him, well, at least half-way buried, as far as a lasting influence in your life is concerned. As for concern with sticking our nose into the lives of others, being kind to your Mom by helping her, if it can be done easily and gently, to do some re-orienting of the way that she does things in her life might be helpful to her. In a psychic way, as well as the practical one of possibly helping her avoid a fall, for her life might well be happier if she can shake off the voice of the ghost of your stepfather - he may be long dead, but she hasn't got him well and truly buried, either, it seems to me. Or why wouldn't she run her life now like she did, in a more "reasonable" fashion, before he appeared on the scene? Help her become "modern" - it's the thing for women to be more independent, right? In conclusion, I hope that you can forgive me for sticking my nose into your life. I hope that you and yours have a great summer. ole joyful...See MoreCeiling fan light turning on by itself--explanations?
Comments (63)Finally tried to really figure out this problem of the ghosting lights which we've had since we installed the fans w/lights and the remote controls over ten years ago. I've read about it on multiple websites over the years. I even brought in an electrician to figure it out. He couldn't either. The fan w/light is on a line with a can light so I actually have to receivers in each room: one for the fan/light and one for the can. Prior to this I had bought another remote as a back up which we needed to use as the can receiver was bad. Turns out, however, that is the solution. The original Hunter universal remote receivers work on 350 MHz. We live in a neighborhood of 2.5 to 5 acre homes so we should not be getting stray signals at all and certainly not in the wee hours of the morning when these lights magically go on. There must be a signal coming from somewhere although we don't know where or from what. The newer remote receiver is set at 400 MHz. I'm testing it in two rooms so that is four receivers. After three weeks there has been no magic lights coming on at any time during the day. I'm going to replace the receivers in the other rooms now. Hope this helps others with a similar situation....See MoreFood Photo Tips: Part 7 - Macro & Camera Icons
Comments (0)Posted by canarybird (My Page) on Wed, Aug 19, 09 at 16:21 Food Photo Tips Part 7: Macro, Closeups & Camera Icons Hi again everyone. I'm back with another entry on how to use your digital camera for taking tabletop photos. Today I want to again go over shooting closeups or macro photos, as well as explaining the use of some of those icons on your camera. Icons for MACRO and SUPERMACRO The term macro when used with photography refers to making small objects look larger through the lens of your camera. Point and Shoot cameras have a normal focal range within which objects are in focus, that is, the camera is able to see your subject clearly and record a sharp image. However if you get too close to something the camera is no longer able to focus. By using the MACRO function on your camera you are able to get a closer shot . You may have found that when you try to get a closeup picture of something on a table or even a closeup of a flower, the result is blurred, even though you braced the camera on the table or used a tripod and had enough light. Depending on your camera you were perhaps too close to the object for the camera to be able to successfully focus. Many digital cameras have a flashing focus light which you can see in a corner of the viewfinder or on the LCD screen to warn you that the camera could not focus properly while you attempted to take a closeup photo. You have to then move backward a little or switch on your MACRO mode. Remember that you should always press the shutter button half way to let the camera focus on your subject before pressing it fully. If the light begins to flash as you do that halfway press, then you know the photo will be out of focus unless you change something. Either move further away or turn on your MACRO setting, press halfway again and your focus lamp (that light in the screen corner that flashes) should stop flashing. It should stay fixed and give a little beep to tell you that it now has the subject in focus and you can finish pressing the shutter. Note: don't confuse the FOCUS light with the FLASH symbol because they can both blink. The flash symbol is a red thunderbolt, which if blinking, indicates there is not enough light to take an optimum photo. Examples of using PORTRAIT mode without MACRO when camera was too close to be within focal range, and then the same setup using PORTRAIT and MACRO mode. Some cameras have SUPER MACRO which allows you to get very close to your subject, where in some cases the camera can be placed less than an inch away from the subject. I'll show some examples: Coins in PORTRAIT mode without macro, then with MACRO, then with SUPER MACRO. Here are a couple of cameras owned by forum members with their focal ranges (distances at which things will be in focus.) The Kodak Easy Share DX 6490 - this camera will focus normally from infinity down to 2 feet away from the subject. If you want to get closer than 2 feet to that piece of blueberry shortcake, you will have to turn on your MACRO mode (it may also be termed CLOSEUP mode). The macro mode on this camera will focus from 2.3 feet down to 4.8 inches. So you should get a sharp picture within that range. Canon Powershot SD880 IS - another member's camera. This one can get as close as 1.6 ft in a normal mode setting. Closer than that and you have to turn on your MACRO mode which has a focal range of 1.6 feet down to 0.8". That means you could put the camera a little less than one inch away from your subject. That would be too close for food photography but you can try it at a distance of 1.6 feet and see how it turns out. On my Olympus SP560 UZ the macro and normal settings have the same focal ranges, which is 3.9" to infinity (10 cm to infinity.) So when I want to get really close I use the SUPER MACRO setting which gets as close as 0.4" (less than a 1/2 inch). Good for insects, flowers or miniature items. On the little pocket-size Olympus Stylus 800, the normal focal range is from infinity down to 19.7 inches. If I want to get closer than 19.7 inches to my subject, I have to turn on MACRO mode, which is good down to about 8 inches away. Closer than than I would switch on SUPER MACRO if it were appropriate for the photo. Examples with this pocket camera are the photos of eggs,above. You should be able to use macro in several of your cameras SCENE settings appropriate for a closeup photo , such as PORTRAIT, INDOOR, CANDLE, DOCUMENTS, AVAILABLE LIGHT, CUISINE, but not in pictures where distance is a necessary factor in the photo. (Landscape, landscape and portrait, fireworks, sunsets etc.) Try setting your camera to PORTRAIT mode and prepare a plate of fruit or other food. Set the WHITE BALANCE (WB) and if not during daylight, to the type of lighting you have. If the picture through the viewfinder (or LCD screen) looks dark, then use the EXPOSURE COMPENSATION (EV) button to get a plus factor until the picture through the viewfinder looks good. Take a picture. Then holding the camera in the same position (or with your tripod) switch on the same options plus the MACRO (or closeup) mode. Take the photo again and compare the two. Or better still, take several because its a fact that the more you practise and the more photos you take, the better they will become. If you continually experience blurry photos it might be a good idea to check out your normal focal range in your (shudder) manual under specifications, Macro Mode Shooting", or go online to *one of the websites that does reviews* and look at the specs for your camera model. There you will see the normal focal range (it may be called shooting range or macro/close-up mode) as well as the MACRO range. *A couple of good websites for checking out details of your camera are: Steves Digicams as well as DP Review. But the easy way to check it out is to get close to your subject, half press the shutter and if the focus light blinks, move back and repeat pressing the shutter until you find a distance where the light no longer blinks. That will be the focal limit of your normal range. Closer than that you will need to switch on MACRO. Other reasons for blurry photos are: 1. Not enough light. The camera needs more time to focus in low light and during that time you or the subject have moved. Use a tripod. This is true especially for indoor or evening photos, and when using night scene options on your mode dial. 2. Camera shake. Even though you have strong light your photos are still blurry. You are moving the camera or your subject is moving. Dont move the camera when you press the shutter button. Hold arms tightly to your sides, brace yourself against a wall, rest the camera on a solid object or use a tripod. If necessary, breath out and hold it while you press the shutter! (Remember to breath in again please.) Leaving MACRO for now, I wanted to go over the BUTTON OPERATIONS and THE MODE DIAL to briefly go over what some of those icons mean and what will they do when you click them into action. Heres a typical MODE DIAL, found on the top right of a digital camera When you turn this dial and select a mode, you are telling the camera to change the settings for a certain situation. Some cameras will have some of these icons together on a separate mode entitled SCENE or SCN on the mode dial. Typical mode choices found on the top of a modern camera dial are for :MOVIE, AUTO, CHECK PICTURES (Review), GUIDE, MY MODE, and M, S, A, P for choosing MANUAL, SHUTTER PRIORITY, APERTURE PRIORITY and PROGRAM. The photo shows icons for an older digital camera where some of the scene options were included there rather than in an in-camera menu. Heres what they mean: AUTO The simplest of all shooting modes, the settings are fully automatic. The camera selects what it deems to be the optimum focus and exposure for your still picture. PORTRAIT - suitable for taking a portrait style photo; the camera sets a wider aperture (lens opening) to blur the background a little, so the subject stands out clearly from the background. SPORTS - suitable for fast action shots, in this mode, the camera sets a faster shutter speed to catch moving objects such as people in sports events. LANDSCAPE & PORTRAIT the camera sets the optimal shooting conditions for a background scene with a subject in the foreground. LANDSCAPE the camera will use a small aperture (lens opening) to be sure the whole of the photo will be in focus, from foreground to background. This is the opposite setting to PORTRAIT where the background is deliberately blurred. Blues and greens are enhanced in this setting. NIGHT this is where you will need a tripod because the camera will use a slow shutter speed, meaning that any movement while the shutter is open will create a blurry photo. You can have some interesting results with coloured lights and portraits in night scenes. Do play around with this mode and see what comes out from your inventiveness. SELF PORTRAIT hold the camera at arms length and turn it toward you to take a photo of yourself. A fun mode. MOVIES the camera sets aperture and shutter speed for optimum results for taking movies. You may have to click on the microphone icon in one of your menus to include sound. MY MODE perhaps not seen on all cameras, this mode allows you to save a group of settings of your choice which can be recalled together with one click. PLAYBACK MODE allows you to go back and see the photos youve just taken. APERTURE PRIORITY also seen as AV on a mode dial. This setting lets you set the aperture setting manually while the camera chooses the appropriate shutter speed for that aperture (lens opening). SHUTTER PRIORITY also seen as Tv on a mode dial. This setting lets you choose the shutter speed manually while the camera chooses the appropriate aperture for that shutter speed. These two above settings are semi-automatic in that you have control over one or the other function. For example if you want to photograph sports and you know you need a fast shutter speed and dont want to rely on the automatic sports mode, then you would use the SHUTTER PRIORITY setting and let the camera choose the appropriate aperture. If you want to set a certain aperture setting but let the camera figure out the shutter speed then you would choose APERTURE PRIORITY. You can control the DEPTH OF FIELD, or the blurriness of the background where you want the background to recede and a subject in the foreground to stand out sharply by using a wide aperture setting. We could perhaps go in the next tutorial or so a little into DEPTH OF FIELD because I think many folks would like to learn how to get that beautiful effect of a single flower or piece of cake (!) standing sharply against a dreamy blurred background. PROGRAM MODE With just a little more freedom to be creative than the AUTO mode, here the camera sets both the shutter speed and the aperture, allowing you to adjust other functions such as white balance, ISO. I think this has been very long today so although we havent got much more to cover in the next two or three tutorials (I thought wed finish with ten all together), I think next time Ill go over the FLASH icon and FLASH menu as well as the SELF-TIMER option which lets you jump into your photos. Subjects Id like to mention: Depth of Field and how to make those beautiful Blurry Backgrounds, the important triangle of variables that you need to know: APERTURE, SHUTTER SPEED and ISO, how they work together and how to adjust them..or at least understand what is happening. And oh yes.I have to finish that full sized LIGHT BOX so we can see what results we can get from that! I hope you are understanding it all and if you have questions please ask here or PM me. So thanks for joining me. I'll be uploading the next installment soon. And please feel free to save the pages on your computer. Sharon (Canarybird) :-) (All text and photos copyrighted) Free for personal, non-commercial use Follow-Up Postings: o RE: Food Photo Tips: Part 7 - Macro & Camera Icons clip this post email this post what is this? see most clipped and recent clippings * Posted by coconut-nj (My Page) on Mon, Aug 24, 09 at 8:38 Sharon, while I haven't been posting directly to your photo tip threads, I've been following them avidly. I so appreciate all the effort you've gone to to explain in such an easy way so many aspects of taking good [better for some of us] pictures. The last week or so I've been very busy organizing and then hosting our family reunion at a local fancy diner and have not had a real chance to digest the latest installments. The macro stuff interests me very much. I've tried to use my macro recently and found when I did the camera refused to take the picture?? Odd. LOL.. I'll figure it out but I suspect I'll have to dig through the manual to see what the problem is. Your post makes me suspect it has something to do with the camera not being able to focus on what I'm trying to do or the distance, or something..heh.. and it won't fire as self preservation. Smiles. I'll figure it out and then be back to digest more of your post. Btw, I got a tripod for my birthday! Yay.. I relative I had staying with me for a while apparently absconded with my last tripod. Grrrr... Needless to say I'm looking forward to using the tripod to work on some of your 'lessons'. Thanks for all your great work on our behalf. o RE: Food Photo Tips: Part 7 - Macro & Camera Icons clip this post email this post what is this? see most clipped and recent clippings * Posted by canarybird (My Page) on Mon, Aug 24, 09 at 10:58 Thank you coconut, and good that you have a tripod now. I'm wondering what mode or scene you are using on your camera when you add in the macro factor. Are you in AUTO or PORTRAIT (closeup) mode? If you are in a scene mode such as landscape for example, you can't use macro as well because you would sending two different messages to the camera...a landscape or far away mode such as sport or sunset and macro, a very closeup mode. The other thing, if you are in PORTRAIT mode and adding in macro, the camera should take the picture unless you are too near your subject or it is too dark. Does you focus lamp blink (the dot in the corner of your screen) before the camera refuses to take the photo? If so, that tells you that the camera can't focus at the distance you are from your subject. Move back a little and keep pressing the shutter button half way several times until the blinking stops. Then take the picture. Let me know if that works and if not I'll think of something else. Luck....:-) SharonCb o RE: Food Photo Tips: Part 7 - Macro & Camera Icons clip this post email this post what is this? see most clipped and recent clippings * Posted by coconut-nj (My Page) on Wed, Aug 26, 09 at 1:13 Good points Sharon, I'll check it out. I thought I had been in food mode, but maybe not. Also the lack of light is quite possible, I'll check that out too. Thanks. Smiles. o RE: Food Photo Tips: Part 7 - Macro & Camera Icons clip this post email this post what is this? see most clipped and recent clippings * Posted by antiquesilver (My Page) on Sun, Aug 30, 09 at 1:42 I don't remember if it's this lesson or another that you suggested using the Self Portrait Timer setting with a tripod to avoid camera shake. So simple & yet so effective. The tripod part is standard but I don't remember being advised about using a timer before but it certainly makes a difference on inside shots. o RE: Food Photo Tips: Part 7 - Macro & Camera Icons clip this post email this post what is this? see most clipped and recent clippings * Posted by canarybird (My Page) on Sun, Aug 30, 09 at 5:57 Right on track antique silver. I'm going over the self-timer in the next entry, hope to have it ready for Wednesday for those who have never tried out using that feature on their camera, along with setting up the tripod and some tips on that. The self timer avoids any shake you might cause to the camera when you press the shutter button. A shutter cable release is another inexpensive addition which permits you to press the shutter without disturbing the camera body. Both systems will help you to eliminate blur caused by camera shake. SharonCb o RE: Food Photo Tips: Part 7 - Macro & Camera Icons clip this post email this post what is this? see most clipped and recent clippings * Posted by dirtgirl07 (My Page) on Sun, Nov 1, 09 at 13:54 Hi Sharon, I feel a little guilty not posting about food!! I have a question that you might be able to answer. I'm trying to take photos of miniature paintings (2.5x3.5in) and the varnish creates a major shine on them. Do you think your mini light box and macro would work on these? The shine is similar to that you get off of jewelry and silver. We've even tried scanning them in which does reduce that glare, but not completely. Thanks for any help! Beth o RE: Food Photo Tips: Part 7 - Macro & Camera Icons clip this post email this post what is this? see most clipped and recent clippings * Posted by canarybird (My Page) on Sun, Nov 1, 09 at 17:28 Hi Beth.... If you're taking closeup shots of miniatures you should be in macro mode. Reflection is always a problem with shiny objects. The light box would be fine as long as you can diffuse the light source by using white tissue or drafting paper and can change the camera angle as well as moving the objects around until the reflected light is not bouncing up into the camera. It will take quite a bit of juggling around to get the angle where you don't see the reflection, but diffusion is just as important. Good luck! SharonCb o RE: Food Photo Tips: Part 7 - Macro & Camera Icons clip this post email this post what is this? see most clipped and recent clippings * Posted by dirtgirl07 (My Page) on Sun, Nov 1, 09 at 18:44 Thanks Sharon! I guess it's going to be an experiment. After posting the question I realized that these were not 3 dimensional either - but flat surface.. That was going to be a challenge on the surface glare. They have to be photographed straight on. The scanned version may have to do, but it doesn't pick up the detail well. Thank you for your posts on the photography - those were great. Your photos are all wonderful looking and after seeing them and a lot of gorgeous blogs, you must have trained a LOT of people. Makes looking at all that food delicious!! Beth...See More
bpath
9 years ago
MtnRdRedux
9 years ago
justgotabme
9 years ago
emmarene9
9 years ago
awm03
9 years agolast modified: 9 years ago
mustangs81
9 years agojustgotabme
9 years agolast modified: 9 years agoUser
9 years agolast modified: 9 years agoalexamorrie
9 years ago
debrak_2008
9 years agoUser
9 years ago
prettybluehouse
9 years agojustgotabme
9 years ago
Related Stories
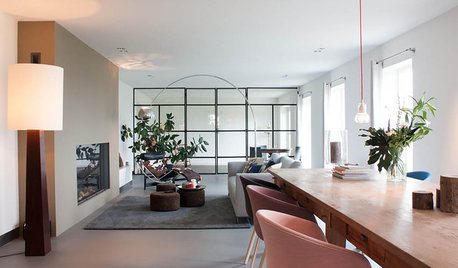
HOUZZ TOURSMy Houzz: Turning a Netherlands Barn Into a Country Home
Once a place for chilling milk, this Dutch home now lets the owners chill out in easygoing comfort
Full Story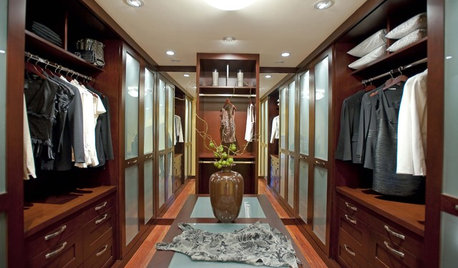
GREAT HOME PROJECTSTurn That Spare Room Into a Walk-in Closet
New project for a new year: Get the closet you’ve always wanted, starting with all the info here
Full Story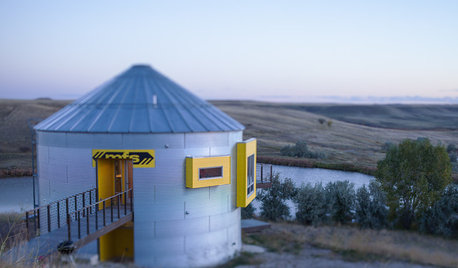
HOUZZ TOURSHouzz Tour: Prairie Grain Bin Turned Bucolic Retirement Home
An agrarian structure and a big dream combine in this one-of-a-kind home that celebrates 250 acres of Montana grasslands
Full Story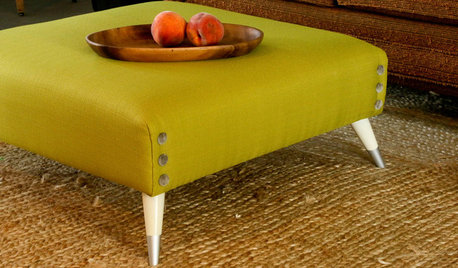
DIY PROJECTSTurn a Shipping Pallet Into a Stylish Ottoman
Get the step-by-step instructions for upholstering your own mod living room centerpiece
Full Story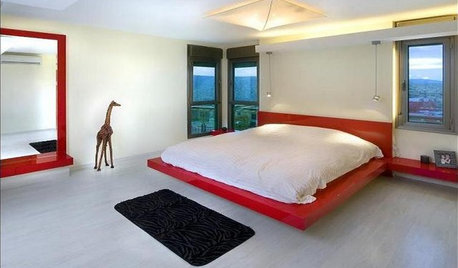
BEDROOMSPaint Your Bed for a Colorful Night’s Sleep
Take your bedroom somewhere over the rainbow with a bed done up in a shade beyond the pale
Full Story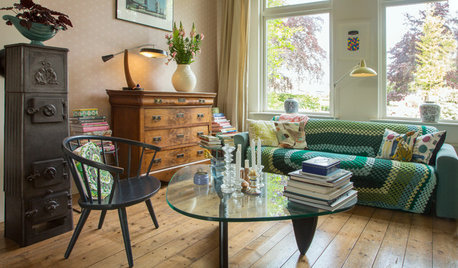
HOUZZ TOURSMy Houzz: A Dutch Home's Gorgeous Vintage Style
An avid vintage collector turns her family home into a warm and colorful showcase
Full Story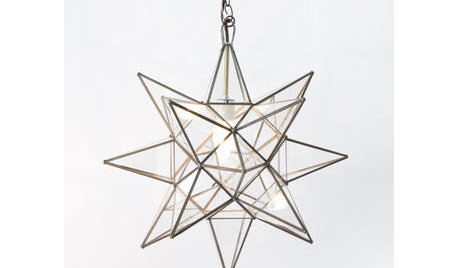
PRODUCT PICKSGuest Picks: Winter Lights to Ward Off Dark Nights
Don't let less daylight around the winter solstice get you down — these lights, candles and mirrors will keep your home merry and bright
Full Story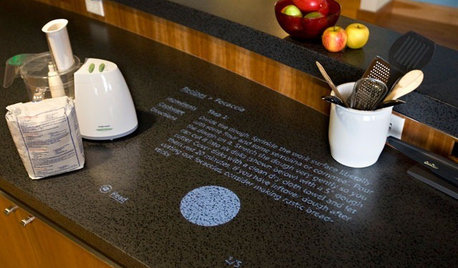
HOME TECHComing Soon: Turn Your Kitchen Counter Into a Touch Screen
Discover how touch projection technology might turn your tables and countertops into iPad-like devices — and sooner than you think
Full Story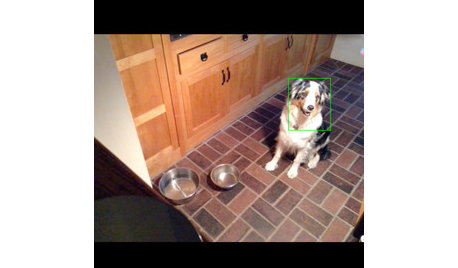
HOME TECHTurn Your Smart Phone Into a Home Security System
Monitor your home a less expensive way by putting your phone and some new gadgets to work
Full Story
HOME TECHHouzz Tour: A Gin Distillery Turned Bachelor Pad
A renovation converts a dated North London apartment into a sleek, contemporary home for work, rest and play
Full Story

justgotabmeOriginal Author