


Scrappy25 renovation Part 1- layout evolution and cabinets
scrappy25
9 years ago


Featured Answer
Sort by:Oldest
Comments (25)

jxa44
9 years agolast modified: 9 years agomagpier
9 years agolast modified: 9 years agoRelated Discussions
Kitchen renovation- cabinets/layout questions
Comments (16)If you were to turn the island 90 degrees I don;t think you would gain anything and you would lose two things - aisle width and island size. You can't put the island any closer to the sink wall because you don;t want anything getting in the way of the 12' trek (sorry) between the fridge and stove. If you move it closer to the sink wall the island becomes a barrier to the pathway between the two. Your aisles widths would also be narrower. Currently they are 4' wide , now you could go to 42" (3 1/2' wide) but that only leaves you with an island length of 5' long x 4' wide (maybe you can go to 4 1/2' wide). You don;t want to go any wider because it becomes difficult to clean the middle of it - it's a long way to reach. However speaking of island size - You have it going beyond the reach of the kitchen - does the right side line up with something (not the overhang part but the cabinet bulky part of it) or is it just hanging out. If not I would shorten it so that the bulky part of the island (not the overhang part necessarily) lines up with the end of the oven/microwave. Is that maybe 6-8"? Now, if you moved the fridge over, which is wider, you probably wouldn't have to do that. If your wife is baking there - everytime she has to go to the fridge she has to walk arooouund the island and 8' to the fridge rather than just turning around to get eggs, butter, milk, whatever. What is the alcove on the sink wall with the window? Is that a lower counter or a window seat? And what is the drawer configuration at the end. Is this a coffee/drinks bar? (Prep sinks don't have to be very big, but, I know how you can get image of what you're kitchen is going to feel like and be like and if no prep sink - so be it.) With respect to the fridge - you can, which you probably know, put panels around it so that it is encased with your selected cabinetry if you move it to the end of the stove run. I'm just throwing out ideas because sometimes we can get stuck in a box and need someone to push us out of it....See Morescrappy25 renovation Part 3- The kitchen cockpit (Stages 45 sink)
Comments (14)Hi Ainelane, since the Stages comes with the bottom rack , and it is undermounted, I don't think that my pots have ever hit the metal. I just went and knocked on the metal and it sounds like a good solid metal, much different than my cheapie sink in m basement kitchenette.I don't see any insulation when I look from below. Curious, I looked it up the Stages listing and they are touting "SilentShield sound-absorption technology offers quieter performance", I honestly have no idea what that means other than that it seems to be on a lot of the Kohler sinks. Perhaps they have engineered something into the metal design? The inside deeper part measures 31 inches across. It is 9.5 inches deep and with the undermount it is deep enough that there is very little outside splashing when cleaning pots and pans. I LOVE my peninsula sink for all the reasons you mentioned. The two matching pull down faucets are like the Chinese lions that flank the front doors in China, they seem to stand at attention in the sight line. When I have company, I put the small drainer into the sink and pull out the heavy Kohler cutting board over it . Although too heavy to be regularly used, that board is a thing of beauty and creates more counter space. The white containers can also come out as needed to hold items for a buffet. pinkpanther5, I remember looking for cheaper alternatives and the Ticor 4000 for $400 would give you a similar design for the larger part of the sink (no ledge), but the drain is in the back center of the Ticor and does not allow the large pullout trash that the Stages does with its off-center drain. I think they are hard to find but they are still out there. That is worth considering if price is an issue, just add one or two integral drainboards to your countertop and you have most of the functions of the Stages sink....See MoreAnyone NOT do stacked cabinets with 10 foot ceilings?
Comments (21)We have 10' ceilings and I didn't want to spend extra thousands for stacked cabinets that I could neither reach nor would likely use (I could've talked DH into anything). Ours was a reno, and we've always had cabinets that go up only ~ 96", finished off with simple crown molding. I just couldn't justify the cost. Sorry I can't send any full pics right now, but kitchen is an absolute train wreck and is still 'down'. Here are a couple of 'in process' views: This is the opposite wall on the other side of the island/kitchen, where the fridge and ovens are in recessed spaces -- crown molding ends at 96". So, perhaps this works in our kitchen since there's balance....See MoreThoughts on bump out in a kitchen remodel
Comments (12)There is a lady named Nancy Yu (Houzz ID Scrappy25) who was particularly active in these forums several years ago, and she faced your precise dilemma with a small space. After years of research and gathering quotes for expanding her kitchen, she settled on doing a bump-out that cost about $5K and then maximized the use of her other kitchen space. She loved the final effect and said the bump-out was totally worth it and added a more spacious feeling to her small area. It also allowed her to stay on-budget for the total kitchen renovation versus building on. She's written a three-part description of what she did, and the first of those posts is here: [https://www.houzz.com/discussions/scrappy25-renovation-part-1-layout-evolution-and-cabinets-dsvw-vd~2817830?n=25[(https://www.houzz.com/discussions/scrappy25-renovation-part-1-layout-evolution-and-cabinets-dsvw-vd~2817830?n=25) Scrappy25 is also still occasionally active on these forums, so perhaps she will see this post and comment....See Moredebbie1031
9 years agolast modified: 9 years agoscrappy25
9 years agolast modified: 9 years agosjhockeyfan325
9 years agolast modified: 9 years ago
bbtrix
9 years agolast modified: 9 years ago
motherof3sons
9 years agolast modified: 9 years agotea4all
9 years agolast modified: 9 years agoscrappy25
9 years agolast modified: 9 years agodccurlygirl
9 years agolast modified: 9 years agoHydragea
9 years agolast modified: 9 years agolannegreene
9 years agolast modified: 9 years agolannegreene
9 years agolast modified: 9 years ago
ainelane
9 years agolast modified: 9 years agoscrappy25
9 years agolast modified: 9 years agoscrappy25
9 years agolast modified: 9 years agoscrappy25
9 years agolast modified: 9 years agoainelane
9 years agolast modified: 9 years agolannegreene
9 years agolast modified: 9 years agoscrappy25
9 years agolast modified: 9 years agoscrappy25
9 years agolast modified: 9 years agoainelane
9 years agolast modified: 9 years agoscrappy25
9 years agolast modified: 9 years agoainelane
9 years agolast modified: 9 years ago


Related Stories
MOST POPULARKitchen Evolution: Work Zones Replace the Triangle
Want maximum efficiency in your kitchen? Consider forgoing the old-fashioned triangle in favor of task-specific zones
Full Story
TRANSITIONAL HOMESHouzz Tour: Part Traditional, Part Modern and All Family Friendly
With clean lines, vintage touches and durable surfaces everywhere, this Los Angeles home balances tastes and needs beautifully
Full Story
LIFETime Travel to Houzzers' Childhood Homes, Part 1
Peek into home design's past and share the memories of Houzz community members with these personal photos and stories
Full Story
DOORSKnow Your House: Interior Door Parts and Styles
Learn all the possibilities for your doors, and you may never default to the standard six-panel again
Full Story
STUDIOS AND WORKSHOPSMy Houzz: Eclectic Charm in a Baton Rouge Renovated Live-Work Cottage
Makers of handcrafted jewelry bring personalized flair to their 1,350-square-foot Louisiana home and studio
Full Story
HOUZZ TOURSHouzz Tour: Stellar Views Spark a Loft's New Layout
A fantastic vista of the city skyline, along with the need for better efficiency and storage, lead to a Houston loft's renovation
Full Story
KITCHEN DESIGNCouple Renovates to Spend More Time in the Kitchen
Artistic mosaic tile, custom cabinetry and a thoughtful layout make the most of this modest-size room
Full Story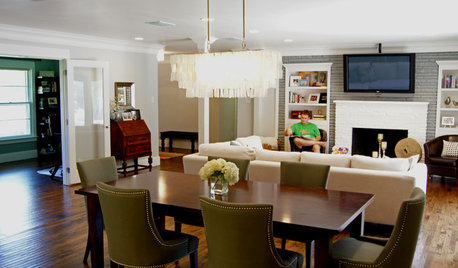
HOUZZ TOURSMy Houzz: Renovated 1950s Family Home in Texas
A complete overhaul reinvents a dark midcentury home, leaving a cool color palette, an open layout and a nursery splurge in its wake
Full Story
VACATION HOMESPatience Pays Off for Owners Renovating Their Beach Condo
A Jersey Shore unit gets a bright new look, a more functional layout and increased space for extended family
Full Story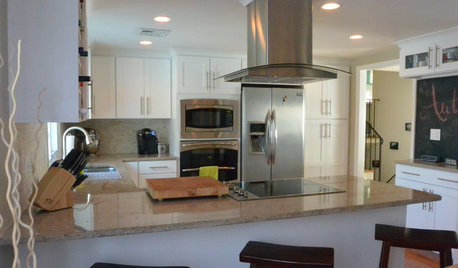
BEFORE AND AFTERSA ‘Brady Bunch’ Kitchen Overhaul for Less Than $25,000
Homeowners say goodbye to avocado-colored appliances and orange-brown cabinets and hello to a bright new way of cooking
Full Story


CEFreeman