


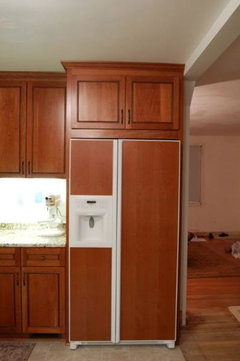
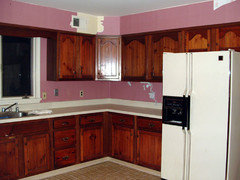
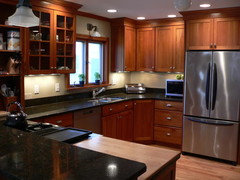
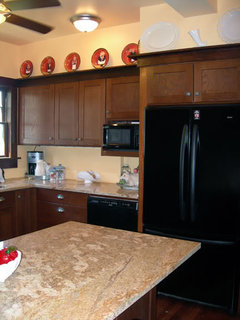
Do you have a refrigerator cabinet for a non-built-in fridge?
nguyendtt
16 years ago
Featured Answer
Sort by:Oldest
Comments (23)

pcjs
16 years agogneegirl
16 years agoRelated Discussions
Regular fridge with a fridge drawer or larger built-in fridge?
Comments (2)We have a built-in 30" all-fridge (Thermador Freedom Column) and two 24" GE Monogram fridge drawers -- and they both are packed, all the time! (We also have a 30" all-freezer in the kitchen plus a chest freezer in the basement.) We did our kitchen ~four years ago, and our two children are now 7 & 5 -- my point being I only have two small children (not voracious teenagers). Granted, we are strict vegetarians, so we have lots (& lots) of fresh produce. But both my husband and I are of the mind: you can NEVER have enough fridge / freezer space! freezer on left, fridge on right: both have faux drawer fronts to help break up the plane stacked fridge drawers are just to left of sink [on right side of pic], with the fridge on the far left of the photo, just next to ovens...See Morebuehl, did you have a tutorial on your refrigerator cabinet?
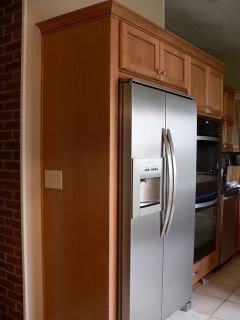
Comments (5)Not Buehl, but I can probably walk you through creating a basic fridge surround if that's what you are asking here. Do you have an extra deep over the fridge cabinet (what size is it?) and 3/4" thick 30" deep x your cabinet's top alignment height side panels plus some scribe molding, and a touch up kit? The place to start is your fridge's utlity connections. You want a recessed box for the water supply and the power supply. If you are on an outside wall where you can't afford to compromise the insulation, you can always inset the box into the adjacent base cabinet in the run. This will keep the plug and water line from interfering with pushing the fridge all the way back into it's cubby. The next place to start is with your fridge's specs. Some fridges are 35 3/4" wide and meant to go into a 36" space. Some require more space. Check the clearance required at the top as well. Some brands need more than others. If your fridge is one that needs a larger opening than 36", you will have to attach fillers to the 36" cabinet box until you have the recommended width. Start with the first tall 30" deep panel next to the base cabinet. Attach the panel to the adjacent base and wall cabinets. If you are using a counter depth fridge, the panel only needs to be 24" deep. Ideally, the panel should cover the entire box of the fridge, but as some are deeper than others, check your fridge's specs. 30" is a good "standard" depth that pretty much covers most fridges sold today. You will now need to install blocking at the top back to push out the over the fridge cabinet to the actual depth of the refrigerator. The bottom alignment height of the cabinet should be 72", so that is where you take a 2"x6" on edge and pre-drill for lag bolts to screw into the studs to extend the depth of the studs. After you have the studs extended, cover them with 1/2" plywood. You want the overall depth of the blocking plus the cabinet box to equal to the depth of the side panel, and if you custom cut the side panel to match your fridge, you may have to do some fiddling with the blocking here. The overall plywood covered blocking should equal the width of the fridge cabinet. I have had some installer use the build up area where the blocking is located to install the recessed power and water supply. It's often better to do that than to impinge on the storage in the adjacent cabinet. It all depends on how you have to run the electricity and water. Now you're on to the other side of the enclosure. Take the second panel and attach it to the blocking. If you have a second cabinet on the other side of the recess, then attach the panel to the base and wall cabinets there. If you don't have cabinets there to stabilize the panel, then you may want to install a bit of very small blocking into the interior at the rear wall to give you something to nail the side panel to. OK, now you've got your cubby. Using a jack or several grunt labororers, lift up the fridge cabinet and attach it to the blocking at the rear. If you've done your job right and made sure everything is plumb (that's a BIG deal for a cubby) then it should just slip between the side panels perfectly and be level without any shims or tweaking. Then attach it to the side panels just like you would attach wall cabinet to wall cabinet (behind the hinge plate to disguise it), making sure to use short enough screws so as not to screw through the panels. Cover the front cut edge of the panel with scribe molding as well as where the panel joins the wall between the base and wall cabinets. Some people will use scribe molding at the floor level against the floor and others will use 1/4" round or baseboard molding. It's an aesthetic choice, but you want to cover the panel/floor transition. Install the crown molding. There will be an approximate 2" gap between the bottom of the cabinet and the top of the fridge (because standard fridge height is 70)-71") and you can attach light rail molding to the cabinet or a horizontal filler on a piano hinge that you can flip up in order to store some cookie sheets or something on top of the fridge. Use the touch up kit's fill stick to fill any of the pin nails, and then you're ready to plug in the fridge and attach the water line and roll it back into it's cubby....See MoreBuilding a refrigerator cabinet for the fridge I don't have
Comments (2)We did this and it is one of my favorite things about the kitchen! (One reason we remodeled our old kitchen was that the 1940s fridge enclosure wouldn't accommodate modern fridge sizes, so I didn't want some future owner to be in the same quandary.) First, I would look at fridges and get a sense of what you might want just to be sure you know roughly what you're looking at. We built for a 36" fridge on the assumption that those will be around for a while. Our actual dimensions are 36 5/8", which happened to accommodate all of the fridges we were contemplating at the time---some can fit in a true 36" enclosure, and some (KitchenAid) are 35 5/8" and need a half inch on either side, so we built to the larger size. Our cabinetmaker then made edges to the cabinet that close the space to 36" so that it looks like a tight fit, but the fridge has air space. To deal with different heights in fridges---and this is where they seemed to vary more---we put in an adjustable shelf above the refrigerator; it can be set as low as 67" and as high as 84" which pretty much covered the universe of freestanding 36" fridges. At the lower heights it's a bookshelf and at the higher heights it becomes a tray shelf. The shelf is made to match the cabinets and has a rail attached to hang down 1.5", which makes it match the rails on the inset cabinetry on that wall and doubles as a way to hide the air space on top that most fridges require. This was a really good solution for us; we have 9' ceilings and stacked cabinets, so it left enough room for an 18" cabinet on top of the shelf that matches the top cabinets along the wall. We built our enclosure 25" deep since we didn't plan to have a fridge with water/ice, although 26" gives you a few more options if you need space for that. Our old fridge is tucked in there now, and actually looks pretty decent even though it's 30" deep. Hope that's useful!...See MoreNon-counter depth refrigerator. How did you handle yours?
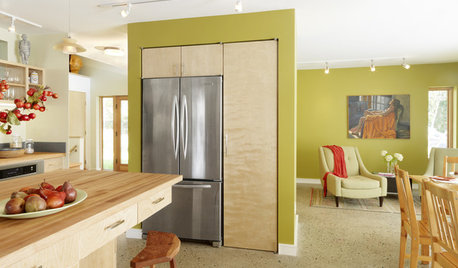
Comments (17)Our fridge went in a spot where one side was flush with a built-in pantry, and the other side was adjacent to the range-wall cabinets (base cabinets only). We were stuck with the depth of the pantry, which left a little bit of the side of the fridge showing. So we pulled out the base cabinets on the other side to match. We initially planned to put a panel there, but the dimensions weren't workable with our stock (IKEA) cabinet components, and we didn't want to spend the $$ on custom. So then I hit on the idea of building a wall to box the fridge in an alcove. It meant losing about 6" of base cabinet, but it fit the modern look of the house, nicely isolated the over-fridge cabinet (the only upper in the kitchen), and looked super-custom. DH and I built and finished the wall. We made it the same thickness as the wall on the other side for the sake of symmetry. Before: After: considered putting in a panel on the other side...See Morenguyendtt
16 years agochinchette
16 years agoUser
16 years agolynnette63
16 years agolynnette63
16 years agolynnette63
16 years agoglad
16 years agoabbycat9990
16 years ago
weedyacres
16 years ago
vjrnts
16 years agokompy
16 years agopatches123
16 years agobeths96
16 years agojaymielo
16 years agonguyendtt
16 years agoraehelen
16 years agorobin_d
16 years agoweedyacres
16 years agojaymielo
16 years ago
Gil Roschuni
16 years ago


Related Stories
REMODELING GUIDESGet the Look of a Built-in Fridge for Less
So you want a flush refrigerator but aren’t flush with funds. We’ve got just the workaround for you
Full Story
FUN HOUZZHouzz Call: What’s on Your Refrigerator?
Magnets, menus, children’s art, coupons, perfect-attendance certificates, song lyrics — what is fridge-worthy in your house?
Full Story
KITCHEN DESIGNYour Kitchen: Spot the Refrigerator
Celebrate your beautiful new cabinetry with a matching finish for the fridge
Full Story
KITCHEN DESIGNStay Cool About Picking the Right Refrigerator
If all the options for refrigeration leave you hot under the collar, this guide to choosing a fridge and freezer will help you chill out
Full Story
KITCHEN DESIGNSee-Through Refrigerators Dare to Go Bare
Glass-front fridge doors put your food and drinks on display, for better or worse. See the benefits and disadvantages
Full Story
KITCHEN DESIGNKitchen Ideas: 12 Refrigerators in Disguise
Designs hide the fridge behind unexpected finishes and doors
Full Story
KITCHEN STORAGEStorage Space Gem: Above the Refrigerator
Underutilized space above the refrigerator has valuable kitchen storage potential. These ideas for cabinets and more help you maximize it
Full Story
HOUSEKEEPINGHow to Clean Your Fridge, Inside and Out
Keep your refrigerator clean and fresh, while you gain storage space and lose those ‘UFOs’
Full Story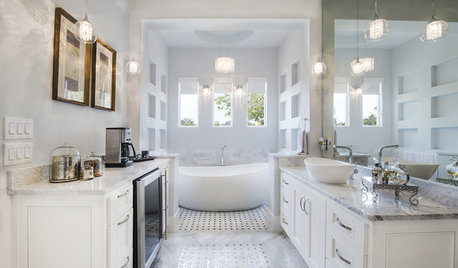
BATHROOM DESIGNSpotted: Refrigerators in the Bathroom
You read that right. Before you protest, here are seven good reasons why people are chilling in the bath
Full Story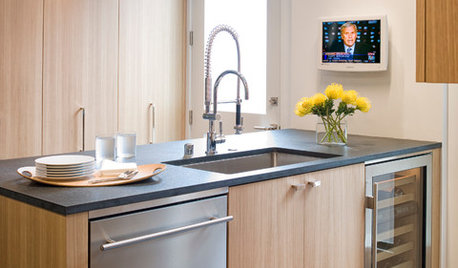
KITCHEN DESIGNFine Thing: A Wine Fridge Right Where You Want It
Chill your collection: No wine cellar or tasting room required
Full Story
Katalina