It took over 10 months of work after years of planning, but we finally have a finished kitchen to share. I haven't been on this board in a while, but I received tons of useful advice and opinions from many of you here throughout the planning and in-progress stages, not to mention the info I got from reading others' posts, so I have to say a big thank you to everyone who has participated here for the past several years.
This was a mostly DIY and low budget renovation (just over $11K). We started out with a pretty cute but not very functional kitchen (all fixed shelves, lowers had only half-shelves, drawers literally falling apart), and thought we would just fix some issues and do a bit of cosmetic updating. Then we discovered water damage under the sink and in neighboring cabinets. These were built in place by hand in the 1970's and there was no fixing just one or 2 cabinets. We definitely had to do a full tear-out.
We knew this would be DIY, and initially planned to buy RTA cabinets from Barker's and paint them navy blue. Then I completed some woodworking projects and decided I was sick of finishing, and just didn't have it in me to do all that painting to an acceptable standard. We ended up liking the Ikea Ramsjo white cabinets, and made some minor tweaks to our layout to make those work instead for less money. We also used Ikea numberer wood counters. I must mention that Barker's was awesome with quotes and questions - I would not hesitate to use them on a future project despite the fact that we didn't go with them this time.
The only aspects of the renovation that were not DIY were electrical (new circuit added for oven, plus fixing all manner of scary hazards that had apparently existed in the house for years), plumbing (had to move pipes), and countertops. We could not lift the large countertop for the peninsula, so we had a friend who is a contractor come in with his partner and handle that.
We did not have to re-do the floors, because we had installed those (hickory) when we moved into the house. The flooring at the time was a wreck, so we didn't wait. We did have a spot to patch where the floorplan was not the same, but it turned out to be a pretty easy DIY with the tongue and groove flooring we had leftover from the original installation.
The budget breakdown (approximate):
Cabinets, Ikea Ramsjo White, birch countertops, and Renlig dishwasher: $5,000 We made our purchase during one of their sales and got 15% off.
knobs & pulls, Hafele from myknobs.com: $160
oak shelf brackets, Tyler Morris Woodworking through Amazon: $140
oak 1X12 for shelves, Home Depot: $70
GE single/double oven & Profile cooktop, Sears Outlet floor models: $1600
Elkay double-drainboard sink, e-bay: $160 (probably our best deal - this sink retails for about $1200)
Local metal shop work to fix minor dents in the sink: $30
Danze Parma faucet & soap dispenser, amazon.com: $260
Waste King garbage disposal, amazon: $130
Broan range hood, Overstock.com: $580
Mexican tiles, e-bay: $150
supplies for tiling (grout, caulk, etc): $75
saw blades, nails, glue, additional hardware supplies: $100
Paint, Benjamin Moore (Light Blue walls, Simply White ceiling & trim, custom mix for cabinet molding): $175
painting-related supplies: $50
molding, Home Depot: $150
wood blinds (mocha), justblinds.com: $240
electrician: $1200 (hourly rate including some additional non-kitchen work)
lighting, Lowes: $140
contractor labor for counters: $500
Osmo Top oil for counters: $30
plumber: $200 (included some additional non-kitchen work)
Total: $11,140
Of course, that's not including all the meals eaten out while we were without a functional kitchen! We tried to do the temporary kitchen in the dining room, but restaurants and take-out were often too tempting :)
On to photos.
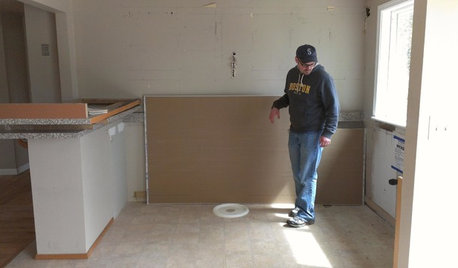
Some befores:
The old backsplash was laminate on particleboard, and was a huge pain to remove. It had been screwed and glued in place before laminate went on.
And this is the old layout:
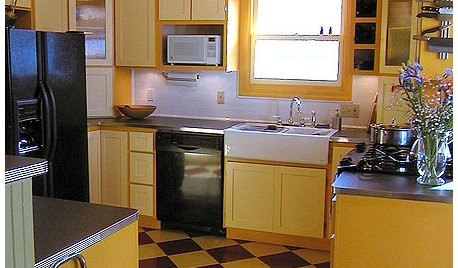
The new layout is nearly identical. We ultimately decided that we really liked the way the U-shape worked for us. But we made the peninsula shorter and wider, so we have 45" between the end of the peninsula and the cabinet next to the fridge, and the peninsula is about 39" wide.
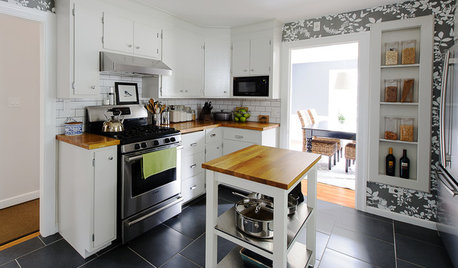
The new kitchen:
The 24" cabinet by the wall on the peninsula is 24" deep with roll-out wire baskets, while the others are 12" deep with adjustable shelves.
We do still plan to change out that "nipple" lamp in the center of the U, so I guess we can't say we're 100% finished.
The 15" cabinet with drawer on top at the end of the peninsula is a pull-out for trash. We love this.
The only upper cabinets are here. We went with the 30" height cabinets because our ceilings are a bit lower than 8 feet and are not level. 36" really would have been perfect, but the only other option with Ikea is 39" unless you use custom doors and cut the cabinets down yourself, which we did not want to do.
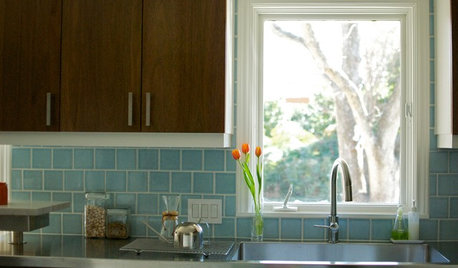
The sink is not centered on the window. We made that decision to get a better layout, and have no regrets. That's the Ikea dishwasher with Ramsjo door panel on the left. It is a huge improvement over our old one.
The open shelving has been great for us. We do not miss uppers here at all, and the kitchen is so much brighter. A couple of those plate stacks get a little higher when the dishwasher is emptied.
We did the peninsula end along the lines of how they do them for the Ikea displays. I would have liked to have just 1 panel, but to do that would have involved trimming the cabinets and the counter more, so we opted for the lower-effort approach. This photo also shows the area where we did the floor patch in front of the end of the peninsula. I'm pretty proud of how seamless that turned out.
Closer view of the backsplash:
And finally, our dogs hoping we will drop some food:


Nicole
Amy Sumner
Related Discussions
Low Budget DIY Kitchen 95% Done!
Q
Ikea OTK, $7500 budget, almost done + a question
Q
Finished French Budget DIY Ikea Adel White
Q
Kitchen Cabinets: -- Ikea, Home Depot/Lowes or custom?
Q
texaspenny
Amy Sumner
williamsem
cawaps
dee850Original Author
cindaintx
LoPay
KBSpider
lavender_lass
michoumonster
liriodendron
williamsem
sreedesq
ppbenn
dee850Original Author
Gooster
jubilante
deedles
Terri
taggie
m2dougherty
lazy_gardens
ginny20
heidia
romy718
oldbat2be
scrappy25
dee850Original Author
kai615
doodledog_gw
lala girl
dee850Original Author
RichinSC
vdinli
theresa2
nosoccermom
annkathryn
dee850Original Author
bicyclegirl1