


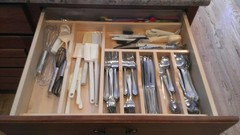
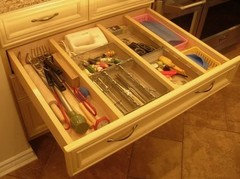
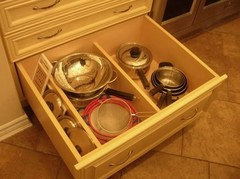
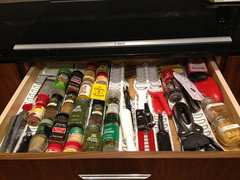
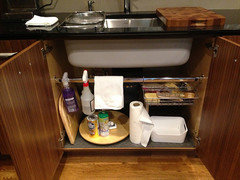
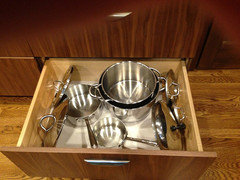
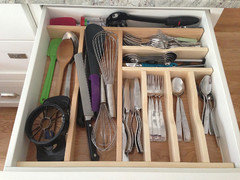
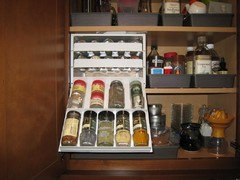
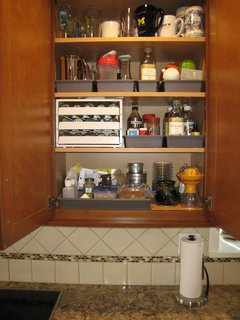
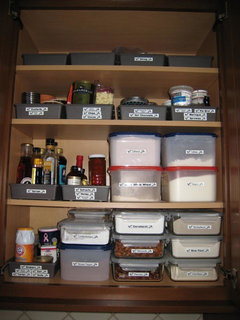
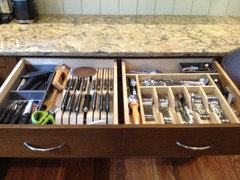
Please post pics of your organized cabinets and drawers
sanjuangirl
10 years ago
Featured Answer
Sort by:Oldest
Comments (34)

gpraceman55
10 years agotaggie
10 years agoRelated Discussions
Breezy please post your drawer depths.
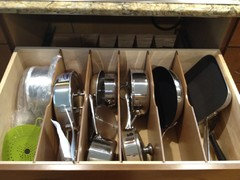
Comments (8)Hi Quiltgirl. Sorry it's taken me so long to be able to grab enough time to answer you properly. First, my cabs are full overlay, not inset. I prefer the inset look, but needed to stretch our budget to cover a whole house reno and inset was too much to spend an already expensive room. Before deciding on a cab/drawer configurations, I had made an inventory of every single item I had to store in the kitchen. Every whisk. Every corn poker. Every serving tray. Etc. Then, I grouped those items on paper by the zone in which they would need to be stored. When my new kitchen layout was settled (which took over a year and hundreds of drawings), I labeled each zone on my plan and looked at what needed to be stored in the space I had. That drove the type of storage each zone needed. I know people rave about deep drawers, but I found that many of my items were small and would get swallowed up in deep drawers. I wanted quick, easy access to my needed item when I opened a drawer, not a scavenger hunt which would necessitate lifting or moving other items in the process. So for me, 4-drawer stacks were better in most places. My 4-drawer stacks hold a ton of stuff. Many drawers aren't as full as they could be. Top drawer to bottom interior height: 3.25" 3.25" 3.25" 8.25" Drawer front height: 6.25" 6.25" 6.25" 11.25" *****Most of these pcs are old and have been at least a little differently organized now.**** Right of rangetop in 38" 4-drawer stack: Left of rangetop in a 38" 4-drawer stack: 15" wide 4-drawer stack in my prep zone to the right of the prep sink: Top I enjoy my 3-drawer stacks in other areas of the kitchen also, but they aren't a good place to store spatulas, baking tools, brushes, serving spoons, cork screws, spices, scale, graters, and other small kitchen tools. They are, however, wonderful in my prep zone for my large and small prep bowels. Interior drawer heights from top to bottom: 3.25" 7.25" 9.75" Drawer front heights: 6.25" 10.25" 13.5" Prep zone drawers. (DW hadn't been unloaded into these drawers yet so they are a bit empty in these shots.) 30" wide 3-drawer stack: Top (need DH to install my Lee Valley drawer dividers.) Middle Bottom I also have two deep drawers under my rangetop for storing all my pots and pans. Those drawers are 8" and 9.25 in the interior with drawer front heights of 11" and 12.75". I find these drawers invaluable for all my big and heavy cookware. Sorry that ended up to be a dissertation on my drawers. :) Hope that answered your questions! This post was edited by breezygirl on Sun, Feb 17, 13 at 14:30...See Moreshow me whats in your drawers-- organizers....
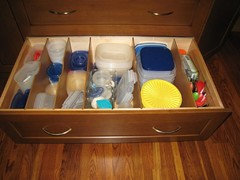
Comments (3)I wanted something that was completely customizable for a couple of reasons: My drawers are pretty wide and the premade ones don't really fit, and the premade ones usually have generic sized slots, and I want some more narrow and some wider according to what I want to store. SO! I started out with the plastic ones from Container Store. They were good because I was able to cut them to fit and make my drawers exactly how I (thought) I wanted them. Time passed and two things happened. One, those plastic dividers didn't really hold up well. They came loose and generally were just not working out. Two, over time I changed my mind about how I wanted the drawers organized. Only slightly, but enough that I really wanted to redo the organizers. If I'd liked the plastic ones, I probably could have lived with them how they were or made a few changes with more dividers, but I wanted a real change. So I bought a bunch of these drawer dividers from Lee Valley. You have to buy the wood dividers yourself and cut them to fit (and sand and stain if necessary). But they are so much nicer than the plastic ones. Nicer looking and they don't move around and come apart. One bad thing is that you have to hammer them into the sides of your drawers (inside) which I didn't want to do, so I actually put wood strips all around the perimiter of the drawers before installing the dividers. So, if one day, I want to completely redo the drawers (doubtful at this point but you never know!) I can simply lift out the dividers and no scars will be left behind. Here is a link that might be useful: Lee Valley drawer dividers...See Morepainted oak cabinets please post pics
Comments (22)We are in the process of painting our oak cabinets now. I can post pics later (when I'm not at work) if you are interested. We are doing the work ourselves. LIke the previous posters have said, it is time consuming. We bought a house in foreclosure and gutted the kitchen. I found great cabinets, in a horrible pickled oak finish, at restore. There is some great advice on this forum, and we also found a good article on painting cabinets on the this old house magazine website. Here is the process we are using: (1) removed all doors and hardware--you have to fill in holes if you are changing hinges or knob position. (2) rub down with liquid sander/deglosser. This cleans and roughs up the finish. (3) Sand with 100 grit paper, vacuum, and wipe down with mineral spirits or tack cloth. Seems duplicative of step 2, but this what was recommended to us so we did it. (3) Fill in grain, and fill dents. We used thinned down MH ready patch and applied with a paint brush. This was much less expensive than Brushing Putty and filled the grain well, but not perfectly. (4) Sand with 220 grit paper, vacuum, and wipe down with mineral spirits or tack cloth. (5) Prime (we used instl-x stix, which was expensive and I don't think it worked as well as the much less expensive kilz or zinzer primers (6) Sand again with 220 grit paper, vacuum, and wipe down with mineral spirits or tack cloth. (7) Caulk all gaps on doors and frames. We found we had to sand a bit again after this step, which meant more vacuuming and cleaning. (8) Paint--we are using Ace Cabinet and Trim (we couldn't find cabinet coat in our area). This paint is good at concealing brush strokes, but does not coat as well as some other paints and takes FOREVER to dry. Not sure I would use again. (9) Sand(again!!) with 220 grit paper, vacuum, and wipe down with mineral spirits or tack cloth (10) Paint final coat. (11) let cure (about one week). (12) reattach hardware and hang We just finished step 8. So I am not sure if two coats of paint is going to be enough. Started step one two weeks ago, and we probably have another ten days to go with the sanding, painting, and curing still to go. Not a quick process by any means. Good luck....See MorePlease post pics of your gel stained cabinets
Comments (4)I'm a big fan of gel stain as that's how I updated my maple cabinets. This is an "in progress" pic from a couple months ago. As you can see, we made a few changes to the cabinets and you cannot tell a difference with the finished product. We brushed it on, 3 coats of stain and 3 coats of the poly (if my memory is correct) I can't say the bottom picture is our finished product but we're almost there. The flooring will be replaced soon and then it's time to move on to the next room. There have been many people that have used General Finishes Java with great success. My original remodel thread has disappeared but my inspiration was Celticmoon....See MoreCindy103d
10 years agozackin
10 years ago
sanjuangirl
10 years agosoibean
10 years agoontariomom
10 years ago
susanlynn2012
10 years agosanjuangirl
10 years agoannkh_nd
10 years agoDebbie Erfer
10 years agozackin
10 years agochrissyb2411
10 years agozackin
10 years agoontariomom
10 years agomls1999
10 years agoontariomom
10 years agomls1999
10 years agoontariomom
10 years agozackin
10 years agomls1999
10 years ago
Megan Meyers
10 years agomls1999
10 years agoontariomom
10 years ago
a2gemini
10 years agosanjuangirl
10 years agoa2gemini
10 years agodilly_ny
10 years agosanjuangirl
10 years agoa2gemini
10 years agobrightm
10 years agozackin
8 years agobeenzmail
8 years ago


Related Stories
KITCHEN DESIGNGet It Done: Organize Your Kitchen Drawers
Clear 'em out and give the contents a neat-as-a-pin new home with these organizing and storage tips
Full Story
KITCHEN STORAGEPulling Power: Clever Drawer Tactics for a Kitchen
It’s not how many drawers you have in your kitchen; it’s how they work for you
Full Story
ORGANIZINGConquer Clutter With Drawers: 14 Inventive Solutions
Organize, neaten and hide all your stuff with drawers in unexpected spots or outfitted with extra-special features
Full Story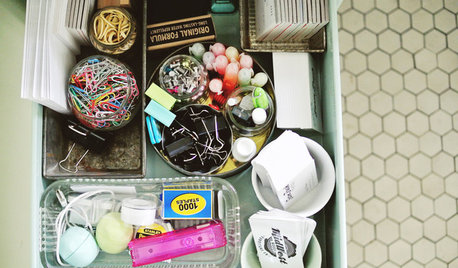
MOST POPULAR8 Ways to Get a Handle on the Junk Drawer
Don’t sweat the small stuff — give it a few drawers of its own, sorted by type or task
Full Story
ORGANIZINGGet Organized: Are You a Piler or a Filer?
Tote out the bins and baskets and learn how to be an organized piler if file cabinets leave you cringing
Full Story
ORGANIZINGGet It Done: Organize Your Kitchen Cabinets
You deserve better than precarious piles of pots and toppling towers of lids. Give cabinet chaos the boot with these organizing strategies
Full Story
KITCHEN DESIGNOrganizing Tips That Really Work: Pantry in a Drawer
Deep kitchen drawer keeps pantry items tidy and at hand
Full Story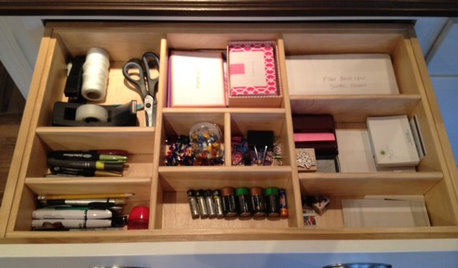
HOUSEKEEPINGGet It Done: Whip That Junk Drawer Into Shape
If the jumbled mess in your catch-all drawer inspires only dread, this quick organizing project is just the sort you need
Full Story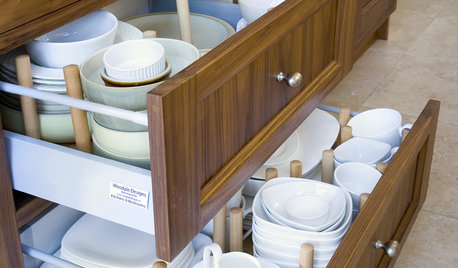
KITCHEN DESIGNIdea of the Week: Customizable Dish Drawer
Tuck dishes safely away in a DIY kitchen-drawer organizer
Full Story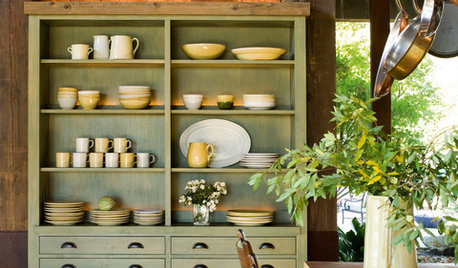
DINING ROOMSHow to Organize and Style Your China Hutch
Whether you reserve your cabinet for your good china or stock it with everyday tableware, here are ideas for arranging it
Full Story


oldbat2be