So it's pretty daunting when you're looking at $7,000 worth of brand new cabinets, and know your installation will affect not only that investment but also the $3,500 you're about to spend on granite!!!!!
I did a ton of research and made DH read lots of articles on line. We debated installation techniques such as french cleats, and whether or not to rent a cabinet jack thingy.
We're experienced DIY-ers and DH is a marine systems tech and mechanic, so he troubleshoots finicky installations all day long. BUT I want to tell you that installing kitchen cabinets- if you're super-picky like I am- is an amazingly exhausting job. No wonder professional installation is so costly. I believe it takes a pretty skilled carpenter to do this job properly. Getting everything level and square, especially in an old house with out-of-plumb walls and wonky floors, takes an enormous amount of brainpower as well as brawn.
Here's what we did, what we learned, and some tips:
1) Tools: In addition to a 4-foot and 2-foot hand level, we borrowed a laser level... a good one that's self leveling and shoots vertical and horizontal lines. THIS WAS A LIFESAVER. highly recommended! We also had access to bottle jacks, a hot glue gun and thin luan for templating, and a full set of power tools. We had a half-bundle of cedar shingles for shims, and good-quality cordless drills with lights.
2) We used the laser level to find the high and low spots in the floor, to decide where to start. We also marked all the studs. We chose to start with the corner of the L, a 36-inch corner base cabinet. We were extremely careful levelling this cabinet, as it would affect both runs. We used cedar shingles to shim.
3) (We removed the doors and drawers and carefully stacked them with packing material between them while installing. This makes the boxes more likely to rack when fastening them, so you really have to check levels constantly... but protects the doors from tools and ladders and makes installation a lot easier.)
4) We contined installing base cabinets, double-triple-quadruple-checking levels on all surfaces with both laser and hand levels. 5 base cabinets took all of Saturday to install.
5) Sunday morning, we started with uppers, again after carefully measuring our clearances, where the wires for under-cab lighting, etc, needed to be. We examined the trim pieces available and planned out how to fill gaps before we started. Because our range is a TRUE 30" wide, and we needed to leave a bit of space to slide it in, we had to decide how to deal with the uppers above it, whose measurements are exactly 30". We decided to make 1/8" cherry spacers at both ends of the row, rather than on both sides of that 30" upper, so as not to break up the rythm of the gaps between the doors. The 1/8" offset between uppers and lowers is not distinguishable. But that decision alone took about 30 minutes!
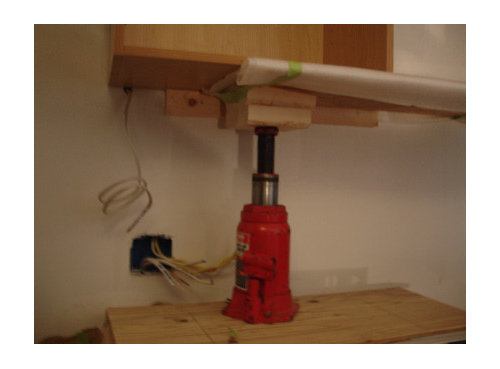
6) We assembled all of the uppers in the run, with the exception of the fridge cabinet, on the floor, carefully aligned and fastened together. We installed temporary cleats screwed to the wall at the line we shot to indicate the bottom of the cabs. We readied a padded plywood support and two bottle jacks to approximately the height needed. Then, DH and our friend hefted the cabinet assembly up to the shims, and we got the bottle jacks and shims in place. We then spent an hour or so leveling, shimming, and fastening.
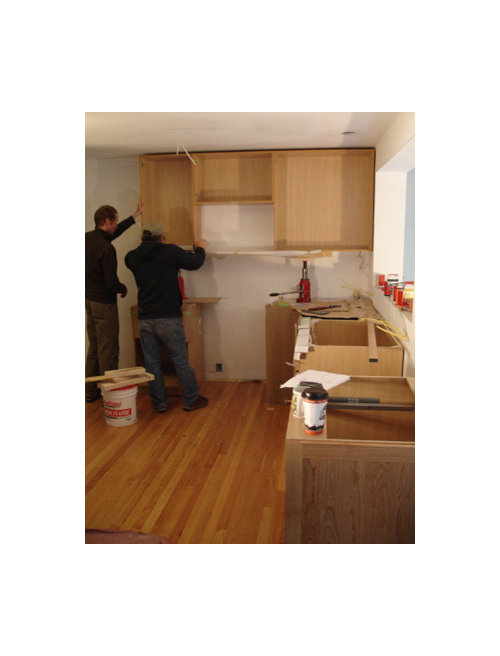
7) Next was the biggest conumdrun: the fridge end cover panel. We probably spent 4 hours on this piece alone. It's an expensive hunk of wood, and we were worried about taking off too much. Yet even after repeated careful measuring, we could not get the geometry right to get it slid into place between the uneven wall, ceiling and floor. Finally DH decided to use a trick they use in boatbuilding, where NOTHING is square or plumb! He used thin (1/8"?) luan strips and a hot-glue gun to make a template. We then carefully cut the panel to fit (scoring the finished veneer and taping it before cutting with a new sharp down-cut blade in the jigsaw). We also cut wedges off the back top and bottom in order to have the "wiggle room" to fit the big panel into the wonky space. Those places are behind cabinetry so never seen unless you pull the fridge out.
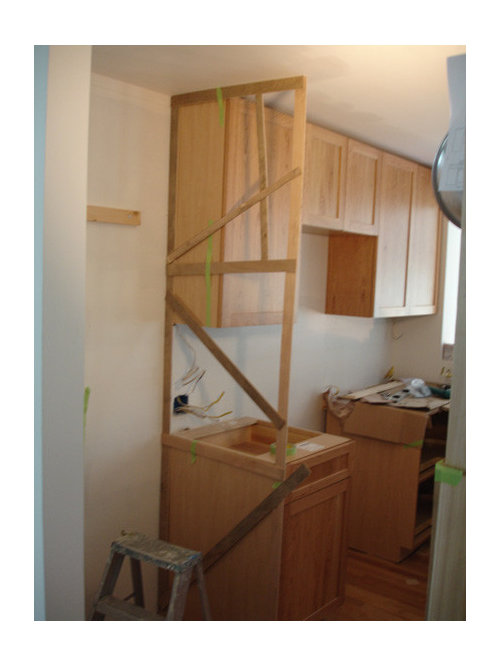
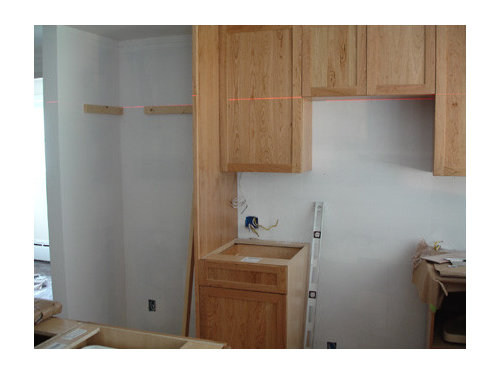
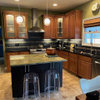
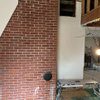
8) The over-fridge cab was also a bear and took several hours. We had to build out blocking on all 3 sides since we were adding small filler strips (we milled down some cherry) around the fridge for a "built-in" look and the box was an inch or so narrower and everal inches shallower. Same techniques: temporary cleats, shims, and multiple levels. (With this one it was just the 2 of us and we also had to make props out of 2x4 and a boathook (!) because we didn;t want to screw a temporary block to the cover panel side). You can see the red laser lines in the photo above.
9) We went around and double checked everything for squreness/plumbness. The boxes do rack when you fasten them, often throeing your careful leveling out of whack when you tighten down the screws. We needed to back a couple of screws off and relieve some of the tension to get everything as perfect as possible.
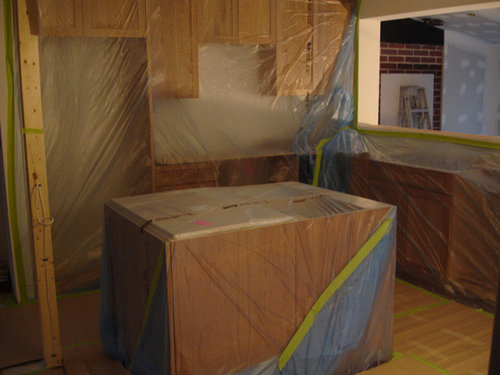
We still have to install the top molding, light rail below, secure the island boxes and put the end panels on the island. Here's what we have so far, covered in plastic to protect from today's final drywall sanding.


chachashea
morton5
Related Discussions
15'X28' Do-it-Yourself Greenhouse
Q
Interested in do-it-yourself vertical structures!
Q
Random things I've learned...
Q
Do-It Yourself Water Softener Installation?
Q
remodelfla
Stacey CollinsOriginal Author
svwillow1
Stacey CollinsOriginal Author
bob_cville
evilbunnie
weedmeister
svwillow1