


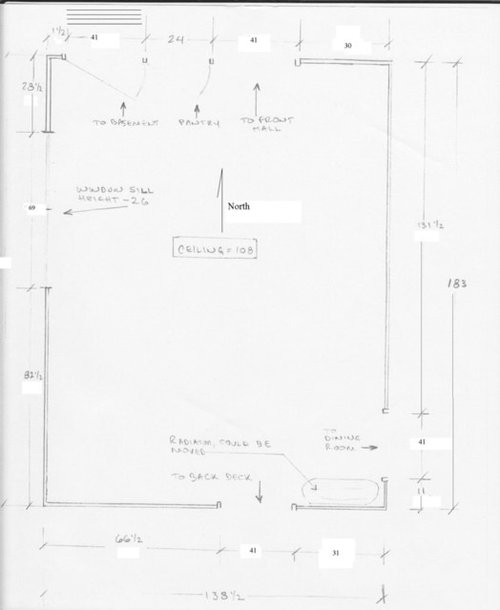
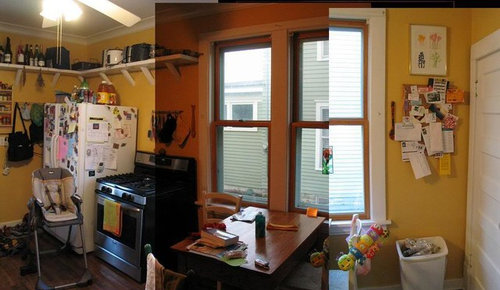
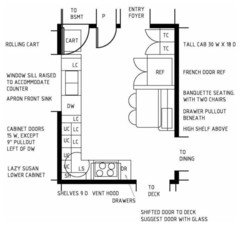
Foursquare Kitchen Remodel - still no good design
davetz
16 years ago
Featured Answer
Sort by:Oldest
Comments (20)

igloochic
16 years agolast modified: 9 years agoRelated Discussions
1930 American Foursquare kitchen (blank slate!)-layout help please!!
Comments (5)Welcome to Kitchens. I drew a peninsula with a clean-up zone, and made the island a prep zone, with a second prep zone between the clean-up sink and range.I'd suggest a small trash pull-out under the prep sink. There are windows on each side of the range. The pantry beside the fridge has shallow shelves for canned goods built on the front of the bump-out, with a tall cabinet with ROTS, and sheet pan storage above. You could keep small appliances on the lower roll-out. I don't like corner pantries as a rule, but this one is where it can do no harm ;). I'd suggest replacing the French doors with a slider, opening left-to-right, to channel traffic behind the island, or moving the doors up beside the pantry. Instead of a more expensive MW drawer, a counter MW could go in the space above the bump-out, with upper cabinets above. That would also leave space for a CT coffee maker. Without the peninsula, you could have an island with seating on two sides, but you would have fewer cabinets and less storage space: If you are using a standard depth fridge, you can pull the cabinets out to the same depth as the fridge box in the above plan, to provide more counter space. In that case, you could have the shallow store for cans I drew in front of the bump-out in the first plan. If you are a fan of banquette seating, you could have built-in benches in the corner, with a mobile cart to add extra prep space and help channel traffic away from the work aisle. benches can double as storage space: Another option, using the extra 3.5': New to Kitchens? Read me first....See More1920 Foursquare Kitchen remodel
Comments (14)One of your layouts shows the top (North) wall at 28'. However, based on the actual "squares", you only have 26'. I used the 26-foot measurement. (It's the "November 3, 2018" layout, 5th comment.) ( Yes I made an error on the width of the addition although we can alter the width up to a certain amount, ) You did not account for wall thicknesses for the bathroom walls. So, I assumed that the bathroom is: ( I measured the actual floor space in the bathroom so we have exactly 6'x6' of floor space in the bathroom) -- 6'0" wide (East/West), including the bathroom walls -- 6'3" deep (North/South), including the bathroom walls – I took this from a note on one of your layouts It does not appear that you accounted for counter overhangs in your layouts (1.5" counter overhangs in front of the base cabinets) ( Yes I forgot to account for them , My plan was rough and just relies on whole 6" amounts LOL ! ) Between the bathroom walls and the counter overhangs, I think you have less to work with than you show. ( see above about the bathroom . I think it will be OK ) You're keeping the Dining Room, correct? I'm asking because a 36"D table is not really deep enough for dinner use. It's fine for a Kitchen Table used for quick meals or snacks, but it's not deep enough to hold serving dishes, etc., as well as table settings. It's also too shallow if anyone is tall or has long legs. (We learned both the hard way!) ( We have always had a 36" wide dining table . That's what we have in our " real" DR too. It's always been fine for 48 years so we'll be good with that. I guess it's just what you are used to . :) ) It also has tight aisles on the North and East sides.I added a 7" bumpout to the window wall. I originally had deeper counters overall on that wall, but the aisles were just too narrow. -- When there's a DW (or DW Drawers) on an aisle, IMHO, I think the narrowest functional aisle width is 45" to allow someone to pass between an open DW door/drawer and the island. It also might allow you to have the dish storage drawers in the island open at the same time as the DW Drawers are open. (More later.) (I will have to think about the aisles wrt to the DW. There isn't a time that we will be having the DW open and anyone will be walking back and forth so I think that won't be an issue. I will have the DW either one standard or the drawers open and unload to the drawers in the island as well as to the only open shelves above the DW . I am planning on all windows to the counter in the rest of the " L".....either side of the cooktop as well. This may change but it is something we are thinking of. As long as aisles are at least 36"-40" I'm good with that. That's what we had at our other house and it was fine. We like to pivot with a small step between the countertop and the island. We use the island as the primary prep space unlike so many that prep next to the cooktop. Will have to give all of this some thought with the new space !! You have given me SO much to think about !! ) -- See MamaDadaPaige's and ErikaNH's windows in this thread:[https://www.houzz.com/discussions/counter-height-window-pictures-please-dsvw-vd~2484108[(https://www.houzz.com/discussions/counter-height-window-pictures-please-dsvw-vd~2484108) The cabinets and counters along the cooktop wall are 3" deeper than standard. This allows more workspace and storage. I added a 9" wide Utility cabinet between the refrigerator/freezer space to ensure you can open the freezer or refrigerator door fully. If you don't need it, then you can add the 9" to the 15" cabinet/pullout next to the sink and put in a 24" cab/drawer base instead. I added depth to the island – if you're going to be rolling out dough or doing other tasks that need a lot of space, I think you will appreciate deeper workspace. It also allowed the addition of more cabinet space – for the extra dishes and crystal. (You can finally get them out of the boxes in the basement!) With that added island depth, a seat could be added, so I added one seat to the island in case you want to sit down while working at some point. It's configured so it doesn't interfere with the Tea/Coffee/Beverage Center since the aisle between the Center and island is only 42" wide. ( I need the pantry cab area to be deeper so that I can have my mixer and grain mill sitting on a main shelf with 2 taller drawers below and shallower shelves behind doors above it. It has to be a 17" tall space x 18" deep at least to hold those. So the island can go back to 36" wide.) ( We are only 2 so we don't need but a short 4'-5' run of area for our mudroom. One bench and a few pegs is all we have now and it's fine.I love the idea of cubbies ! Will definitely do those. There should only be a 48" walkway from the " new " sitting room into the addition .) I also added an 8' row of 18" deep cubbies with seats/benches and drawers under the seats/benches. It could be just one long row, but I thought 2 to 4 cubbies might be nice for some separation for each person. I also thought the cubbies would look nicer than just hooks on a wall. You can add doors, if you'd like to hide any mess. You still have a 53-inch wide aisle (52" if you add doors) – I think that's plenty of aisle width. Oh, note that I closed up the 65" doorway by 13" to accommodate the cubbies. The doorway is still 52" – as with the aisle, I think it should be wide enough. Sliding door to the garden…I was deliberate in its placement. You’re a bit short on aisle space, but if the table and door are placed as I show them, there should be plenty of room to use the sliding door – there's approx. 48" of aisle space between the ovens and the table. If you want even more space, you could move the table against the East wall and add a bench for that one seat. It would free up over 30" of space. The aisle between the table and the North wall is tight, but if you put the sliding side on the left, then it should work. (I was having the ovens well away from the cooktop so that DH will be using that North wall all alone and I will have the ovens and the baking/pantry cab with island to do my thing, If you can think about how that can be made to work. ) . Other items: Coffee/Tea/Beverage Center: It has the under counter refrigerator you wanted. I added a sink since your layout said "wet bar". I recommend a prep sink instead of a bar sink so you can use this space as extra prep space – it has plenty of counter space and a water source. I added a narrow trash pullout (1-bin) since (1) it's always best to have some counter space between the sink and counter edge to minimize splashing and knocking things off onto the floor and (2) I don't think an 18" wide sink base is big enough for a trashcan underneath. (A third reason is that I don't like trashcans under sinks – but that's my personal opinion!) I added a shallow (9" deep) upper cabinet to give you additional storage for the paraphernalia associated with a Coffee/Tea/Beverage Center as well as add extra storage overall (in case the 61"W cabinet under the island isn't big enough for your extra dishes and crystal!). The aisle between the table and Center is only 46.5" wide. This is because of the items I mentioned above (bathroom wall thickness, etc.). It's probably fine when it's just the two of you, but you might consider moving the table back against the wall . Refrigerator/Freezer: I wasn't sure how much space the Twins needed, so I added some space. I know they're 32" wide each and you need 2" or so on each side plus you probably need a bit of space between them, so I used 71" total space. If you don't need that much, add it to the cabinets on the right! ( The TWINS don't have any space between them. So they are 64" with the allowance on either side for opening. I messed up on that at the last house and couldn't get the bins out of the freezer !! YIKES ) . Work Zones/Storage You have three or four Prep Zones: Primary -- between the sink and range Secondary -- to the left of the sink and in the Coffee Center. Both have direct access to water Tertiary -- in the island. There is no direct water source in the island. Baking workspace I think this is where the island excels. It gives you a large workspace for rolling out dough, decorating cookies/cakes, etc. Trash pullout I put it in the island so it's easily accessible from the primary Prep Zone, the Cleanup Zone, the Cooking Zone, and the Baking workspace on the island. ( I would rather have two wide drawer bases in the island for all of our dishes except what will be on the one set of open shelves on the wall above the DW . I don't need another trash pull out with one in the coffee area and one between the cooking and the sink. DH will kill me if we have that much trash LOL ) Cooking Zone: It has plenty of landing space and workspace There's room either to the left of the ovens or on the island Pot & Pan storage is under the cooktop I recommend storing pot holders in the top drawer between the cooktop and the ovens. ( I will have drawer stacks all along the North wall....one in the prep area to the left of the cooktop. one beneath the cooktop and then I had planned the equal 42" area to the right of the cooktop with another drawer stack. We will have a hanging long bar behind the cooktop for the skillets and utensils as we had in our other kitchen.. DH loves having everything right out there where he can see it. . Need to look more at your plans. Your details are SO much better than mine !! ) ( Cleanup Zone: The Dishwasher Drawers (DWDs) are out of the Prep Zone. Dish storage is in the island across from the DWDs Optionally, you could have one upper cabinet for storing glasses. It's offset enough that the DWDs won't be in the way of getting into the upper cabinet. ( OK>.....THANK YOU THANK YOU !! You and mamagoose have given me SO much to work with !! I really appreciate it and my contractor will too. I have leeway as to size of the addition both length and width. I need to print out the floorplans you both have come up with and spend time thinking about it all. The bathroom will open into the walkway /mudroom area. The new sittingroom/old kitchen will have builtins on the sittingroom side surrounding the door. These will be for display of my wood bowls and books. ) ....See MoreFrustrating Foursquare kitchen layou
Comments (23)I like the plan above with the cooking triangle in the NE corner and a cleanup wall on the western wall. But, I measured again and the single window is too far over to line up a prep sink under it - besides which, that would really cut into the prep space. So I think there are two options - a 24" sink cabinet 15" from the fridge, or a 36" corner sink cabinet. The 24" sink cabinet gets me 48" of continuous countertop to the left of the sink (vs. 36 if I use a corner sink cabinet). But it means I have to void the corner and use two 3" fillers. Worse, it seems like the person at the prep sink would feel hemmed in by the perpendicular countertop, and because they are at right angles to the cook, the risk of collision seems higher than with the corner sink. What do you think?...See MoreGarage remodeling advice (siding, colors, etc) for American Foursquare
Comments (8)What a beautiful home. I know you said the garage is gray to tie in with the house foundation, but I don’t think that’s working. I’d do a white garage (like your house trim) with a fancy door like mindshift shows. A cupola and a weathervane sounds good. Your home has enormous presence. In contrast, your garage is plain and appears cheap. Dress it up with some handsome features....See More
davetz
16 years agolast modified: 9 years agoigloochic
16 years agolast modified: 9 years agohatman52
16 years agolast modified: 9 years agoigloochic
16 years agolast modified: 9 years agopooks1976
16 years agolast modified: 9 years agopooks1976
16 years agolast modified: 9 years agopooks1976
16 years agolast modified: 9 years agoheatherseets
16 years agolast modified: 9 years agohatman52
16 years agolast modified: 9 years agodavetz
16 years agolast modified: 9 years agomjlb
16 years agolast modified: 9 years agoayasud
16 years agolast modified: 9 years agolmhall2000
16 years agolast modified: 9 years agolmhall2000
16 years agolast modified: 9 years agohatman52
16 years agolast modified: 9 years agomightyanvil
16 years agolast modified: 9 years agomjlb
16 years agolast modified: 9 years agocerajean
16 years agolast modified: 9 years ago

Related Stories
TRADITIONAL ARCHITECTUREHouzz Tour: Caretaking a Handsome Yonkers Foursquare
Thoughtful updates make a New York couple’s home ‘more of what it already was,’ says the architect-owner
Full Story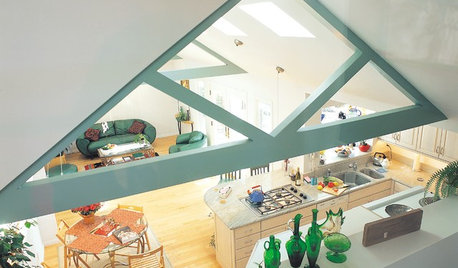
REMODELING GUIDESHome Styles: Why Postmodernism Still Matters
Playful mix of history and irony helped pave the way for today's headline-making buildings
Full Story
KITCHEN COUNTERTOPSKitchen Counters: Granite, Still a Go-to Surface Choice
Every slab of this natural stone is one of a kind — but there are things to watch for while you're admiring its unique beauty
Full Story
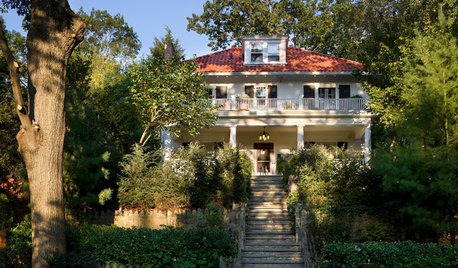
TRADITIONAL HOMESBefore and After: Beauty and Functionality in an American Foursquare
Period-specific details and a modern layout mark the renovation of this turn-of-the-20th-century home near Boston
Full Story
KITCHEN DESIGNKitchen Layouts: A Vote for the Good Old Galley
Less popular now, the galley kitchen is still a great layout for cooking
Full Story
KITCHEN OF THE WEEKKitchen of the Week: Good Flow for a Well-Detailed Chicago Kitchen
A smart floor plan and a timeless look create an inviting kitchen in a narrow space for a newly married couple
Full Story
REMODELING GUIDESThe Good House: Little Design Details That Matter
Tailored trim, cool counters and a nice weighty door — such details add so much to how a home feels to the people inside
Full Story
ARCHITECTURERoots of Style: The Eclectic American Foursquare
The turn-of-the-20th-century style transitioned U.S. residential architecture from the Victorian era to the modern age
Full Story
REMODELING GUIDESGood Houses Are Good Neighbors Too
The best houses engage the world and fit into their surroundings, even while celebrating their own distinct style
Full Story
GREAT HOME PROJECTSUpdate Your Windows for Good Looks, Efficiency and a Better View
Great home project: Replace your windows for enhanced style and function. Learn the types, materials and relative costs here
Full Story
igloochic