SHOP PRODUCTS
Houzz Logo Print
2ajsmama

My first attempt (sample) at a box cushion!

2ajsmama
14 years ago

I decided to use my Goodwill fabric to make a sample box cushion before I used the "real" outdoor fabric - esp. since it's a stripe. Took me all day yesterday (minus 4 hour break for teacher conference, ballet class, treadmill, etc.). Plus another hour this AM to wind a new bobbin, insert it, get the thread to pull up (that must have taken 30 min) and then sew the last seam where I was attaching the Velcro piece of boxing to the top of the cushion.

I started with the largest chair in case I cut pieces too small - used the cushion cover the PO had sewn as template, it was a little big so I pinned it to the size of the seat, then allowed for seam (didn't measure, just eyeballed it), cut 2 pieces the same by folding the GW fabric, then measured my foam (3"), cut one long piece 4" wide to wrap around the sides and front, leaving plenty of space before the back corners. Then cut an 8" wide strip for the back, wrapping around the corners so I had plenty of room to stuff the foam in, folded it in half and cut, then ironed over about 1" on each where the Velcro was to go. I had a big roll of sticky-back Velcro so cut a piece about 1/2" short (again, eyeballing it, I'll measure for the real cover) and stuck it on the right side of one fold and the wrong side of the other, then stitched them down to secure.

Now comes the hard part - I had already sewn the 4" wide boxing (with about 1/2" seam) to one sea piece. Then I had to attach the Velcro pieces to the long piece of boxing and the seat piece. Maybe it would have been easier to sew if I had attached the Velcro boxing to the other boxing first, then sewed the whole ring to the seat piece. But I wanted to figure out how big an opening I wanted so I did the solid boxing first (and didn't get it the same distance from each corner - should have been more careful when I started pinning but I'll do better next time). Then pinned and sewed around the solid boxing to the other seat piece. By then it was time for dinner and I ran out of bobbin thread so finished this AM - sewing the other piece of Velcro boxing to the seat this AM which was even harder - it really wanted to bunch in the corners. That's going to be the bottom side if I ever actually *use* this cover.

I don't think I'll need 8", will try 6" for the closure boxing next time since I had to trim the seams quite a bit when I was done. I think 2" bigger than the other piece is plenty to fold over 1" on each to attach the Velcro. Anybody got any other tips to make the next one easier? I kept hitting pins, bent a few, thank goodness didn't break a needle. And the rounded corners are tough - not too much just attaching the first piece of boxing to the first seat piece, or even the first closure boxing to that seat piece, but boy, attaching the last seat piece was a bear!

I cut the foam (salvaged from my mom's old cushions) to fit in the back corners but left it a little long in front, figured I could trim if it wouldn't fit in the cover. But I stuffed it in, now the cushion is nice and firm, cover fits tightly, no empty corners.
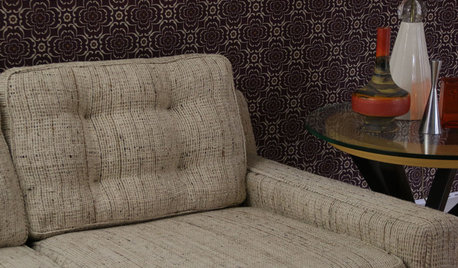
Bunchy corner

Where it all comes together

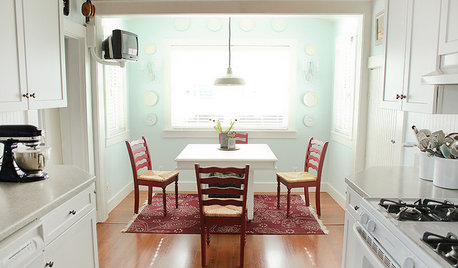
Wrinkled back corner - the last piece to sew
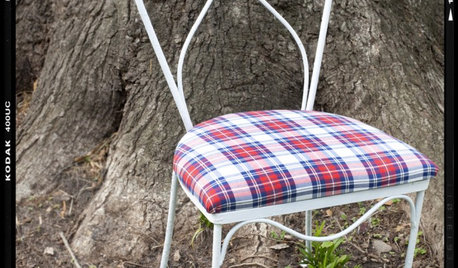
Tada!

It even fits (fairly well - better than store-bought cushion) in the corners! I should have cut the solid boxing shorter on this side though so the Velcro would wrap around more and the seam would be hidden under the arm like it is on the other side

This side looks nice (if I do say so myself!)

I'm still trying to figure out the best way to work with the stripes since I want them to line up in the front - I'd lose the seam on top, but I was thinking of cutting the top seat piece 3" deeper in front (and maybe in back too, and attaching the Velcro directly) and maybe wider on the sides, and then folding in the corners and just sewing a smaller bottom piece on? So 2 big pieces, seam on the bottom where it won't show, no boxing at all? Or at that point should I just wrap the fabric totally around the cushion, sew some side seams and put the Velcro in the back and have what I think is called a knife edge cushion?

Actually, I'm wondering if it takes me a day to make each chair cushion and 2 days perhaps for the settee, whether it's not worth it when I can buy cushions (I have, was going to return) from Target for $10 each (2 needed for the settee). When I was working, no way would I consider making my own. Now that I'm SAHM, what's my time worth? What's having cushions that fit exactly right, in the fabric I like, even if they're not perfect, worth?

Comments (27)

  • sheesh
    14 years ago
    last modified: 9 years ago

    Make cording for the seams. If you don't have enough stripes for bias cording, choose one of the colors. Cording is no more difficult than what you've done already, so go for it.

    I couldn't follow your idea for the velcro, and boxed cushions hold their shape better and have a more finished look. Besides, every time you look at them, you'll feel happy! I do!

    As for your time....well, I sew lots of garments for my kids and grandkids. Clothes are cheap nowadays, but the pleasure I get from making the clothes is enormous. So,yes, it's well worth it.

    Sherry

  • 2ajsmama
    Original Author
    14 years ago
    last modified: 9 years ago

    Cording/piping looks nice, and I found a tutorial on it - if I cut all the pieces for the cushions and the boxing I might have enough to make cording, actually I might have a similar blue bias strip (bought for Ds's baby quilt then decided to just fold over and hem). Though might not be enough for all the cushions and almost 12 yrs later might not find a match!

    I'm a bit intimidated by sewing the cording into the seam though - it was hard enough pinning 2 pieces of fabric together and sewing around the rounded corners (esp. at the end), to try it with 3 pieces *and* one of those a really skinny piece that has to be positioned just so...

    Would you cut 4 pieces of boxing instead of 2, to be able to match the stripes on the front (running vertically to match the top, wrapping over the edge) *and* on the sides (running horizontally again like wrapping around the sides from the top), have vertical seams (no piping) in the front corners? Here's the fabric I want to use just wrapped around the foam (ignore the solid color piece).

    The only piece the sides would even show at all would be the chair that I just made a cushion for out of the solid khaki color, since the weaving is a little more open. All the other chairs/settee have pretty solid arms, but if I have vertical seams on the front boxing on one chair I'd want them on all the cushions.

    I sort of followed these instructions, they explain the Velcro better though I think she goofed adding 2" to half the boxing width for *each* Velcro piece. I'd have to measure the openings where the back meets the arms on each chair and make sure to make the Velcro back piece big enough to hide the seams under the arms instead of having it peek out the side like it did on one side on my sample. I just wasn't even thinking of it, was just trying to make a big enough opening to stuff the foam in.

    Here is a link that might be useful: Matt & Shari - box cushion

  • Related Discussions

    Attempting to post my first pic...

    Q

    Comments (11)
    Patrick, which code to use depends on the internet site. Different sites require particular types of code to be used in threads. Here, full size images will be displayed using the 'tag' code that is automatically displayed beneath each pic in your Photobucket album. That is how usually post single images in threads. There is also a little check box next to each of your pics, and a button at the bottom of each page to "generate html and img code" that creates a new page with code for clickable thumbnails. Use the first line of code for use in this forum (html clickable thumbnails). This is useful if you have a whole bunch of photos to display and don't want to make pages load slowly for those with slow internet connections. They can then decide to click and wait for a full size image, or not. You should see your picture or thumbnail in the preview screen when creating a post here at GW. If not, check the code again before submitting. Once you firgure out which links work, it is easy. I saw some of your garden on another site and am glad to help. I want to see More of your 1/2 acre dry garden. Â Â
    ...See More

    OK Judith.... My first attempt at stacking plates

    Q

    Comments (22)
    bettyd, I think your arrangement looks wonderful! I've never tried stacked plates and hope my first attempt looks half as good. About your camera; I like the warm colors of the third picture best. When I got my first digital camera a couple years ago I would look at my finished pictures on the computer (kind of hard to see all the detail just on the camera's lcd). If I would take a shot like you did, several times in several different ways my computer would give me information when I ran the mouse over the thumbnail picture (such as flash or different icons for other settings I used). Hope I'm not confusing you. There are so many different brands of cameras out there. You have to figure out your own, but it is so much fun in the process. My friends laugh at me because I take pictures of everything! But then, when there's a "good" opportunity I feel like I have practised and am familiar with my camera.
    ...See More

    My first attempt at stacking plates

    Q

    Comments (22)
    Gosh, y'all are sweet! The only problem is that I'm certain the moment I try to move it, everything's going to fall off. I wasn't thinking to decorate it in the place it would be displayed! I've been working on a garland for my loft. I've been to the store no less than 10 times and hit every dollar store in two towns. They only carry 2 boxes of everything I need! So it's still not done! I've always wanted to do it up right for Christmas, but never had the space or time until now. And now I have LOTS of inspiration, thanks to you guys. So now that I'm starting decorating for Christmas, I found out I may be having Thanksgiving here...so what to do with the all the Christmas stuff??? UGH. Now I'll have to decorate for Thanksgiving instead! BACK TO HOBBY LOBBY! :)
    ...See More

    My first attempt at a cream pie

    Q

    Comments (26)
    Murraysmom, there's room for both you and Terri! FYI, if you do use this recipe (others call for pudding mix, etc), you do use almost the whole can of coconut milk. There's an ounce or two in a little container in the frig left over. Maybe 1/2 and 1/2 isn't required, but I use it in my coffee so I always have it on hand. Butter and cornstarch, no problem, cornstarch is a great thickener for chinese type sauces. But I'm sure there are other recipes that are just as good, with the ingredients you have on hand.
    ...See More
  • nicole__
    14 years ago
    last modified: 9 years ago

    OK.....I don't use pins, at all. "IF" you use pins, pull them out before you sew over them. I scotch tape newspaper to the item to make the pattern. I use 1/4" seams, no extra fabric, it fits the cushion exactly. If the foam is 3" wide, your side piece of fabric is 3.5" wide. I don't sew the ends of the side piece together until I'm one inch from completing the circuit. I stop, sew the seam together, then sew the side piece to the cushion. The corners should be cut rounder. The fabric should not pleat or gather to turn the corner. Hold/stretch the fabric with your fingers when turning, it will stand up a little if it's got no flex to it. I use bulk zippers on the back(Hobby Lobby $1.98yd, 18" each for a seat cushion. I purchased a spool of piping & zippers @ a local thrift store). I sew the whole thing with a zipper foot. Piping is a must to get a professional look. :0) Walmart has piping and $1.50yd fabric to practice on. I encourage you to stick with it! :0)

  • nicole__
    14 years ago
    last modified: 9 years ago

    Sorry....you & I posted @ the same time. :0)

    The top & bottom are one piece. The side piece, you start sewing in the front, matching up the stripes as your eyeballing it. The piece in the back you sew ahead of time, find the center and sew into the back, leaving an inch unsewn on each side of the velcro (in your case,a zipper in mine). When the side piece reaches the back, stop, sew the two side pieces together, then finish stiching the side piece to the cushion. See how the stripe lines up? The piping is cut on the diagonal, it doesn't line up with anything. Soooooooooo....you have 2 side pieces, one that encloses the velcro, one that starts in the front and connects to the back piece that encloses the velcro.

  • 2ajsmama
    Original Author
    14 years ago
    last modified: 9 years ago

    Thanks nicole - I like the piping, just seems hard to sew on. Should I sew it to the seat piece before sewing on the boxing? Or do I risk making it look sloppier with 2 seams there? I'll have to check Walmart for cording, our local GW doens't have much for sewing supplies, I lucked out on some fabric (about 3yds of the kind I used for the sample, and a couple of large pieces for throw pillows for my mom) a couple times but that's it. No Hobby Lobby around here, Joann's is a good hrs' drive 1 way, Walmart and Michael's are it and Mike's doesn't even carry fabric though they might carry zippers, etc. My "good" fabric was $2/yd at Job Lot LOL!

    I already ruled out the zippers b/c I already had the Velcro and I thought it might be hard to find (and more expensive than free!) 30" zippers for 4 chairs and 5ft zipper for settee. I've never used a zipper foot but one came with my machine - I'll have to put it on and practice.

    How do you get your pieces to stay lined up, esp. around corners, if you don't use pins? How do you sew it around the corner without gathering it (or having it bunch by itself)?

    About sewing the ends of the strips (boxing) together - I assume you have the zipper in the back strip, you sew the other strip to the seat part, leaving 1" on each end of it. Then do you line up the ends of the zippered part with the attached strip and sew them on, *then* sew one side of the zippered part to the seat cushion? Or do you sew the zippered part on first, then join the ends? And how do you sew the last seat part onto the sides?

  • 2ajsmama
    Original Author
    14 years ago
    last modified: 9 years ago

    Please bear with me - I'm really a newbie at sewing.

    Top and bottom are 2 separate pieces. The front and sides are one long strip - just like I did mine. The back is another strip 2" wider, then cut in half for either zipper or Velcro. So far, I think I did it right.

    Now, you're saying sew the long strip onto the bottom of the cushion - do you leave 1" hanging on each end? Then close the zipper or the Velcro and sew that piece on, leaving 1" on each end. Then sew the 1" (overlap 1/2"?) left on each end of each strip to the closure piece? Then how do you get in and sew the 1" or so where they join to the bottom of the cushion? And how do you sew the top seat piece on?

  • nicole__
    14 years ago
    last modified: 9 years ago

    I think you've got it! :0) You "do" sew the piping on the seat cushion first, both the top piece and bottom piece. Note: I cut the end of the piping an extra inch long, rip the seam back an inch, cut the piping/rope part off, then fold the fabric over the end of the piping to get a finished end.

    Sewing the boxing together: I sew the zipper into the strip, then sew it (centered) onto the cushion back, leaving it unstitched for an inch on each end. Start the front piece,centered on the front, linning it up with the stripes on top, pulling or letting it out to match, then stop, sew it to the velcroed section....:0) Done!

    Keeping pieces lined up: Pull the fabric on top up(uses more or less fabric the direction you pull it) or down, to get it to line up with no pleats AND......since you haven't sewn the back piece to the velcro piece yet,it's a perfect fit front to back. :0)

  • nicole__
    14 years ago
    last modified: 9 years ago

    When your done, it's a closed piece. You have to open the velcro to turn it right side out.:0)

  • nicole__
    14 years ago
    last modified: 9 years ago

    Oh....if buying piping is an issue....use clothes line(I found it at a dollar store).

  • work_in_progress_08
    14 years ago
    last modified: 9 years ago

    ajsmama - the last time I sewed anyting was 9th grad Home Ec. Just wanted to say, I think the cushion looks great. I can't even begin to read of all the advice posts as my head is spinning from the instructions.

    I'd love to see the finished cushions after you have them completed. You've really impressed me for sure!

  • 2ajsmama
    Original Author
    14 years ago
    last modified: 9 years ago

    Aha! I bookmarked this for the bias strip instructions, but didn't pay close attention since I wasn't using a zipper. But do it like this, except after cutting my wider strip in half, iron it over and attach the Velcro instead of a zipper. But sewing on the piping is the same.

    GW didn't like the link so you'll have to copy and paste.

    http://sewmamasew.com/blog2/?p=527

    Nicole just sews the 2 pieces of boxing onto the first seat piece before joining them, but then the final piece is done the same way as in the link. I may even add handles, come to think of it, for hanging to dry/storage.

    I do like the idea of placing the strips (pinned together instead of sewn?) on the foam to line them up with the top pattern and to place the joints so they don't show behind my arms - guess I could just cut the Velcro parts long to allow for placing those side seams once they're centered and sewn on. What do you think of the tip to sew 1" in each corner 1/2" away from raw edge and then clip? Will that help ease the corner?

    If I sew the piping onto each seat piece first, will I be able to "pull" and line up with the boxing? Or just have to adjust the boxing to match the stripes in the front? If I do it with just 1 strip (besides the closure strip) then my side stripes won't match - is this not a big deal since it'll only really show on 1 chair, or should I use 3 separate strips for the front and sides, which means vertical seams in the front corners?

  • 2ajsmama
    Original Author
    14 years ago
    last modified: 9 years ago

    W_i_p - I didn't ever take Home Ec! I did sew a peasant dress for a Girl Scout badge when I was in 6th grade or so, but it fell apart shortly afterwards. I made stockings for DH and the kids modeled on the one my mom made (and I decorated) when I was a teenager - mine needed new lining so I took in out, turned it inside out to see how it was done but they were all cut out freehand (out of folded fabric so 1 seam and front/back matched). I also embroidered quilt squares and made a baby quilt for DS, and a couple of simple sundresses for DD last year but I've got to say this cushion cover is the most involved (pieced!) thing I've made in 35 years since that dress!

    Now DD wants an Easter dress - but I don't think I'm up for that this week. Maybe more sundresses (this time not using the stretchy dress fabric from Walmart, I'll actually try using a pattern). I still want to hire someone to make my LR drapes.

  • 2ajsmama
    Original Author
    14 years ago
    last modified: 9 years ago

    I checked online at Joann's, they have a 3-yd roll of Heavy-duty Make your own zipper - that might just do the 3 chair cushions, I'd need another roll to do the settee (and possibly a back cushion). For the same price ($11) they also have a 5.5 yd roll of just "regular" duty zipper. Anybody use this? Is it sturdy enough for seat cushions with a tight-fitting cover?

    Also looking at cording to make piping - 9/32" looks big, they also have 1/16" but is that too tiny? I don't have a good idea of scale, I'm afraid the 1/16" might look too tiny (and be too hard to work with) on the 40" long settee cushion?

  • nicole__
    14 years ago
    last modified: 9 years ago

    You got it for sure....I see those wheels turning. The side strips "do not" match. Only the front and back can match! On furniture the sides disappear. The sides of the chair hide the fact it's not matching! Yes a handle for hanging up is ok. The wicker is "airy", has natural ventilation, no need really. Here are some outdoor cushions "I" made. Over the years the cushion has started to sag.....

  • 2ajsmama
    Original Author
    14 years ago
    last modified: 9 years ago

    What size piping did you use on that?

  • nicole__
    14 years ago
    last modified: 9 years ago

    Cute little dress you made for DD!!!!! My mom made all my barbie doll clothes to match what she made for me.....hint...hint....:0)

    I just made a cushion for DH's office chair & used a 14" dress zipper,thrift store purchase for .25cents. Problem there .....it's not really long enough, I had to struggle to get the cushion stuffed into the cover. It's strong enough, the back of a cushion shouldn't get pulled on.

    9/32 or 1/4" is fine for piping. You want it to show up! I believe a pkg of clothes line is 10yards....$1~~

  • 2ajsmama
    Original Author
    14 years ago
    last modified: 9 years ago

    Just measured - I've only got 3.47 yds of fabric to make all these cushions, so the piping will have to be in the solid color (bleached muslin). It's going to be tight enough to make the boxing - at least I've got 58" wide fabric and the deepest seat is 20" so maybe I'll be able to squeeze out enough for the sides (definitely have enough for front and back). Not even going to prewash the fabric - when the cushions get dirty I'll just have to spot-clean them, or bring the covers to the drycleaners once a year.

  • 2ajsmama
    Original Author
    14 years ago
    last modified: 9 years ago

    We were posting at the same time. Barbie clothes??? I have trouble enough working with big pieces of fabric, don't think I can work with something that tiny LOL!

    I have a couple of black zippers I inherited along with my mom's sewing box, they're 22" so could do a couple of chairs maybe, though the Velcro piece I used was 30" and I had no problem getting the foam in. I think I'll just order more Velcro from Joann's (50% coupon) unless I can find it locally - I got the initial 15ft at BJ's in RI years ago, I had used some so I need about 5ft more - or I could use snaps on the settee, I have lots of snaps but I'm afraid they'll rust.

    Isn't clothesline really thick?

  • nicole__
    14 years ago
    last modified: 9 years ago

    The cheap clothesline I found was 1/4". I found a BIG roll of piping @ the thrift store for $5. Someone donated all their quilting goods.
    {{gwi:1625317}}

  • 2ajsmama
    Original Author
    14 years ago
    last modified: 9 years ago

    That was lucky! I'll check the dollar store for thin clothesline. If I can't find any can I buy 12 yds from you LOL?

  • nicole__
    14 years ago
    last modified: 9 years ago

    oh yeah.....I looked it up.....it had 760yds on that spool when it was new!!!!!

  • 2ajsmama
    Original Author
    14 years ago
    last modified: 9 years ago

    So you probably have 500 yds, you can spare 12 right (at 1 cent per yard plus shipping LOL)?

  • nicole__
    14 years ago
    last modified: 9 years ago

    Come on over.....I'll share!!! lol I can't believe they sell it in bulk like that!!! Walmart charges $3 for 5yds. This thrift store I go to is da bomb! I just picked up a lamp today, with a shade for $3!

  • 2ajsmama
    Original Author
    14 years ago
    last modified: 9 years ago

    Nice lamp - that would go for about $6 at my GW, without the shade (maybe $8-10 with)!

  • nicole__
    14 years ago
    last modified: 9 years ago

    Do you think this floor lamp is close enough to be used in the same room?

    Here is a link that might be useful: Metal floor lamp...

  • 2ajsmama
    Original Author
    14 years ago
    last modified: 9 years ago

    Bring the table lamp along and see if they're the same color - I can't tell from the pics. If they are, and they're not going to be on the same side of the room, then yes. If not, then no - the styles are too different IMHO to work if the colors aren't close. But maybe you should start a new thread - I'm not the one to ask here, judging by other people's responses opposite to mine regarding ttodd's stemware and clock LOL!

  • dekeoboe
    14 years ago
    last modified: 9 years ago

    If you have to order more Velcro, I would suggest not getting the sticky back kind. Sewing through lots of sticky stuff is a pain because the sticky stuff keeps getting on the needle and creating havoc.

Sponsored
NME Builders LLC
Average rating: 5 out of 5 stars2 Reviews
Industry Leading General Contractors in Franklin County, OH