


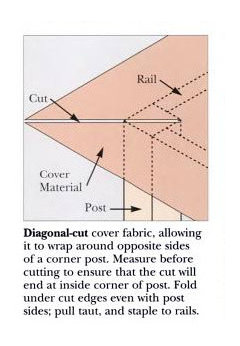
How to upholster around inside corners
franksmom_2010
12 years ago
Featured Answer
Sort by:Oldest
Comments (17)

beausrose
12 years agocliff_and_joann
12 years agoRelated Discussions
frame around pole, pole to be in corner
Comments (5)Just put up the stud walls (up to the post), then overlap the drywall so it meets in the corner. Taping the inside corner should suffice since the drywall will be secure nearby anyway. And since the walls will not be secured to each other, make extra sure they're solidly attached above and below to minimize movement. You could also just glue 2x4's to the pole with liquid nail....See MoreInside mitered corners tile cutting procedures
Comments (4)jim73, whether it's an inside corner or a wall grout line, here is what you do to make it look straight: Use grout as your friend to make it look right later. Use a router blade to sand the edges of the grout line tile edges prior to that. More detailed description is next: When using large tile: before cutting each tile, its space has to be measured individually. As a woodworker you already know how to measure... During cutting you will make cutting errors of 1/16' to 1/8" and this is normal because the wet saw blade cannot make it more precise that that. Just keep laying tile, as you only have X minutes per tile before your time is up and your thinset is too old... If you try to sand down each tile to perfect size you spend time on an operation that in the end was a timewaster, unnecessary. OK, so you end up with an ungrouted tiled wall that has some tile "seams" looking wobbly, to everyone, whether they are a perfectionist or not. The next step is to rectify the seam, i.e. to get a straight looking grout line. To do this you kick up some dust. Using a router blade, run it up and down the seam. This widens the grout line very slightly. Nothing to worry about. You only need to remove the portion of the tile that is visible to the eye, not the whole depth down to the wall. It might take a few seconds. Or almost a minute. Not minutes. Then, finally, later, when grouting, you pack in enough grout that it grips around the tile edge and that grout line becomes the new reference point for people viewing the seam. After grouting, the grout compensates very well for whatever remained of the visible wobbliness of the line. When a wall is ungrouted, and you view it face on, the imperfect nature of the tile "seam" lines to be grouted are most obvious. Don't sweat it. It's something you learn to see beyond instead of looking at it. There is another thing to work at, if you are a perfectionist. The big thing to strive for is to get the flatness perfect so there is no lippage from tile to tile across the wall plane. This requires you to use the same amount of thinset underneath each of your large tiles, and this is hard to do even with a trowel that measures out the amount of thinset, but there are ways to do it... and this is a new subject. Eric pretty much already answered your Q about mitering. You don't need to miter inside corners. One column of tiles will go into the corner and then the perpendicular wall tiles will butt onto them. You can also router this line later if you want to want a visible edge that the grout line will follow, and this makes it appear as though you did indeed miter the inside corner. Good trick if you want to impress your woodworking friends. If on one wall you are laying a column of whole tiles at the corner edge and IF they are not the ones going inside the butt, then you would see a difference with the tiles on the perpendicular wall because its first column of tiles will be cut. There is always a visible difference between tile edges, that are the whole tile edge and a cut edge. So, shave down the whole tile (cut off its edge) and the inside corners will look consistent. Same applies to wall edges. Either a whole tile meets a whole tile or a cut edge meets a cut edge, when you have floor-to-ceiling lines. B.T.W., As a general rule, corners are where you place the tiles that are cut down a little in order to have whole tiles everywhere else. hth...See MoreTrim around the edges of the wall and on the corners
Comments (1)I am not real sure which trim you are talking about. I have the white, that looks like the vinyl coated wall board and I also have the fake wood trim. I too have missing pieces and some places nails are actually sticking out. I simply have pulled the gazillion nails they use and put up real oak trim stained to match what we already have. As pieces fly off, we add more real wood. As far as taking the batten strips off and filling in the gaps, there are many threads on here to help you deal with that. Just make sure you do it correctly for your type of climate. If you have extreme seasons like I do in ND, you will need to do it differently that places like FL where they really don't have different seasons. The house will shift and cause cracking if you don't do it correctly. I hope this has helped you some. If you are looking for a more active site, try mobilehomerepair.com. Tons of people willing to help. I get alot of info there! Good luck!...See MoreHow to do inside corner on office builtins?
Comments (9)Casey, Great pics. But I stil don't understand how to intersect a bookcase that has a 24" lower with a 12" (or so) upper with a bookcase that is ALL 12" (no 24" lower) from floor to ceiling. Maybe there isn't an elegant way to do it because after hours of searching online I haven't found one pic. The room is almost square, 14' wide by 15' long. I want the 12" over 24" on the 14" wall and the regular bookcases on one side 15' wall...See Morefranksmom_2010
12 years agocelticmoon
12 years ago
Circus Peanut
12 years agofranksmom_2010
12 years agoCircus Peanut
12 years agofranksmom_2010
12 years agocliff_and_joann
12 years agofranksmom_2010
12 years agocliff_and_joann
12 years agojb667514
5 years ago
Martin Halliday
3 years agoratherbesewing
3 years agoMartin Halliday
3 years agoJennifer Wilson
9 months ago


Related Stories
HOMES AROUND THE WORLDHouzz Tour: Family House With a Surprise Around Every Corner
If houses could smile, this 1903 New Zealand villa might have the biggest grin of them all
Full Story
BEFORE AND AFTERSBasement of the Week: Surprises Around Every Corner
With a secret door, games galore and walk-out access to the yard, this Prairie-style basement in Minneapolis never fails to entertain
Full Story
DECORATING GUIDESHow to Commission Custom Upholstered Furniture
Learn the questions to ask, the details to discuss and the easiest thing to get wrong on a custom piece
Full Story
DIY PROJECTSMake an Upholstered Headboard You Can Change on a Whim
Classic stripes today, hot pink tomorrow. You can swap the fabric on this DIY headboard to match your room or your mood
Full Story
HOUZZ TOURSMy Houzz: Step Inside a Converted Medieval Priory
The owners of this historical property have used vintage finds and a playful style to create a welcoming family home
Full Story
UPHOLSTERYSeeking a Quiet, Relaxed Spot? Try Upholstering Your Walls
Upholstery can envelop an entire room, a framed panel or a single wall. See some design options and learn what to expect
Full Story
BEDROOMS13 Designs for Your Upholstered Headboard
Shopping for a bed? Here are some ideas for headboard shapes, sizes, details and fabrics
Full Story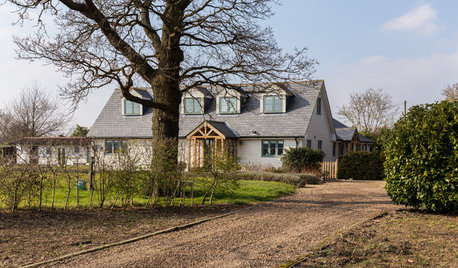
HOMES AROUND THE WORLDMy Houzz: Author Makes Her Home in a Quiet Corner of Hertfordshire
British novelist Freya North refreshes a dated bungalow to create an idyllic country home for her family
Full Story
DECORATING GUIDESDecorating Around the World: Creative Amsterdam Style
Get ideas for the playful details, fearless color and art in these inspiring Dutch homes
Full Story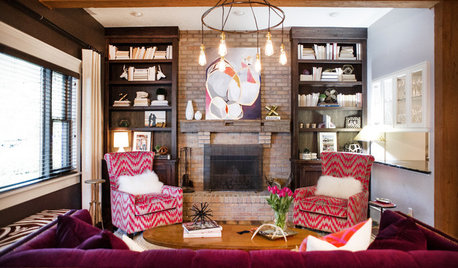
LIVING ROOMSNew This Week: 3 Ways to Work Around a Living Room Fireplace
The size, location and materials of many fireplaces present decorating challenges. Here are a few solutions
Full Story


desertsteph