So I decided to go really big. I now have so many different binds and FT composters that I am getting tired of having to feed them all individually, especially as I anticipate needing more and more as time goes by. I really wanted to have the ease and efficiency of a fabric composter, but have much more space than the "Worm-Inn" funnel shape allows. I had been looking online and at you-tube videos and saw one of the industrial composters that I kind of liked. It was like a big cube made out of metal, electrically heated with a motorized sweeping mechanism that would shave off the bottom inch or two with the flip of a switch. Its basic box shape maximized both capacity and surface area. It's only drawbacks were moisture control (it was metal, not fabric) and it was, of course, thousands, if not TENS of thousands, of dollars.
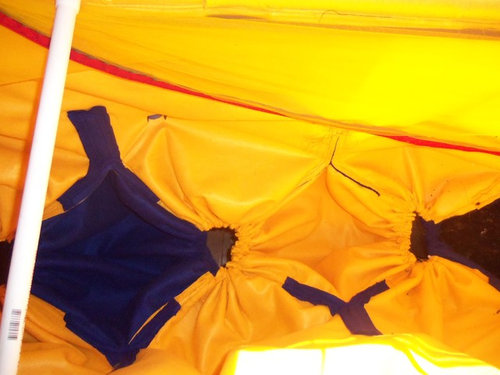
I wanted to see if I could construct something equally awesome out of fabric and PVC. Unlike my former FT fabric vermicomposter, I bought my fabric at the fabric store. I didn't think I would be able to find a ten-yard bolt of the kind of fabric I needed at a thrift store, so I just used my 50% off coupon and bought two whole bolts of Eco-Felt. This is the stuff recommended by the DIY worm-inn instructions online, and I liked it because it is sturdy, breathable, colorful, and made from reclaimed plastic bottles. I constructed a simple box frame out of both fabric and PVC pipe that is ten feet long, two feet wide, and four feet high. On the bottom, I inserted pieces that were 3' X 3' (these are the blue pieces). I cut slits in the bottom of the yellow "box," folded the blue in half, and stitched it to the slits to form an upside-down v shape that ran from front to back at four different places about every two feet along the length of the box. What this did was create five gaping holes that were 7-8' in perimeter along the bottom. I inserted drawstrings and drew them shut, creating an uneven but relatively flat bottom and five different outlets for harvest. I made them really big because I didn't want to lose any cubic footage due to a funnel shape, and because I wanted harvest to be as easy as possible. I've seen the you-tube videos of people trying to scrape hard VC out of a small funnel opening with a mini pitchfork - it looks tedious. I wanted to be able to empty out a single section with the pull of a string, if necessary. I put in 3' drawstrings so that it can be opened relatively wide over a large bin. Two things I noticed: the bottom is definitely not flat. The blue fabric is large enough that the weight of the fabric forms "pouches." However, the unevenness allows me to manipulate it from the bottom if necessary because there is slack in the fabric. Second, the 7+ foot perimeters of the bottom openings did not allow for complete closure with the drawstrings. In short, the bulkiness of the double-layers of felt simply could not be cinched tight like with the funnel shape. By the time I figured this out I already had the whole thing up on the frame, and didn't feel like taking the whole thing back to the sewing machine. So I did what we normally do for new FT composters: I lay down a few layers of paper over the openings and began layering the worm-laden compost, bedding, and food over the top. It worked just fine.
I used velcro tabs to secure the sides to the frame (they are not yet installed in the pictures, but run along the lower edge of the composter) so that the composter would retain its rectangular shape rather than sagging down to the floor. I added a zipper-close mesh top. I found a package of two 7' zippers with industrial-strength adhesive at the hardware store. I had them meet at the center and they were long enough to wrap around the sides. As I mentioned in my earlier post, my sewing machine doesn't jive with industrial strength adhesive, so I stuck the zipper to the fabric and then hand-stitched around the edges to reinforce it.
I made triple-reinforced seams. I laid the two pieces of fabric side-by-side and then overlapped them by at least an inch and a half. I stitched through all four thickness (because this is all double layers of eco-felt) and then went back and stitched another two seams 1/4" on either side of the original seam. I used 100% polyester thread so that hopefully the worms won't eat their way through it.
Here are some pics:
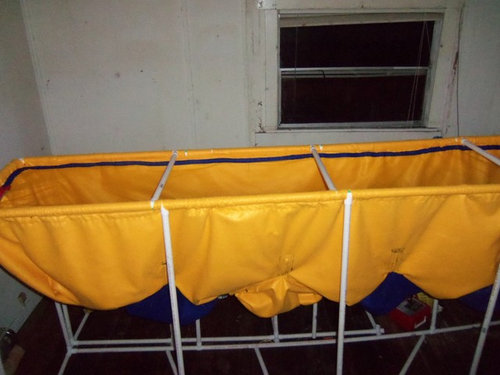
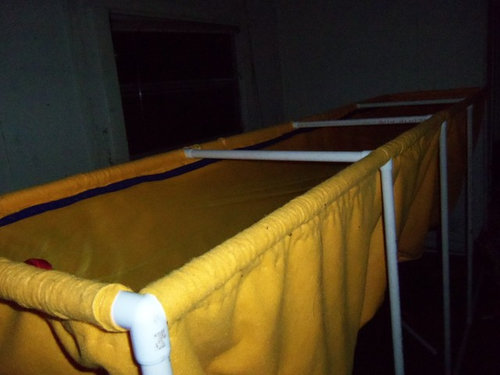
This is the front view - the blue strip running along the back inner edge of the composter is just more eco-felt to reinforce the seam of the mesh. You can see a tiny part of the red zipper on the left-hand side.
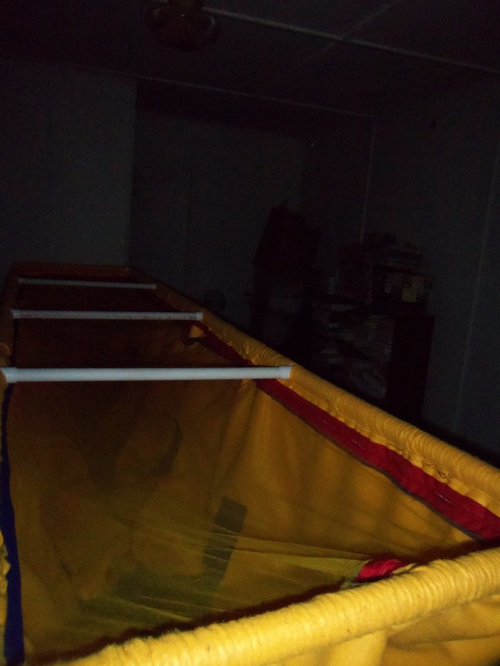
This is the inside of the composter - you can see the drawstring closures which are about 2"-3" wide and the blue pouches. When I went into the fabric store and asked for an unopened bolt, they had limited color selection. I decided to be adventurous and said, "I don't care, so long as it's BRIGHT" - hence the yellow and blue. Why can't worming be eco-friendly AND fashionable? :-P
This structure is in a room that is just 12' X 12', so it is hard to photograph the entire thing. This picture shows the length, with the cross-beams for support. You can see that I built in an extra-wide seam so that the 3/4" PVC could slide all the way through the fabric, distributing the weight. I used open T PVC joints and spaced slits in the top of the composter so that I could slide an entire 10' PVC pipe along the edge. I wanted there to be as few joints as possible to keep the weight evenly distributed and maintain the integrity of the structure. In short, wanted as few weak points/stress points as possible...if this thing falls down when it's full, it ain't getting back up again. Best not fall down in the first place.
Here's another view of the length, where you can clearly see the mesh top and the red zipper. The two zippers meet in the center of the 10' side so that I can open one side or the other.
In this picture you can see the inside of the composter with the mesh open. I am starting to load it and you can see some compost on the right-hand side. I'm not going to try and fill it all at once, but if/when I have enough money to buy a bulk order of worms, I'll have a place to put them.





mendopete
PeterK2
Related Discussions
New at composting?
Q
fabric scraps in compost pile?
Q
Mel's Mix: My Compost Variety, is it ok?
Q
My new FT Vermicomposter
Q
PeterK2
mr_yan
equinoxequinox
equinoxequinox
morgan_3
Worms4TracyOriginal Author
morgan_3
mr_yan
Worms4TracyOriginal Author
equinoxequinox
reyas