HFGH 10x12 doors
16 years ago
Featured Answer
Sort by:Oldest
Comments (12)
- 16 years ago
- 16 years ago
Related Discussions
modifiying the 10x12 hfgh
Comments (11)hi, its been a long time, but i would love to see the pictures from your build! my HFGH just arrived today and I'm so excited to put it together without crying! Your profile on photobucket is set to private, would you mind sending me a link? thanks!...See MoreHFGH 10x12 Door
Comments (3)The latch that I used was for a tool chest like you see on pickup trucks. I got it at the same surplus store as where I got the little windows that I put in the back. The latch has a J hook welded to a bolt with a handle on the end. I can turn the J hook and adjust it to the proper length so I can just hook it on the one door and cam it over and the door is snug against the rubber strip and the strips on the door ends are tight against the GH framing. Pull the doors shut and measure the gap and buy a rubber strip that width. A shed latch probably would work but it will be a little big. What I have is small and looks nice on the door. I use a small padlock it has worked really well for me. Maybe you could find something similar just shop around and see what you can find. GOOD LUCK...See MoreHFGH 10 x 12 Playing in the traffic.
Comments (10)This is my reply from Harbor Freight. Part # 9HOCGH1-52 PANEL CONNECTOR--current price $1.00 Part # 9HOCGH1-55 REAR SIDE PANEL--current price $12.65 Part # 9HOCGH1-58 WALL PANEL--current price $10.51 Part # 9HOCGH1-63 FRONT SIDE PANEL--current price $10.70 I can order the above parts you are requesting. I will need you email back with your full name, billing & shipping information and how you would like to pay for the part. (Due to security reasons, we do not accept credit card information through email). Or you can contact our Customer Service Department at 800 444-3353 and they can assist you in placing the order. Please note, the part you are requesting will need to be special ordered from the Manufacture and will take approximately 6 to 8 weeks time for delivery. Thank you for your email inquiry. Thank you Ellen Marie Piles Customer Service...See MoreModifing the 10x12 HFGH
Comments (0)Since their seems to be a never ending demand for information on how to modify the 10x12 HFGH I have decided to put up a post with everything all in one location. This GH as it is shipped needs several changes to it if it is to survive in a storm. You will need a minimum of tools but a cordless drill is a real time saver get one if you don't have one. The main problem is the way the wall stud is attached to the base and the fact that the base is so flimsy. The wall stud attaches with a J hook it hooks under a lip on the base. The base is bent with a lip then bent down again were the J hook goes this is a poor design when the wind pushes on the wall the lip will flex. This is easy to fix I used three ways to dramatically improve the strength of the base. Since the base is made from thin metal I would not consider putting it into the ground like the instructions say. Make sure you put it on a foundation of heavy timbers this will keep it dry and give you something strong to anchor to I used treated 4x4 timbers for the foundation some use heavier timbers but it is not really necessary a 10x12 is not big enough to need anything bigger. Assemble the metal base measure from corner to corner to make sure it is square then take measurements for length and width so you know what size to make the foundation because the dimensions in the instructions are WRONG !! I used long lag bolts to assemble the foundation and then used two 8ft. treated 2x4 and cut them in half. I put a 4ft. piece diagonally across each corner this will keep in square. Make sure the timbers are square before putting these on. After they are attached turn the timbers over and bolt the metal framing to it making sure it is square before bolting down. I put a piece of polly tarp between the metal base and the treated timbers to protect the metal from a chemical reaction between the timbers and the metal base.. DO NOT use cad plated bolts in the treated timbers it will eat them up..I used "x21/2" stainless steel lag bolts with one in each side of a corner and every two feet on all sides be sure to use quarter inch flat washers. After I got my GH sitting where I wanted I drove metal fence posts into the ground in all four inside corners. I torched the posts in half and that will give you about 30 inches per stake Some people put the roof on the framing one piece at a time. This means you will need to work from a tall latter to install the clips that hold the roof panels on. You would have to work through the openings in the rafters. I assembled mine and then used 2x2 pieces of wood bolted at the roof ends and two C clamps at the center this way we lifted the roof up on the frame and bolted it on all in one piece.. This requires four people to do. If you have the help it works pretty good but if you must do it alone then you will need to assemble it one piece at a time up on the framing. The reason I assembled my roof on the ground was it made it easy to install the clips and screws in the center of the panels. The photos show the corners where I used a 1 1/4" square tube and a piece of 1 1/4 aluminum angle and bolted it to the base and the corner stud. I run bolts in from both sides so it is cross bolted and then bolted to the base. This will make a big difference in the structure. Make sure that you drill one hole lower so as not to interfere with the top bolt as they must cross each other to secure the corner stud from both directions. I bought aluminum flat 1 1/2 wide 3/16 thick cut and drill so they can be bolted up to the lip on the inside of the base. I used a hex head # 10 self tapping metal screw. This ties the top lip to the bottom and since the bottom is bolted to the heavy timbers it is sturdy. The flat piece should be placed under the wall stud make sure you have a lag bolt through the base into the timber at this point If you have the timbers used for the foundation flush with the inside of the base you will have a ledge on the outside I used this to install some L brackets see photo these are just heavy corner brackets available at a lot of stores. Two photos show how I used aluminum angle to hold the pool cover on the roof. Many have posted that they could not keep the cover on this one will not blow off no way for the wind to get under it. Put the thermal blanket on the roof over lap all sides a little pull it tight then lay the aluminum angle pieces tight against the roof rafter clamp in place then use a #8 self tapping screw and secure the angle piece to the rafter and then with a sharp knife trim off the excess. - The back wall will flex this is due to the poor design. I used heavy L brackets and self tapping screws to attach them to the rear corners and then cut a 3/4" EMT tubing to correct length and flatten a couple inches on both ends and bolt it to the L brackets. Mount it against the wall use T bolts and 3/4" PVC U Clamps to secure it to all the wall studs. The T bolts go in the channel of the wall stud. I used ¼" bolts and used my bench grinder to make T bolts from them. You can also buy them from Charleys but with shipping they are costly. The U clamps are in the same place as the EMT tubing at Lowes. I found the best price and availability for stainless steel bolts was Fastenal if you have one near you they will have what you will need. Instead of the EMT tubing you can also use aluminum channel if you prefer and it could be even stronger depending on the size channel used. Order some of the heavy clips from Charlies and add them to what comes with the GH but you will need to secure the center of the panels because if the door is open and a gust of wind goes inside it will cause the center of the panels to bow out and this will make the panel shorter it will pull out from under the clips and you will have to go to your neighbors to get them back. I used #10 x 5/8"self tapping screws with a neoprene washer on them. Put them in the center of the panels drive them into the horizontal bracing part # 30.. The neoprene washer will allow the panel to move from temperature changes and will seal out rain water. If you live where you get a lot of snow you could do what I did and put ¾"EMT tubing on the roof rafters. I used ¼"T bolts and U clamps to secure it to the roof rafters. I installed them about half way between the side wall and the top this will help prevent the roof from trying to bow and it also makes something to put hanging baskets on in good weather or use drop chains to support grow lights.. On mine when the doors were closed their was a gap between them. I cured that by putting a piece of weather stripping on one door. Photos of the windows and ceiling fan have nothing to do with the strength I just put them in so you can see how I built mine. When these photos were taken it was not done yet I don't know if you ever get done. The original Instructions were full of mistakes but they have been updated since I bought mine but their are still some problems with them. If you run into a problem their are several on this forum that have built them so you can get help here. Also use the search feature and do a search for HFGH this will bring up a lot of posts on this subject. I would strongly urge you to locate this GH where it has a wind break from the prevailing winds. Some of the things that I have outlined here could be done different but this is how I did it and their have been several others who have copied it with great success I bought nearly all of the material for the modifications at LOWES for a cost of about $ 100.00 so with a little effort on your part you can build the equivalent of a $ 3000.00 GH for less than a $ 1000.00 Photos of modifications can e found here. Information provided by: Gardenerwantabe...See MoreRelated Professionals
Birmingham Landscape Architects & Landscape Designers · Cary Landscape Architects & Landscape Designers · Cottonwood Landscape Architects & Landscape Designers · East Rancho Dominguez Landscape Architects & Landscape Designers · Rancho Palos Verdes Landscape Architects & Landscape Designers · Southfield Landscape Architects & Landscape Designers · Jackson Landscape Contractors · Eureka Landscape Contractors · La Mirada Landscape Contractors · Lees Summit Landscape Contractors · Leicester Landscape Contractors · Woodland Landscape Contractors · Winter Gardens Landscape Contractors · Raytown Landscape Contractors · Tarpon Springs Solar Energy Systems- 16 years ago
- 16 years ago
- 15 years ago
- 15 years ago
- 15 years ago
- 15 years ago
- 15 years ago
- 15 years ago
- 9 years ago
Related Stories

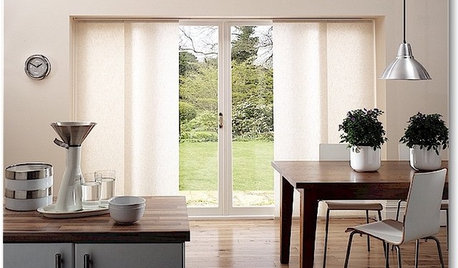
DOORSThe Art of the Window: 12 Ways to Cover Glass Doors
Learn how to use drapes, shutters, screens, shades and more to decorate French doors, sliding doors and Dutch doors
Full Story
REMODELING GUIDES10 Extraordinary Door Designs
Perk Up Your Look With a Hidden Ping Pong Door, Bookcase Door and More
Full Story
ARCHITECTURE10 Custom Doors That Uncover Meaning
Break out of the standard-door rut by learning a significance that few people ever consider
Full Story
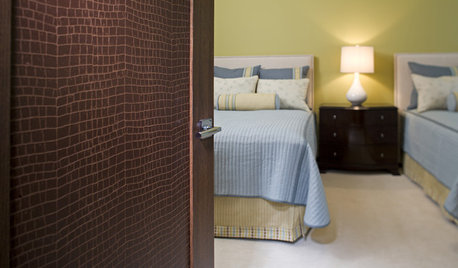
DOORS10 Cleverly Crafty Ways to Refashion a Door
Enter the world of faux croc, nailheads and wallpaper to bring imagination and liveliness to a plain door
Full Story
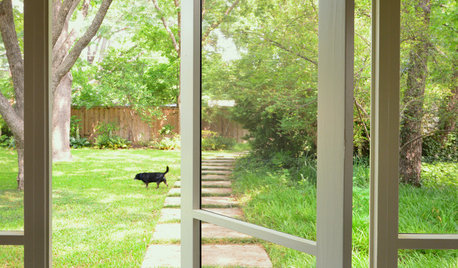
DOORS10 Ways to Work Screen Doors, Inside and Out
Take this functional feature up a notch with one of the many alternative door styles available
Full Story
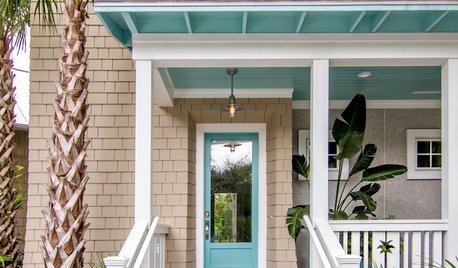
CURB APPEAL10 Unexpected Color Schemes for Home Exteriors
Give your home’s face a brand-new look with paint picks that go beyond the everyday
Full Story
CURB APPEAL9 Daring Colors for Your Front Door
Stand out from the neighbors with a touch of neon green or a punch of hot pink
Full Story
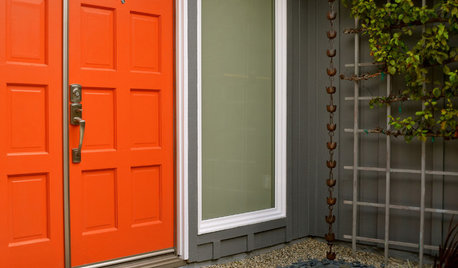
MOST POPULARHow to Choose a Front Door Color
If choosing a door paint isn't an open-and-shut case for you, here's help
Full Story
FRONT DOOR COLORSFront and Center Color: When to Paint Your Door Black
Love the idea of a black front door? Here are 8 exterior palettes to make it work
Full Story
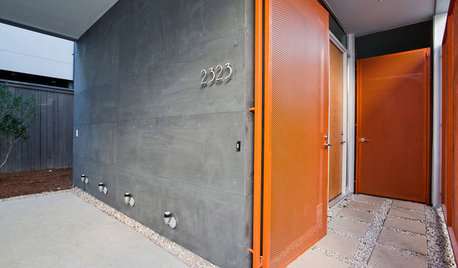
FRONT DOOR COLORSFront and Center Color: When to Paint Your Door Orange
Bring high energy and spirit to your home's entryway with a vibrant shade of orange on the front door
Full StorySponsored
More Discussions
tominnh