

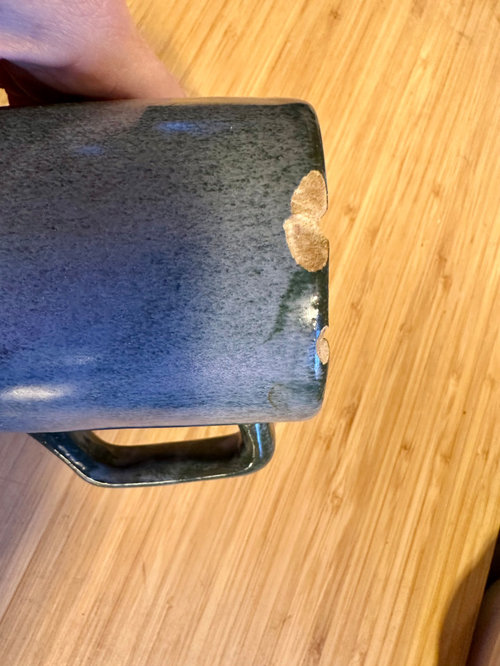
Any hope for my chipped glazed (Favorite) mug?
6 months ago


Featured Answer
Sort by:Oldest
Comments (39)
Related Discussions
Running out of hope/ideas for my Meyer
Comments (9)Hi all, Thank you for your input. First of all to clarify, I did re-pot this tree last summer (August) after a few months of decline. I transplanted into "basically a 511" mix, which means that I didn't screen the bark and added more of a locally produced potting soil which is supposedly formulated for Seattle weather. I didn't wash the old mix off the roots. When the tree kept declining I really regretted the mix I'd put it in (too dense/wet, I thought) and so re-potted this spring carefully screening all the components of the 511. I also washed the roots and discovered that the center of the root ball was hardened silty-like soil that was basically like cement, but I managed to dissolve and chip away at it without damaging the roots. I thought this was probably the old-old mix that it had been in too long. I was so worried about hurting it when I re-potted last summer that I didn't attempt to wash the old soil off the root. So when I discovered the petrified soil I though that maybe it was the source of the problems? Also, I thought I'd read that trimming the roots lightly actually stimulated growth, but one would need to do the same with the foliage to balance things out. Did I completely misunderstand this? If so, I feel terrible!! The tree is outside in my greenhouse and has lived outside it's entire life. It's really chilly, windy, and rainy here, so I want to keep it in the greenhouse until our weather calms down and warms up a bit. We did have a week of nice weather and the greenhouse got hot, which is when I moved all my trees out, and then when it got cold and windy I stuck this guy back in. The ironic thing to me is that this was my first citrus tree, purchased from a Home Depot-like store. It had been living in regular potting soil and doing great when I lived in Oakland. When I moved to Seattle years ago, I re-potted it in Gardener & Bloome Acid Planting Mix, and it loved that and thrived. Last time I needed to re-pot, I couldn't find that mix and used just the local supposedly-good-draining mix (which I've since realized hasn't been good for any of my other container plants, so I've completely stopped using it) The tree was stellar, until I tried do become educated!! (although my other citrus seem to have benefitted). Two other things I wanted to mention. It has tiny holes in the bark and also some lesions. They aren't new at all, and there doesn't seem to be any borer or insect activity, plus, the branches are still green, but still I wonder? Could it be something systemic? Also, since last year, the leaves have kept getting smaller. They are much smaller than my other Meyer leaves. Is this some kind of deficiency, or just the fact that it's somehow not getting the nutrients it needs? I gave it two separate foliar fert applications about a week apart after I re-potted this March, and it seemed like the leaves got yellower! The last time I tried using the wooden dowel method to water it, the skewer was damp, but the leaves looked like the were wilting. I watered (with FP) and it perked right up. Maybe I haven't been getting it evenly watered? I feel like I'm starting to just become crazy about it, and maybe I need to just chill out and leave the poor thing alone, but if it dies becomes of something I didn't do for it, I would just be too sad. Sorry for the long post, but I'm super upset about this and trying to paint the picture so as to give you pros the info you need to diagnose. If there was a citrus ER, I would take it there right now. Thanks everyone, I really appreciate your input....See MorePlease help me with glazing my painted cabinets
Comments (11)I took the doors down, and the handles off, I did leave the hinges on( lazy I know but you are only swiping glaze and I was careful) I cleaned them with ammonia and water with a drop of dawn. A professional painter may recommend something different but it worked for me. The gel stain was Minwax. I used Aged Oak (medium warm brown) which I think would be a nice color and would consider for my own green buffet. I did thin down the glaze slightly with regular paint thinner so it wasn't so gel like and it moved around longer. I think if you wanted to go with the gel I would thin it a bit too, it'll spread faster aqnd give you more working time. My first coat was Aged Oak slapped on lightly and evenly. It did change the red hue from red to a red brown, but when I wiped off it left barely no noticable difference in the original color of the red or if it did it was so subtle I didn't see it. I would slap on glaze/gel over entire door. With old towel wipe off everything but what you want to remain in crevices and let dry. You can always go over them again if you want them darker or browner. I would say offhand maybe 1 minute to slap on, three minutes to wipe off and finish? Dab with towel in hard to reach corners. My process was two parts, one for the brown glaze, one for the mahogany. Then I did do one coat of poly. I'd say you could do it in a weekend. Thursday night wipe down cabinets, take down doors and hardware, set up work area. Friday glaze and let dry(I would do the cabinet face frame too just in case there is a slight tone difference- after the glazing just wipe it completely off) Saturday poly. Sunday morn rehang doors. I did mine over Martin Luther King weekend. It went fast. If you have some old painted boards do a few practice slap on's and wipe off's. Plus you'll be able to see if the wiped off glaze does leave any noticable color behind. If you have painted cabinets then you certainly have the skills for this, it's just a more one door at a time project, than painting all the cabinets all the same color, each door is it's own project....See MoreMy Whitehaus farmhouse sink arrived! Is this little chip ok?
Comments (6)I believe the stepped lip is "supposed" to be the front! It also looks a lot more comfortable to lean against while washing dishes. As for the reinforcement grids (chips on bottom), they appear to be superficial chips - not ideal, but probably not a problem. Make sure there are NO hairline cracks emanating from them though - if there are ANY cracks (not chips, but fine CRACKS), return that sink ASAP because that will be a disaster waiting to happen. You bought the sink on Ebay, so I hope for your sake there are no cracks! Do contact the seller and report the chips though. Was that mentioned in the listing? If not see what they say. I highly doubt that happened during shipping - that kind of damage would happen on the edges, not the middle of the bottom. Either it was already chipped when listed (and they failed to mention that, listed with different pics), or it happened when they packaged it for shipping. Either way it is their fault, so see what they say. Maybe get a refund for the shipping cost? I assume it was insured, but you'd have to return it to get the post office to pay the insurance claim. If there are no cracks and they refuse to deal, give them neutral feedback with details of the chips in the info section. It will be very useful info for future buyers. Here's a tip - plug the drain hole with a silicone or rubber drain plug (hardware stores sell them, I believe) and some silicone caulk (let dry), fill the sink with water, mark the top of the waterline with some painter's tape, and let it sit (in a bathtub) for 24 hours. If the water level does not go down you should be fine....See MoreMy Adenium in coco chips experiment
Comments (33)this really IS interesting...SLD, if your coco chunks were still damp, but not wet, like tapla used to say, 'like a wrung out sponge', that's a good thing!! Especially since you mentioned you've had a ton of rain. What is your goal?....growth & no rot?....with as much rain as you've had, I'd say you're doing really well with this experiment =D I think my chips are too big for my climate & wanted to heed warnings about the finest coco stuff (texture of peat) being too water retentive for Northeast, so somewhere in between is probably a good place to start for me. Repotme.com has 1/4 inch and 3/8, both easily half the size of the chips I have now & probably what I would need. I think I'll mix the big ol bag of chunks I have now into the garden & get the wee stuff. What I bought was pretty small, but could be smaller still. Yes on the diatomaceous earth....it's texture is like the chalk you might use in the gym, loose and messy. I sprinkle heavily on potted or indoor only plants. I don't want it in my garden, because it's disruptive to beneficials as well as pests. Right about now, I start surveying all who will come inside and how....they are prioritized into groups, and I begin to treat for pests, set up their winter homes & prepare for a freak cold snap. Last minute re-pots are done, trimming etc. Since roots are rarely injured with such a loose mix, and I keep mine as dry as I can, I re-pot and prune kind of willy-nilly, (disclaimer) not recommended unless you are willing to take the chance or like me, know your odds....See More- 6 months agolast modified: 6 months ago
- 6 months ago
- 6 months ago
- 6 months ago
- 6 months ago
- 6 months ago
- 6 months ago
 6 months ago
- 6 months ago










Related Stories
GRAYDesigners Share Their Favorite Light Gray Paints
These versatile neutrals can help create a range of moods in any room
Full Story
KITCHEN DESIGN5 Favorite Granites for Gorgeous Kitchen Countertops
See granite types from white to black in action, and learn which cabinet finishes and fixture materials pair best with each
Full Story
MATERIALSAre You a Maker? Show Us Your Favorite Tool or Material
Houzz Call: A tool or material can be a maker’s best friend. We’d like to see your favorite — and what it helps you achieve
Full Story
KITCHEN CABINETSDesigners Share Their Favorite Looks for Kitchen Cabinets
Two-tone color schemes and low-profile hardware are among the trendy cabinet looks these designers are loving
Full Story
KITCHEN DESIGN5 Home Cooks Share Their Favorite Family Recipes
Peek inside the kitchens of these Houzz users and learn how to cook their time-tested, passed-down dishes
Full Story
PRODUCT PICKSGuest Picks: Mugs to Suit Every Taste
Winter means hot drinks, and everyone knows that a hot drink tastes better in the right mug
Full Story
ORGANIZINGPin Your Hopes on Pegboard for Winning Organization
Highly versatile and budget friendly to boot, pegboard is a champion in the battle to stay organized. Here's how to use it with style
Full Story
MOST POPULAR12 Key Decorating Tips to Make Any Room Better
Get a great result even without an experienced touch by following these basic design guidelines
Full Story
BUDGET DECORATINGHow to Refresh Your Kitchen on Any Budget
With the right ingredients you can make this key room more stylish and functional, whether you spend $100 or $10,000
Full Story
KITCHEN DESIGNCoffee Bars Energize Any Room
Love coffee? Wake up to these great designs for a café-style area in the kitchen, guest room and even bathroom
Full Story

Sherry8aNorthAL