


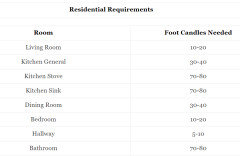
Can someone explain track lighting to me?
Debbie Downer
3 years ago
Featured Answer
Sort by:Oldest
Comments (13)

Debbie Downer
3 years agoRelated Discussions
Hybrid Musk Pruning - Can Someone Help Explain This To Me?
Comments (8)The older I get, the less energy I have, the less my roses need pruning at all. That is my new axiom in gardening. I think pruning is largely a matter of fitting the plant into the space allowed in the garden. The older I get, the less critical my jaundiced eye becomes. This year I had very little time for pruning and consequently many roses did not get pruned. One of those was Penelope. I have never seen her look better. Odd, isn't it? Then again, this year I managed to prune Ballerina before she leafed out (haven't got to her the previous two years) and she looks about the same as always. More and more I think that pruning the diseased canes and dead one (but only if you have to--the dead canes will be discarded by the plant eventually) works best for me. Buff Beauty who was moved last spring and pouted was not pruned and he looks pretty good as well. (Why BB is a he I don't know). Course, his looking good is really a matter of sprawling wherever he wants and that's exactly what he is doing. Now mind you, pruning only diseased canes can be a matter of cutting to the ground depending on the location of the disease, and this year I have a couple of those. Anyway, my advice on Hybrid Musks (and any rose for that matter) is prune diseased canes, step back, take a look, and prune for shape depending on placement in the garden. Don't forget to have the beverage of your choice when its over. Celebrate the work and enjoy your results....See MoreCan someone explain the JD craze to me??
Comments (139)Well guys, We still live in the house we bought to in 2014 in order to move Donna's aging mom who was (at that time) showing symptoms of dementia. The dementia progressively took its toll on her mind, and then in October of 2016, she was diagnosed with stage 4 bladder cancer. She lived until early February 2017 and died here at home with us, as she wished and she had made us promise not to let her die in a hospital or nursing home. She died surrounded by family and a hospice nurse was present. I only relate this story because Donna's mom's health situation was the reason we bought a house big enough for all of us to live in, under one roof.........and the subsequential multiple projects and renovations.........were the reasons I dropped off of the forum. As soon as we moved into the house, I had a long list of things that HAD to be done, and a long list of lesser things we WANTED to do......so my time on the forum just could not be justified.....I simply had too much to do. The first things to be done were to come up with safety measures to help prevent an elderly woman with dementia from injury by being proactive about preventing her from "escaping" the house. I had to equip all exit doors with a deadbolt lock keyed inside and out (all keyed alike) and we had to come up with a nearby "hiding place" close to each lock location for spare keys in case of emergency. This house has a full basement with stairs, and we did not want her mom to have access to the stairs, so I included the same deadbolt on that door too. The sliding door to the second floor deck was a challenge in that it had a key lock on the outside ONLY with just a paddle lock lever on the inside. I had to come up with a way to make that door lockable with a key from the inside. My solution was to remove the lock assembly from the door and "reverse" location of the paddle lever plate and the key tumbler plate, so that the key tumbler would be on the inside. I stripped out the guts relating to the paddle lever and covered the hole where the paddle shaft came through with a small brass plate.....heavily epoxied in place from the backside (inside the door). All you can see from outside is a small hole blanked off with brass. The deck is on the second story on the backside of the house with stairs leading down the the pool, which is enclosed inside a fence, so we never use the sliding door as a "key entry" point anyhow. Then there is the attic storage space epic adventure. The attic space when we bought the house, was almost non-existent. There was a total of 4 sheets of 4' X 8' plywood (128 sq. ft.) on the joists at the top of an extremely rickety pull down wooden stairs. Stairs were the first to go. Replaced with a sturdy aluminum pull down folding stairs. Then I hauled 22 4' X 8' sheets of 3/4 OSB into the attic space.(each sheet was cut in half lengthwise to fit through attic stairs opening). We now have about 800 sq. ft. of usable attic storage space. I built 2 inverted trusses (strong backs) to attach to the joists on the sections spanning the 12' kitchen and the 18' den. These trusses ensure that the load imposed by the extra OSB and stored material are ultimately borne by the load bearing walls at the hallway, den, and both walls of the kitchen. The addition of the trusses assures that the ceiling joists do not assume a sway back shape over time resulting in cracked ceiling gypsum board. I assembled the trusses in the attic and fabricated them to have about 1/2" "preload bow" on the 18' truss and 3/8" preload bow on the 12' truss. This was to ensure that the trusses were actually carrying some load right from the start. After I got the trusses built and fastened onto each joist they served with metal strapping, I built a 30' long, 2 tier shelf system into the truss structures. Shelves are 24" wide and the bottom shelf is 20" off the floor, while the second shelf is 46" off the floor, so you have the attic floor under the shelves, and the 2 shelves themselves for storage, That yields 180 sq. ft. of space, plus the remaining 720 or so sq. ft. of attic at various head space. The tallest overhead clearance is about 6'2" at the rafter collar ties (and I added collar ties so that every rafter has a tie, instead of every third rafter as the house was built). There were 4 rafters that had "split" open due to improper orientation by the rough carpenters. They had placed rafters with knots situated on the lower chord of the rafter (tension side), which is a no-no. These rafters had to be jacked back into place and reinforcement panels of 3/4" plywood "scabbed" onto each side, glued and screwed. The original scheme had the ventilation exhaust fans from both bathrooms simply dumping into the attic space, another no-no. I extended the exhaust hoses over to the gable area of the house and busted through the brick and installed 2 bona fide exhaust hoods with insect screens. On the longest hose, which was a 4" hose....I built a booster fan box in the middle of that run and wired it so that it turns on when the original fan turns on. I felt that a 16' run of 4" hose would probably need all the fan power it could get to keep from simply "stalling out". The other hose was 6" and only 8' long, so I felt it was adequate with no additional help needed. I could go on and on about other projects, but these were some of my most major undertakings, Now, about my employment. I no longer work as a forklift mechanic in the shop. In midsummer 2015, I took over running the parts department when our longstanding partsman retired. This was challenging in that it put me to the task of acquiring and dispensing the parts instead of installing them on vehicles. It has also been challenging in that I was the first partsman in our history to actually have the capability of searching the Volvo and Daimler websites to look up parts. It was in the summer of 2015 that the company finally got onboard with software to enable this. Prior to that advent, our method of ordering parts involve looking the parts up in hard copy paper parts manuals, or talking to a vendor/dealer on the phone and trying to describe what you wanted, it was sometimes a crap shoot whether you would get the right parts or not. The outgoing partsman never had to use the computer to look up and order parts, and when it was introduced, he refused to do it saying that his time was too short to need it, so he told me to get all the training and he would just watch. LOL He and I worked side by side for 3 months while he showed me most of the ropes before he retired in October 2015. That is a summary of what I have been up to. I know this was completely off topic, but since the request was posed here, I felt OK in responding here....See MoreCan someone please explain pullouts to me install-wise?
Comments (8)Okay, thank you... I'm starting to understand. Also found an old thread that was helpful. I'll forget the between the appliance idea, then. Greendesigns: Thank you so much and please bear with me just to make sure I understand what you're saying: 1. If this installs between a cabinet and a fridge that has a side panel, I can attach it to that fridge panel as well as to the cab on the other side? Another counter height panel WOULDN'T be necessary next to the fridge panel? 2. If the fridge was free-standing, then a counter-height, 3/4" panel would need to be added next to the fridge so there'd be something to screw the insert to? And... 3. If I want it to look like a fill piece, just add the fill piece to the front of the pullout insert. If I want it to be even with the front of the doors then an additional something needs to be added on top of the fill piece? One more question for you: If a person had a tall pullout between a fridge (with side panel) and a wall, could the insert be screwed into the wall on that side, or does another panel need to be added to the wall and then the pullout screwed to that? Taggie: thank you for those links. I do remember that broom pullout. That might be in the running for what to do with that space. It would be handy for sure. Here is a link that might be useful: old thread 3...See MoreCan someone explain IKEA cabinet heights to me?
Comments (5)My ceilings are 92". I put in a 90" cab that is not on the rail. It is attached to the wall though with the other option shown in the directions. It is sitting on pieces of 2x4 slide under it. And tipping that puppy up and getting it in place was chaotic. I still have to figure out how it'll get trimmed out on the bottom. But I needed the 10" of storage. :) I have it on one side of my fridge with a 36x20 cab over that, and a 30" beside that. We hung all of them to about a 1/2" from the ceiling, so the 30" has extra counter to cab base clearance. I have a tall coffee maker sitting there. The counter is also a 2" butcher block....See MoreDebbie Downer
3 years ago
Celadon
3 years agolast modified: 3 years agoDebbie Downer
3 years agolast modified: 3 years ago
JuneKnow
3 years agoDebbie Downer
3 years agoDebbie Downer
3 years agoTBL from CT
3 years agoDebbie Downer
3 years agolast modified: 3 years ago

Related Stories
BATHROOM DESIGN15 Ways a Mirror Can Light Up Your Morning
Reflect a Chic Look With (If Not In) Your Bathroom Mirror
Full Story
HOUZZ PRODUCT NEWS2 Things That Can Help Keep a Remodeling Project on Track
How you react to a problem can make or break a project. Being nimble and creative can ensure a positive outcome
Full Story
THE POLITE HOUSEThe Polite House: What Can I Do About My Neighbors’ Trash Cans?
If you’re tired of staring at unsightly garbage way before pickup day, it’s time to have some tough conversations
Full Story
LIGHTING10 Ways to Enjoy the Magical Glow of String Lights
They’re not just for the holidays. You can use them to add warmth and sparkle to a room, a tabletop or a porch year-round
Full Story
MOST POPULAR9 Real Ways You Can Help After a House Fire
Suggestions from someone who lost her home to fire — and experienced the staggering generosity of community
Full Story
PENDANT LIGHTINGChoose the Right Pendant Lights for Your Kitchen Island
Get your island lighting scheme on track with tips on function, style, height and more
Full Story
LIGHTINGYour Guide to Common Light Fixtures and How to Use Them
Get to know pot lights, track lights, pendants and more to help you create an organized, layered lighting plan
Full Story
HOUSEKEEPINGHow to Keep Your Light Fixtures Shining Bright
Try these 9 tips for cleaning pendants, sconces, track lighting and more
Full Story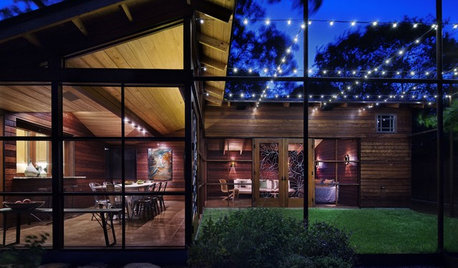
GARDENING AND LANDSCAPINGMake Outdoor Magic With String Lighting
Some enchanted evening, string lights may help your patio or porch put a sparkle in someone's eyes
Full Story
TASTEMAKERSMeet Peter Bristol's Inventive Lighting and Furniture
The Seattle designer explains what makes a good design solution and why he doesn't worry about decorating his home
Full Story

cawaps