


Bathtub Repair or Full Reno?
Carrie B
3 years ago


Featured Answer
Sort by:Oldest
Comments (8)

Carrie B
3 years agoRelated Discussions
Is it necessary to caulk between wall tile & tub and tub & floor?
Comments (16)The vertical wall seams crack more readily because the house shifts and moves. Ive tried grouting only and going back to caulk with sanded grout caulk or silicon only after a crack develops, hoping in some cases it will not. Sometimes it does not crack. Some contractors caulk all seams as a matter of course, no callbacks, safer. I liked the idea of sanded grout caulk to match your grout color It has not held up for me in wet conditions, such as the top of the bathtub where the wall tile starts, etc. , definitely not along the shower floor where the wall tile starts. It has held up in other areas though, and looks nicer when it all ties in. I agree, mildew on silicon is unsightly. Every bathroom has different conditions, including ventilation, moisture, etc. Some people have to clean out and recaulk the silicon every year or two. Whether its allegedly mildewproof silicon or not....See MorePro Question, repairing 48-818 Gerber W&O (tub)
Comments (1)I bought another brass W&O and used the necessary parts with the existing. Done deal....See More1940's laundry tub faucet - repair or replace?
Comments (6)From reading all of this it is apparent to me that the DIY methods are radically different from the old school plumbers methods. Everyone is talking about running to the hardware store and replacing the stem and such. I must be getting Alzheimer's or something because I honestly can't remember the last time I actually had to replace a stem. In the trade the old school plumbers all have a small metal multi-compartmented box that holds a complete assortment of both flat & beveled faucet washers, an assortment of Bib screws, brass cup washers and hopefully a pair of bottoming taps for the screw threads. In addition we have a roll of stem packing material and a couple specialty tools, a handle puller and a set of plumbers sockets. Now I would not expect a homeowner to purchase a complete Sexauer Washer set at $55 but you can buy a complete assortment of washers at any hardware store for about $2 and keep them in your tool box. Begin by turning the water off at an angle stop, a zone valve or at the main if necessary, then open the faucet and drain the line. Remove the handle retaining screw, then use the handle puller to lift the handle off the end of the stem shaft. Pounding on the handle with a wrench is a sure way to damage the handle. (handle pullers are about $10 at any hardware store) If the stem body is accessible such as on the laundry faucet in question or a kitchen or lavatory faucet use an adjustable wrench to remove the stem body. If the stem body is recessed into the wall such as on a tub/shower mixer use a plumbers socket to remove it. (A full set of plumbers sockets is about $10 at any hardware store). When you get the stem body out remove the bib screw that holds the washer on the end of the stem, then remove the old washer. Examine the end of the stem. Most stems have a cast raised ridge that surrounds the outer part of the washer to prevent it from expanding outwards. You may find a chip or two missing from that ridge, if so, that is not a big problem but in a worst case we find the greater portion of that ridge is missing. In that case we use a pair of pliers to break off the remaining portion of the ridge, then use a file to smooth any burrs so the end of the stem has a flat surface. Select the correct washer and if you had to file the end of the stem flat you install a brass cup washer under the washer to replace the ridge. If you have a bottoming tap available it is best to run the tap in the threads of the stem to clean the threads, then put the screw through the washer and into the stem and tighten it in place. Next, unscrew the stem packing nut on the outer end of the stem and turn the stem until you can remove it from the stem body. Use a fine stainless steel wire brush to clean the threads of the stem and apply a liberal coating of "Plumbers grease" on the threads. (A small 1oz can of plumbers grease is available at any hardware store for about $.50 to $1.) Now remove the old stem packing material from the outer end of the stem body. Insert the stem into the body and turn it until the stem is in the full open position. Now you wind the new stem packing material around the stem shaft and push it down into the stem journal. continue packing until the stem packing material is slightly higher than the end of the stem body. Replace the stem packing nut and tighten slightly so you feel a slight friction when turning the stem. Now set the stem aside for a minute. Reach your finger nail into the faucet body and feel the surface of the seat. If the seat is pitted, chipped or feels like a rough sandpaper surface replace the seat. To replace the seat you insert a seat wrench into the center opening of the seat, then unscrew the seat. (You can get a seat wrench at any hardware store for about $3). Normally you will have to take the old seat to a good neighborhood hardware store and have them match a new one. (Ace & True value hardware stores are great for matching seats, but don't expect a lot of luck at Lowes or HD) Here is a tip. The original seats are usually brass. For a few cents more you can get "Monel metel" which will hold up much better and if you have severe hard water condition that tears the seats up quickly you might want to get a stainless steel seat. The SS is will cost about twice as much as the brass but it will outlast the brass 10 to 1. Before installing the new seat apply a couple turns of white single density Teflon tape to the threads. (There is a trick to installing the new seat. It is nearly impossible to hold the seat and get the threads started in the faucet body. The trick is to wedge the new seat on the end of your seat wrench and use the wrench to reach it in an start it.) Now here is the one point that many people overlook. Before you attempt to install the stem body back into the faucet be sure the stem is turned to the full open position. If it is in the closed position the new washer will be pressed too tightly against the seat and it is instantly distorted beyond use. Tighten the stem body, then turn the water one. You may need to tighten the stem packing nut a bit to seal the new packing. Once you are sure there is no leak replace the handle and your done. The first time you do this you may end up buying the afore mentioned tools but even if you do buy the tools, the total cost of the job is far less than the cost of a professional service call, and once you own the tools the next time you do this job all you will be out is a few cents for the washers and stem packing. I would strongly suggest every homeowner or DIY'er should get these tools and keep them in your tool box. Also, next time your at a hardware grab a package of assorted faucet washers. The package is about a dollar or two and with the price of gas it simply isn't worth coming back to the store for them when you need them....See MoreUpset - bath tub issue
Comments (10)Since it's on you, I'd go after Kohler again. Simply start anew. Get a written diagnosis from the second evaluator. Send it to Kohler and start a warranty claim. Pretend it's the first time you've called them. 1) Tub was purchased from _____ on ____. 2) Tub was installed on ____ by a licensed plumber in accordance with the manufacturers instructions. 3) Within days of the installation a squeaking noise was heard. 4) You had two people come out and diagnose it as a delamination. Include the written report from the second person. 5) State what you want: A new tub. I'd also contact the point-of-purchase. They sold you a bad tub. As a follow up to the initial phone call claim with them, include the written delamination assessment made by the second evaluator. Send them the same info noted above. Written letters and emails start the paper trail. Phone calls are great to "shake the tree", any time you talk to anyone note the day, time, person you spoke with, case/claim number if they assign you one, and take brief notes of the conversation. Kohler is usually pretty good about claims. Best thing I can offer is to be calm but firm in your conversations, be businesslike. And keep good notes. When I've dealt with things like this, I've kept my notes in a document file on my computer. If I talk to someone new, I'll email them the file while I'm on the phone with them. Depending on the situation I might password protect it or convert it into a pdf file before sending it so it can't be muddled with by the recipient. No, I've never done or had done a gel injection. I've never heard of it being done. Not saying it won't work. But I've never had a tub delaminate! As a bit of a last resort, talk to your GC. If Kohler is claiming the tub was installed incorrectly, that falls back on him and on his plumber. You might be able to get separate letters from the plumber and the GC saying that the tub was installed IAW the manufacturers instructions and that they agree with the evaluation that delamination as a result of a manufacturing defect are the cause of the squeak. Again, all that is based on the tub having been installed correctly. ie, it's not a drop-in tub that is being supported by the rim instead of by the base/feet for example. Again, good luck....See MoreCarrie B
3 years ago PRO
PROAvanti Tile & Stone / Stonetech
3 years agoCarrie B
3 years ago
Lyndee Lee
3 years agoCarrie B
3 years ago
Related Stories

BATHROOM MAKEOVERSRoom of the Day: Superstar Style for a Small Full Bathroom
Warm metals, a claw-foot tub, repurposed outdoor faucets and a special sink base contribute to this stellar renovation
Full Story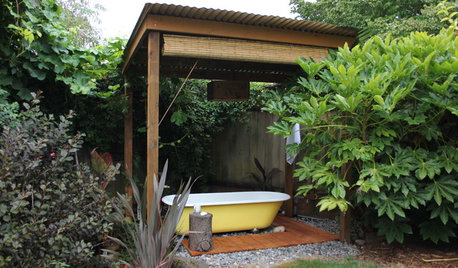
GARDENING AND LANDSCAPINGWhy Is There a Bathtub in the Backyard?
Nope, it's not waiting for bulk trash pickup. These days outdoor tubs are serving soakers, beer drinkers and even the fishes
Full Story
PHOTO FLIP71 Dream Bathtub Views
Soak in the sights with this collection of tantalizing tubs and inspiring vistas
Full Story
BATHROOM DESIGNRoom of the Day: A Salvaged Bathroom Full of Fresh Ideas
Entwined pipes as faucets, old doorknobs as towel hooks and swaths of concrete bring function and attitude to a master bath
Full Story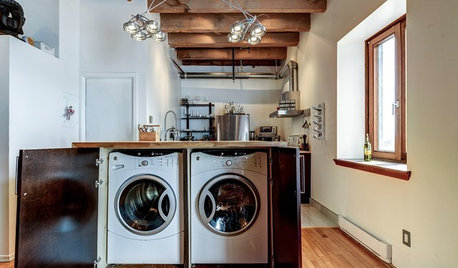
LAUNDRY ROOMSA Kitchen Laundry Cabinet Full of Surprises
A little DIY spirit allowed this homeowner to add a washer, dryer, kitchen countertop and dining table all in one
Full Story
BATHROOM DESIGNShould You Get a Freestanding or Built-In Bathtub?
If you know you’re a bath person but aren’t sure which type of tub to get, these questions can help you decide
Full Story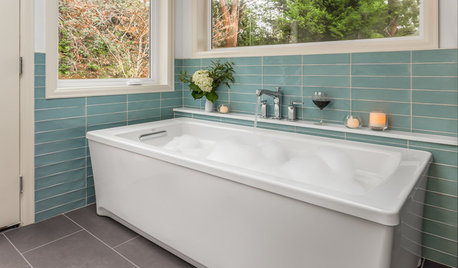
ADDITIONSRoom of the Day: Small Addition Gives a Couple Room to Relax
A new master bathroom provides parents with a place for lingering and luxuriating
Full Story
MOST POPULARShould You Keep Your Tub?
There are reasons to have a bathtub, and plenty of reasons not to. Here’s how to decide if you should keep yours or pull the plug
Full Story
BATHROOM DESIGNShower Curtain or Shower Door?
Find out which option is the ideal partner for your shower-bath combo
Full Story
SELLING YOUR HOUSEFix It or Not? What to Know When Prepping Your Home for Sale
Find out whether a repair is worth making before you put your house on the market
Full Story


Nancy in Mich