


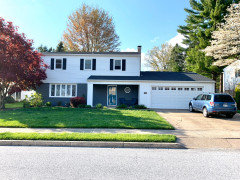
Our house looks like a big white box
Angela Wenger
4 years ago

Featured Answer
Sort by:Oldest
Comments (35)

millworkman
4 years ago
Angela Wenger
4 years agoRelated Discussions
Feeling like we've made a big, big mistake with our build...
Comments (46)First of all, you will get used to the noise. I'd visit Mom in FL whose house was a half mile away from the train tracks and the first day, I'd hear every train, but after that, hardly ever. Second, I think you need to get to know your neighbors...sounds like they are friendly types which is a good thing. I grew up in the country surrounded by lots and lots of land and few children because there were few houses. When I married and moved to an acre lot, it was terrible for awhile....all the traffic, the kids, the dogs, the mowers... Then I got to know my neighbors. And trust me, the chain saw isn't so loud when it's good neighbor Tim doing the sawing and you don't mind asking John if he could not mow on Saturday as you're planning on a memorial service for your Dad with lots of people coming.... And neighbors can be a great help, like when your snow blower breaks or when you need someone to feed the cat. I know our neighbor was glad for us when the house next to her's caught fire and the firemen wouldn't let her go home that night, so she spent the night with us. Every lifestyle has it's plusses and minuses. Change your perspective, seek the good, and then see where you're at. You may be surprised. BTW, we are now back home on 11 acres, but the area is so much more built up than when I was a kid. Even on our 11 acres though, I know when Bill is sawing or Jimmy is running his back hoe or when Norma is out mowing, or when Jessica's kids are playing with their dog. It's comforting....See MoreBIG news at our house!
Comments (15)Those UFOs are here frequently. As a matter of fact, I see them every time I look out that door! :-) We won't have a plastic liner, but we will eventually stock it with fish. After our several year drought ended last year, the first good rainfall brought lots of baby fish into the creek from the other ponds upstream. We've waited so long, and this is a VERY exciting day for us. I'm having a hard time staying focused on work...my office windows look out to the back, so I'm watching them move dirt!...See MoreFood Photo Tips: The Final & The Big White Box
Comments (0)Posted by canarybird (My Page) on Mon, Sep 28, 09 at 10:59 Food Photo Tips: Part 11 Last Tips & The Big White Box Hi again everyone. I'm back with another entry on how to use your digital camera for taking tabletop photos. This will be the last of the series so I would like to make a resumé of what has been covered with a few additional tips. Just a reminder that this series has been written for owners of simple point & shoot (P & S) cameras using automatic settings, and for those who have not yet studied their camera manual in depth. But if you havent already done so, I encourage you to try the semi-automatic settings such as Aperture Priority (A or AV aperture value) and Shutter Priority (S or Tv time value) where you have more control over the depth of field in the first, and the freezing of movement in the second. Here is a list of important points that will help you to improve your tabletop and food photos: 1. Dont use the flash of your P & S camera for taking food photos. It makes food look terrible. Do use natural daylight when possible, ideally from a north facing window and when necessary, with a light sheer curtain or white tissue paper taped to the glass to diffuse strong light. Daylight and with Flash 2. In low light conditions use a tripod when you can and an indoor camera setting for available light. Such a setting could be called Indoor, Available Light or Candlelight. Different brands of cameras use different names for low light settings. If no tripod is available, brace yourself and the camera against a door jamb or wall, hold the camera firmly, bring your elbows in together tightly over your chest and breath out.hold it.and snap the shutter. For close tabletop work you can support the camera on a bean bag, stack of books or other solid object. 3. Rather than getting too close to your subject which may create distortion, try moving back a little, using your optical zoom to bring the subject closer until it fills your viewfinder or LCD screen. 4. Remember to adjust your White Balance (WB) setting for the type of illumination you are using: Sunlight (which is a normal daylight setting even when theres no strong sun), Cloudy (good setting for indoor daylight), Incandescent light bulb (Tungsten), Fluorescent or CFL bulb. There is also the AUTO setting but you should definitely make an adjustment when using artificial light. One setting I didnt mention is the custom white balance, usually the last on the WB dial and not on all cameras. This allows you to hold a piece of white paper near the subject, take a photo of it and then use that to set the correct white balance for the photo you are about to take. If you would like to try that, then check your manual for instructions. It is a useful way to get the exact light balance for your photos, but its not possible to go into that setting here in the last post of this series. 5. If you see through the viewfinder that the photo will be too dark, raise the Exposure Compensation (EV) by one, two or more clicks. See Part 3 for more about EV. 6. Use a paper sweep if you want to have a light uncluttered background, and a piece of white foam or paper to reflect light onto the dark side of a photo with one light source. You could also use a small mirror to reflect back some light onto your subject, but be careful if your light source is strong not to create reflected light that is harsh. 7. If you are going to photograph a hot dinner, have your photo corner, light and camera ready before you plate the food. That way you will capture it while it is still moist and fresh looking. But also have a small squeeze bottle of sauce, oil or gravy ready to drizzle over the food to create a bit of glistening highlight in case the food begins to look dry. 8. In your spare time, practise with your camera in your photo corner or table with the lighting conditions you would have at dinnertime or when you are most likely to take your food photos, using props such as fruit bowls or stacks of differently shaped vegetables on a plate. Try different lighting conditions, camera settings and shooting angles, with and without tripod if you have one. Take many photos. If you find one out of ten, twenty or thirty that you think is good, then you are doing fine, because it takes much trial and error to find what works, and many deleted photos to get one good one. Write down what you did and what settings you used that were successful. 9. If you have a tripod, use it for low light and evening photos of food and table settings. And try also using the self-timer to avoid the slight camera shake and resulting blur caused by pressing the shutter. Once youve worked using a tripod and the self-timer youll see how good it feels to take photos with your hands free. 10. ISO. I didnt get around to covering this but you may find you are only able to alter that setting on semi automatic (Shutter Prioroty or Aperture Priority) or MANUAL modes. ISO controls the sensitivity to light of the cameras sensor. The sensor is where the image is recorded in a digital camera, in place of film. The higher the ISO number used, the more sensitive is the sensor and the lighter is the resulting photo. It can be compared to the ASA number of film. If you have used a film camera you may remember that when purchasing film, you had a choice of film speeds eg. ASA 125, 200, 400 etc. The higher the number, the more sensitive to light (termed faster), was the film. In a similar way the ISO can be raised to make it possible to capture a photo using a faster shutter speed in low light. The only inconvenience is that the higher numbers produce more of a grainy photo, called noise in digital photography, which is not always a bad thing. In dark interiors, such as churches or museums where flash is not allowed, you could raise the ISO setting of your camera and still capture a photo. For this reason the three variables, Aperture (lens opening), Shutter speed and ISO are closely linked and are interdependent for controlling the exposure in your photos. A suggested setting for outdoors is ISO 100, whereas in interiors that could be 200, 400 or higher depending on the level of illumination. Some cameras now reach extremely high ISO levels such as 3200 in special high sensitivity modes. Other Food Styling Tricks: 1. When using daylight through a sunlit window, tape leaves, strips of paper or other shapes onto the window glass to produce interesting shadows on a wall behind your subject. 2. To make a cup of coffee look freshly poured, add a spoonful of soapy water to the surface. Of course thats only when youre not planning on drinking it! 3. Use a pastry brush to baste vegetable oil onto cooked vegetables to add shine. 4. Make chocolate curls by using a vegetable peeler over a block of chocolate. 5. Use a can with the ends removed to stack small amounts of foods such as salad or rice inside to give height to your dish, when photographed from the side. I think weve all seen that done on TV cooking shows. 6. Brush a bit of Kitchen Bouquet over chickens or drumsticks that look too pale to give a better colour. 7. Keep uncooked greens and herbs in ice water until ready to use. It keeps them looking fresh. 8. To have steam rising from your food, place it hot from the stove quickly in front of an open window on a cool day. This is one that I do, since my main photo corner is in front of a window . Get down low and snap from the side to get the steam. It helps if there is some darkness behind the dish so the steam can be seen. Other tips for commercial food photography involve using materials which render the food inedible, such as photographing a bowl of cereal using white liquid glue instead of milk, so the cereal doesnt look soggy. But I wont go into those because after all, we are going to serve this food to our family arent we? The Big White Box There are several good tutorials on the web for making a light box and as weve already covered the mini white box, you will be familiar with the technique of papering the inside with white posterboard or paper, cutting out windows for the lights and adding a white paper sweep inside. Here is how Ive made my big box from a printer box which was a little battered after being stored in my garden shed! Measurements of this box : Width 19" (49 cm), Height 13.5" (34 cm), Depth 12" (30 cm). 1. Cut off one of the small flaps on the top of the box, and using a box cutter cut out 3 windows, leaving 3" (6.5cm) window frames around the edges as in first photo. Thats two large side windows and the top opening where your main light will shine.Then cut strips of white poster paper to cover the frames around the windows inside the box. 2. Turning the box on its end, tape tracing paper to the outside of the two big side windows and paper the inside of the three remaining flaps using white printer or poster paper and a glue stick or liquid white glue. 3. Cut a paper sweep the length of one side plus enough to come right out to the front opening and attach it to the back wall with a couple of cello tape loops on the back of the paper. The sweep must be easy to remove when you want to change the colour or replace it when its soiled, so its not glued at the top. 4. The reason for papering the three white flaps in the front opening for the camera is so we can also push them up into position to act as reflectors. The two long side flaps can be nearly closed, leaving just enough room for you to put the camera lens through the opening. 5. Ive set up three lights on my desk: the top extension desk lamp with the CFL bulb which shines down through the top opening and two smaller side lamps to shine through the tracing paper windows on wither side. I needed books to raise up the two small lamps, both which have CFL bulbs. I didnt notice at first, but the little lamp on the right has a warm coloured rather than a daylight bulb, so on the following photos you see a golden light coming from the right. However I left it at that. Do be sure your bulbs are all of the same Kelvin temperature, as marked on the bulb package when you buy them. (Daylight is around 5000K to 6500K). The lower the number, the more golden is the light. Recommended reading: If you like to collect photography books as I do, then here are some that I recommend you read (after youve read your camera manual of course) :-) 1. Digital Food Photography by Lou Manna 2. Close-Up Photography by Michael Freeman 3. Light Science & Magic by Fil Hunter, Steven Biver, Paul Fuqua 4. Understanding Exposure by Bryan Peterson Online: There are many sources of informationon on digital photography on the web now, but I have always liked Darren Rowses Digital Photography School tips and tutorials for beginners and experienced photographers, with a search function so you can find information about a specific subject . Well weve come to the end of these tutorials, so Ill say good luck to those who are new to digital photography and are anxious to start posting food and other photos here on the Cooking Forum or on your blog. I hope this beginners introductory series has been of some help to you and that youll find much enjoyment and satisfaction with your camera. And one day you may want to explore the world of the DSLRsthe digital single lens reflex cameras that can bring much more joy to your picture taking. Remember to keep experimenting with new settings on your camera and dont be shy about showing off your work. You have a whole world to explore with your camera and the more you do, the easier it will become. Thanks for following and good luck! SharonCb (Canarybird) Follow-Up Postings: o RE: Food Photo Tips: The Final & The Big White Box clip this post email this post what is this? see most clipped and recent clippings * Posted by dlundin (My Page) on Mon, Sep 28, 09 at 13:07 You did an incredible job on your tutorial, Sharon, and anyone who follows it will have a great improvement in their photography. Kudos to you! o RE: Food Photo Tips: The Final & The Big White Box clip this post email this post what is this? see most clipped and recent clippings * Posted by antiquesilver (My Page) on Mon, Sep 28, 09 at 14:57 Thanks, Sharon, for taking the time & effort to do this. Your concentrated series has been more informative & interesting than many local classes. Another reason that makes this forum so special. Hester o RE: Food Photo Tips: The Final & The Big White Box clip this post email this post what is this? see most clipped and recent clippings * Posted by canarybird (My Page) on Mon, Sep 28, 09 at 18:40 Thank you both for your lovely comments Diana and Hester! BTW Diana....how was Barcelona??? I'm dying to see your photos! Did you like the market and the tomato bocadillos? SharonCb...See MoreOur big pear tree is covered with white flowers...
Comments (2)I live in south Alabama abt 90 miles from the gulf of Mexico which puts me on the gulf plain. Our tree Should attract pollinators, but sometimes we get a temperature Drop that causes the big flowers to drop off! My IPad is from the First series ,and does not have the better "photo" features. But I am working on posting pictures because I would like to!...See More
Anna (6B/7A in MD)
4 years ago
Denita
4 years agolast modified: 4 years agoAngela Wenger
4 years agoAngela Wenger
4 years agoAnna (6B/7A in MD)
4 years agoAngela Wenger
4 years agopartim
4 years agoAngela Wenger
4 years agopartim
4 years agopartim
4 years agoAngela Wenger
4 years agoAngela Wenger
4 years agoptreckel
4 years agoAngela Wenger
4 years agonjmomma
4 years agohoussaon
4 years agoAnna (6B/7A in MD)
4 years agoAngela Wenger
4 years agoeinportlandor
4 years agolast modified: 4 years agoAngela Wenger
4 years agolopipopi
4 years ago PRO
PROJudyG Designs
4 years agolast modified: 4 years agoAngela Wenger
4 years agoAnna (6B/7A in MD)
4 years ago PRO
PROCelery. Visualization, Rendering images
4 years agoAngela Wenger
4 years agochiflipper
4 years agopartim
4 years agoAngela Wenger
3 years agoDenita
3 years agolast modified: 3 years agohoussaon
3 years agoAnna (6B/7A in MD)
3 years ago


Related Stories
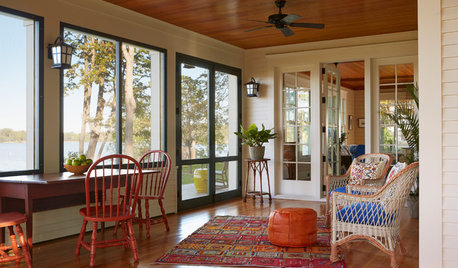
VACATION HOMESHouzz Tour: New Lake House Looks Like It’s Been There 100 Years
Simple detailing and careful design create a classic cottage loaded with charm in Minnesota
Full Story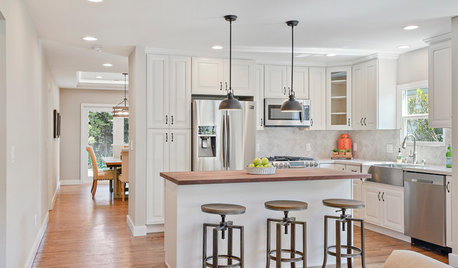
KITCHEN COUNTERTOPS5 Countertops That Look Beautiful in a White Kitchen
The countertop surface you choose can make a big difference in the look of your kitchen
Full Story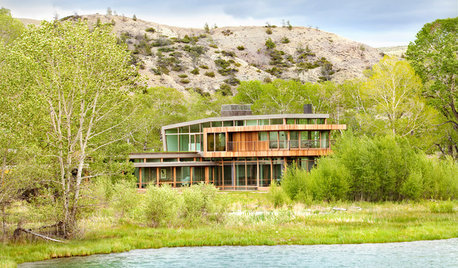
CONTEMPORARY HOMESHouzz Tour: A Big Sky Country House Embraces Wide-Open Views
Generous glass opens this Montana home to the rugged scenery, while wood keeps the look warm and inviting
Full Story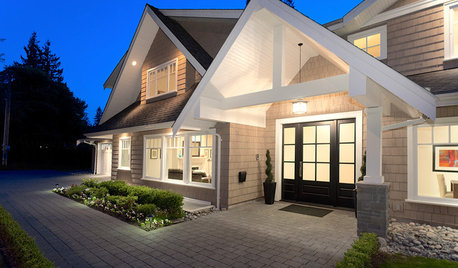
UNIVERSAL DESIGNWhat to Look for in a House if You Plan to Age in Place
Look for details like these when designing or shopping for your forever home
Full Story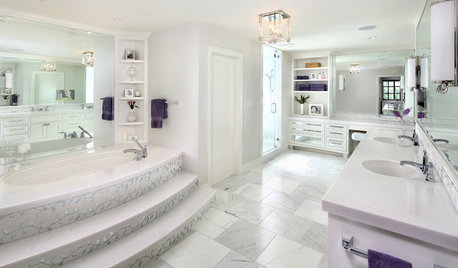
BATHROOM DESIGNRoom of the Day: Luxe Hotel Look for an All-White Master Bath
A ‘beauty bar,’ marble-lined steam shower and laundry chute are a few of the amenities in this glamorous spa bathroom
Full Story
LIFEHouzz Call: What Makes Your House Feel Like Home?
Sometimes just one thing gives you that warm and fuzzy feeling. Let us know what it is for you
Full Story
VACATION HOMESHouzz Tour: A New Lake House Gets a Lived-in Look
Antiques mixed with newer pieces give a relaxed Quebec getaway the feeling of being developed over time
Full Story
MOST POPULARTrend Watch: 13 Kitchen Looks Expected to Be Big in 2015
3 designers share their thoughts on what looks, finishes and design elements will be on trend in the year ahead
Full Story
COLORWarm Up to White All Around the House
Explore the many ways to design a white kitchen, bathroom, dining room or bedroom that's far from stark and sterile
Full Story
HOUZZ TOURSHouzz Tour: Downsizing From a Big House to a Studio and Deck
A retired Colorado couple seeking a smaller home find their living solution next door
Full Story


Celery. Visualization, Rendering images