


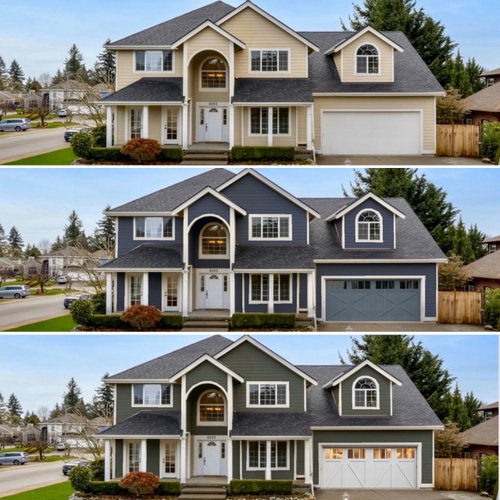
Hold the cream... before and after design ideas
Revive AI
4 years ago
Featured Answer
Sort by:Oldest
Comments (17)
Related Discussions
Before/after pictures-oak to cream/glazed -pictures
Comments (91)Molly3573-I did not strip the cabinets -clean /fill/prime- The base board trim is just taller base trim from Home Depot- I used the pre-primed faux wood stuff and I used a newall (sp?) post cut down for the corners of the island and corner guards for the corner of the cabinets to dress them up. The bead board was just the pine bead board sheets (4x8) at Home Depot primed and painted with the same. I did not glaze them like the cabinets. All attached with a brad nailer- small trim nails would work and a hammer-but take longer- hope this helps -adding crown molding really gave the best bang for the buck as an upgrade- good luck with your kitchen!...See MoreWhen do I compare cabinet pricing, before the design or after?
Comments (7)What I suggest for someone price shopping is to make a simple list of 4 cabinets in "standard" construction and shop just those 4 around. Do a plain 24" butt cabinet with a finished (cabinet door applied) side, an 18" drawer base with no finished sides, a 36" tall 24" butt cabinet with one finished (cabinet door applied) side, and an 36" tall 18" wide cabinet with no finished sides. Add 1 stick of classic crown molding and one stick of wood toe kick. Those cabinets and moldings give you a mix of simple middle of the run cabinets and end cabinets and wood molding (some lines use vinyl). The pricing you get from these 4 equal cabinets will let you compare lines "apples to apples" without getting any design services. Of course, presenting your current layout to the designer while you're getting the price quote for any free ideas they are willing to give you as well as talking with them about their cabinets in general should be a priority. Good rapport with a KD is priceless, and a good quality long history of being in businesss is also priceless in this day and age. I don't do design work for free, nor will most of the other KD's I know. That' means no 20/20 work without a design deposit. If you have a list of cabinets that you want to compare prices, I will input them as a price quote only, but that won't include many needed elements like finished sides and molding--which can add 20% to a kitchen's cost--and which many of the folks in the boxes who are giving you "free" design work probably aren't including either in order to lowball you. If I have the time to do a simple design mock up for you, I will print a perspective of that out, but that "pretty picture" won't have any cabinet information or sizes on it. Now, what I will do for free is take the time to talk to you about what you want in your kitchen, both functionally and aesthetically. I will ask you where you see yourself budget wise without actually asking a hard number. I will tell you the benefits of each of my cabinet lines and where they fall in terms of good, better, and best and what that translates to in pricing. I will tell you if your description of you desired kitchen seems to be in line with your generally stated budget, or if you should rethink that item. I will point out items that you may have forgotten or that havent' received enough attention. I will explain to you the benefit of choosing my firm, both in the design achievements and the professional installers that we have to create the design in actuality in your kitchen. If there are any cabinet promotions going on, I will explain them so that you can get the most for your dollar spent. At the end of our sesssion, I will ask you to choose our firm for your project. If you choose to think it over, that's fine. I am willing to meet with you further if you want to clarify any of the above points, or want to get any input from a trusted friend or family member. However, any design work will only begin when I have received the deposit and my installer has given me an accurate measure of the space....See MoreOnly 'Before' - no 'After' done yet - ideas invited!
Comments (3)The cushion on the larger chair doesn't look like it belongs on it, was it added to an already upholstered back, is it attached ? seems like a deep and comfy chair but it does appear to be a complicated project. the queen anne chair will be lovely; keep us posted on your "afters" when you get around to it !!...See MoreCL patio glider before and after
Comments (23)cyn427--I considered painting the background cream, but actually didn't paint it at all. I didn't want the background too stark since we really don't have any other white out there, so just left it with the sort of beige viney floral design it had, then taped off what I wanted to remain unpainted. That way it also was easier for me since I just sprayed exterior black on the whole thing (used a few coats of rustoleum ultra 2x coverage) then just peeled off the tape. Surprisingly, it doesn't even feel any stiffer than the fabric already felt. I'll try to post a close up. From a distance, it just looks like the background color is light linen. If it looks purple instead of black that may just be my poor phone camera picture. Purple would have been cute, but I'm not that creative! clblakey--The seat is actually a typical outdoor fabric that you see on many patio sets. I think it's nylon, and it doesn't seem plastic. We have it on a couple chairs we've had for several years, and the fabric seems to hold up quite well so far. BTW, I loved your permanent marker coloring the wire on your crystals in the post a pic thread! my3dogs--you know how much I've loved seeing your projects! Your comments mean a lot, and I'll try to post if I ever finish something else. teacats--I'll try to give an update at the end of the summer on how it held up. I'm wondering that myself! trailrunner--If you were close to me, I'd love to help you paint chevrons on your glider! And to ALL the rest of you --I've seen your homes you've shared and admired your tricky organzational ideas (mustangs), your helpful suggestions (teacats)....well, all of you--thanks for your kind encouragement. I love seeing what you all do to make your worlds interesting....See More PRO
PRORevive AI
4 years ago PRO
PROOpen House Home Staging & Redesign, LLC
4 years agoRevive AI thanked Open House Home Staging & Redesign, LLC- PRO
Revive AI
4 years ago


Related Stories

LANDSCAPE DESIGNBefore and After: 4 Backyard Makeovers With Space-Saving Ideas
Smart space design, outdoor seating, container plants and more turn these yards into lovely retreats
Full Story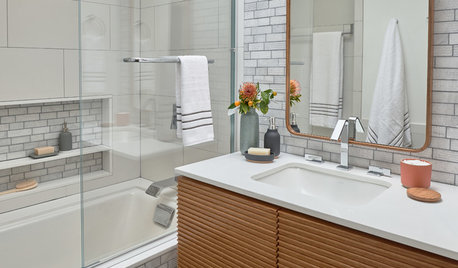
BATHROOM DESIGNBefore and After: 63-Square-Foot Bath With a Space-Saving Design
A family bathroom gains a spa-like look and a large tub-shower, separate toilet room and linen closet
Full Story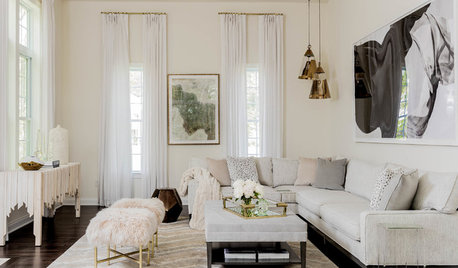
TRANSITIONAL HOMESHouzz Tour: Designer’s Home Is Stylish, Serene and All in Cream
A newly built house in Massachusetts gives an interior designer a blank canvas to create the home of her dreams
Full Story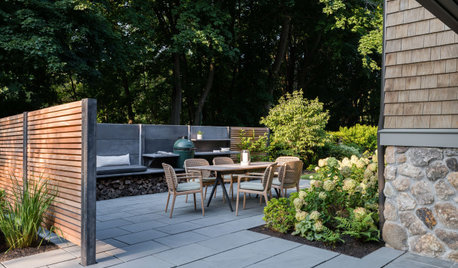
LANDSCAPE DESIGNBefore and After: 3 Side Yards Add Outdoor Kitchens and Seating
Designers turn underutilized outdoor spaces into places for cooking, lounging and more
Full Story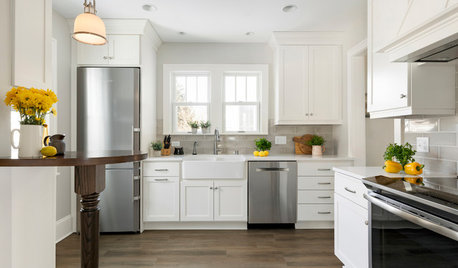
KITCHEN MAKEOVERSBefore and After: 11 Inspiring Kitchen Transformations
Look to these kitchen renovations for ideas and inspiration
Full Story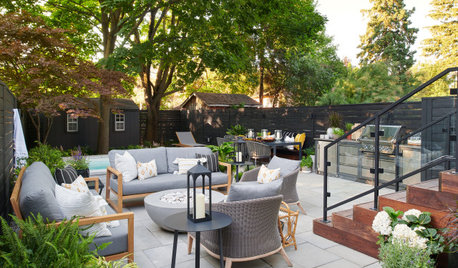
LANDSCAPE DESIGNBefore and After: 4 Patio Setups to Inspire Outdoor Lounging
Outdoor sofas, fire pits and a petite plunge pool are a few of the features in these backyard retreats
Full Story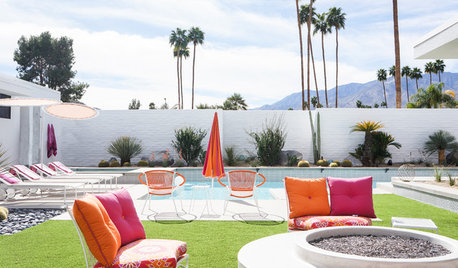
DESIGNER SHOWCASESBefore and After: Moroccan-Inspired Palm Springs Style
Escape to the 2018 Modernism Week showcase home, where jewel tones and graphic tile create a cool desert vibe
Full Story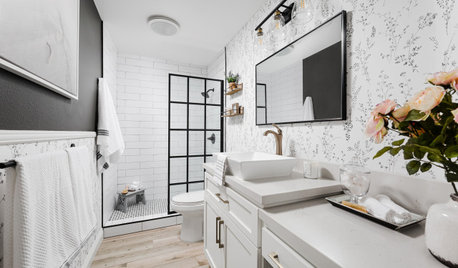
BATHROOM DESIGNBefore and After: 5 Bathrooms That Rock Wallpaper
See how wallpaper adds pattern, texture and pizzazz to these recent bathroom makeovers
Full Story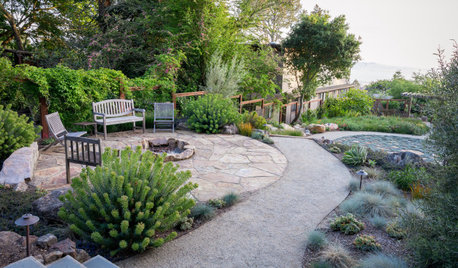
LANDSCAPE DESIGNBefore and After: 4 Outdoor Makeovers Transform Oddly Shaped Lots
Stunning transformations reveal that skinny, sloped or pie-slice-shape plots can become beautiful gardens
Full Story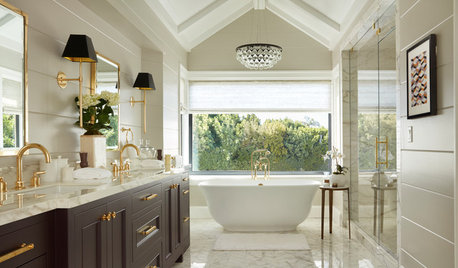
BATHTUBSBefore and After: 6 Dream Bathrooms That Free the Tub
Freestanding tubs replace bulky built-ins in these beautiful bathroom remodels
Full Story


Little Bug