


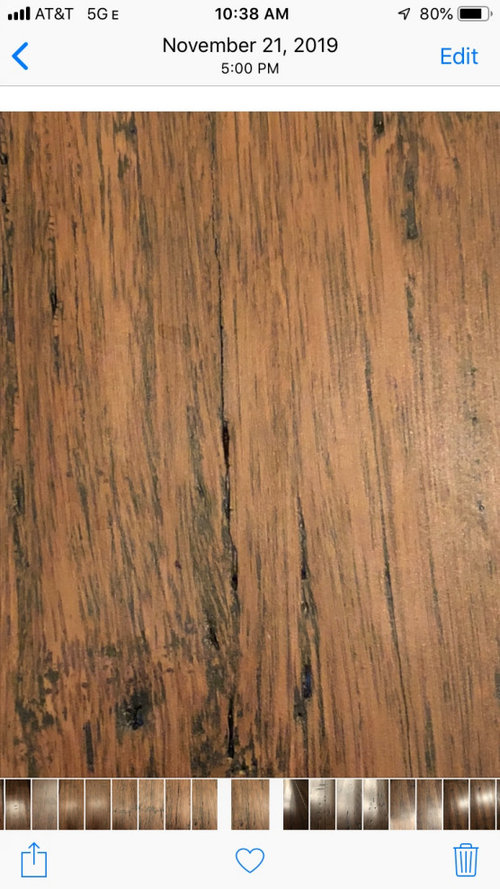
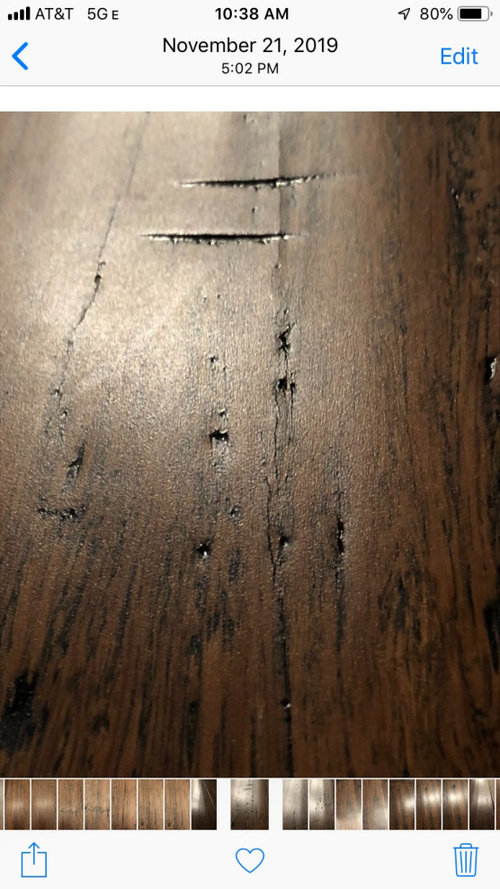
Floors Cracking!!! Need advice from professional installers.
HU-84007406
4 years ago
Featured Answer
Sort by:Oldest
Comments (8)

HU-84007406
4 years agoRelated Discussions
I need professional advice, shower door install
Comments (10)I presume there is proper purchase for the screw threads behind the tile. A wall stud, for example. Here's my recommendation since this is a fail times two. Have them remove the bracket and drill an oversized hole the depth of the tile, the thinset, and if the backer board is frangible or compressible, the depth of the backer board as well. In a typical situation that might be 1/4" + 1/8" + 1/2", or 7/8" depth total. So drill a hole 3/8" in diameter (or whatever diameter your sleeve is) and 7/8" depth (or as needed per the explanation above). Insert a metal sleeve bushing into that oversized hole. The goal is for the sleeve to be at least flush with or just slightly proud of the face of the tile. Here's an example. Not the perfect size or proportion, but a quick grab off the internet to define "metal sleeve": Aluminum or copper is fine, if steel I recommend spot priming them for corrosion protection. Install the sleeve into the oversized hole. Then install the hinge bracket. The sleeve will transfer the compression forces from the hinge brackets directly to the studs, bypassing the fragile tile, grout, and backer board. Just an idea....See MoreIn need of quick stone floor install advice
Comments (5)If by floating the floor you mean they're going to put down a dry bed to isolate the tile from the subfloor, as long as they know what they're doing it's a good thing. In my house we've used Ditra, which is the modern equivalent for those of us who don't know how to do it properly any other way. Orange waffle type material with a fibre backing. Thinset on the subfloor, then Ditra. Then thinset on top of Ditra which works its way into the waffle shaped surface and locks in mechanically, not by adhesive so much. Tile goes on this bed of thinset. If the subfloor moves, less movement is transferred to the tile. I wouldn't install a natural stone floor without it. My 2nd floor bath is on 2x8 joists that span 15 feet (true 2x8 lumber - 90 years old) and the laundry room is right next to the bathroom. 3 years in and the 80 sq ft of 12x12 inch marble tile and grout doesn't have any cracks. Just put 30 sq ft of marble on the basement slab - used Ditra there too. Works with heated floors as well - heating system goes under the Ditra. My bathroom floors can go to 90 degrees no problem. Hardiboard etc. has nothing to do with a floating floor. It's just another subfloor material. You want 2 layers of plywood at least 1 1/4" thick total (if I recall) for stone floors. Don't need cement board under tile. People use it on shower walls etc. as it's less prone to damage from moisture but if you're getting moisture to your surface under the tile you're pooched whether its drywall or concrete board. That's why showers always need Kerdi or another waterproofing layer between the tile and the wall....See MoreAdvice needed from Pros re Tiling (grout cracks)
Comments (7)"....What do you think needs to be done now? ...." I think you need to remove some grout and pop out a few of the tiles. I would think you have a bond breaker issue where the substrates' tile prep has failed or the thin-set has failed. Often large tiles are set with the wrong setting materials. you might discover a pre-mixed thinset like Mastic was used. This would of course be a bad idea and not the right choice for that tile size. Your builders could have used construction adhesive and cement board as tile prep - that would be wrong as well. Or maybe the thin-set was right but over watered and installed too thick. So many things could have been done wrong. Removing a few tiles should point out what the problem was. Do you know if the installer left room for expansion around the perimeter? HOUZZ FEATURE IDEABOOK: [WHY BATHROOM FLOORS NEED TO MOVE[(https://www.houzz.com/magazine/why-bathroom-floors-need-to-move-stsetivw-vs~16362005) URL:[https://www.houzz.com/magazine/why-bathroom-floors-need-to-move-stsetivw-vs~16362005[(https://www.houzz.com/magazine/why-bathroom-floors-need-to-move-stsetivw-vs~16362005)...See MoreNew floor grout cracking - need advice/opinions
Comments (15)Grout shmears over already full grout lines generally don't work with fully cured grout. Open and partially used bags of anything portland cement based, like your grout? While sitting in that basement, the powder is being exposed to atmospheric moisture. It can start to hydrate in the bag. Any hydration prior to being used reduces the strength of the final product. Since you have the bag? Call the manufacturer's tech department. The number should be in the fine print on the bag, if not, you can find it on the manufacturer's website. This is exactly what they are there for, don't at all be intimidated by the idea of calling. Have the photos ready, often times I'll have them attached to an email, and while talking to tech, I'll get his email addy and email them while we talk. Instead of describing the issue, the tech can see the issue with his own eyes while you are on the phone. See what the tech say. Instead of a schmear that will likely flake off over time...and likely be horrifically blotchy in color, they may recommend a grout cleaning, and then the application of a grout colorant. You can get a head start on that discussion by looking at grout colorants by the manufacturer of your grout. Is the colorant a semi-transparent dye that penetrates the grout, like staining wood? If so, because the colorant is somewhat transparent, there may still be shading and color differential in those blotchy areas. Is the colorant a topical film, an opaque epoxy-based colorant? While epoxy-based colorants will be perfectly uniform in color, the result can sometimes result in somewhat shiny plastic-looking grout lines. Epoxy colorants can be tedious to install. Any sort of colorant usually requires a grout cleaning before the installation of the colorant. Have the tech write you what is needed, or refer you to a website. Print out those instructions, along with the emails from the tech, and present those when you have your discussion with the GC. The other alternative, and this one can open up a host of other problems, is removing the grout and reapplying new grout. Because the prep work has to be somewhat meticulous...the cleaned out joints have to be even in depth, and the chance of the tiles being damaged during grout removal, and the chance that they may bugger up the new installation as well? Sometimes the application of a topical grout colorant is the easier path. Regardless of the path you choose, I recommend you discuss your expectations for remediation with the GC ahead of time. Get them in writing. You both know what you have going in. Make sure you're both expecting the same outcome. Lastly, "Should we be buying a new bag of grout for this touch up work?" You should not be buying anything. Here's why. You provide the grout. It fails. Might not be because of the grout, it might be because of poor prep, or the choice to do a thin schmear, and the schmear was doomed from the start. Regardless, the installer blames you for providing old grout. Or for not providing a grout cleaner. Or the wrong grout. Or...(pick your poison). when they do the work and they provide the materials? They own responsibility for the entire chain of materials and labor. Good luck!...See MoreSJ McCarthy
4 years agoHU-84007406
4 years agoSJ McCarthy
4 years agoHU-84007406
4 years agoSJ McCarthy
4 years agoSJ McCarthy
4 years ago
Related Stories
GREAT HOME PROJECTSHow to Install a New Tile Floor
Is it time to replace your tile floor? Here’s how to get it done, which pros to call and what it will cost
Full Story
TILE6 Questions to Answer Before You Install Tile Flooring
Considering these things before tackling your floors can get you a better result
Full StoryLATEST NEWS FOR PROFESSIONALS‘Help Clients Narrow Down Choices’ and Other Advice From Pros
Home design and building professionals share tips they learned from recently completed projects
Full Story0
CONTRACTOR TIPSContractor Tips: Countertop Installation from Start to Finish
From counter templates to ongoing care, a professional contractor shares what you need to know
Full Story
LATEST NEWS FOR PROFESSIONALS12 Business Tips From Professionals Who’ve Been There
Home pros share advice on successfully navigating the complicated tasks of running a business and working with clients
Full Story
KITCHEN STORAGEKnife Shopping and Storage: Advice From a Kitchen Pro
Get your kitchen holiday ready by choosing the right knives and storing them safely and efficiently
Full Story
HOUZZ PRODUCT NEWS‘Understand Your Clients’ and Other Advice From Pros
Several pros share important business lessons they’ve learned from recent home design and remodeling projects
Full Story
DECORATING GUIDES10 Design Tips Learned From the Worst Advice Ever
If these Houzzers’ tales don’t bolster the courage of your design convictions, nothing will
Full Story
KITCHEN DESIGN16 Practical Ideas to Borrow From Professional Kitchens
Restaurant kitchens are designed to function efficiently and safely. Why not adopt some of their tricks in your own home?
Full Story
FLOORSHow to Get a Tile Floor Installed
Inventive options and durability make tile a good choice for floors. Here’s what to expect
Full Story

SJ McCarthy