


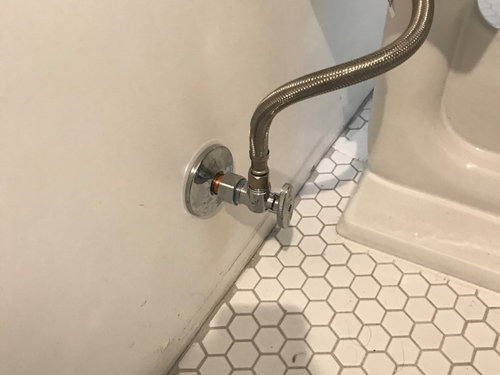
How to install wood paneling behind toilet supply flange?
bardzil
4 years ago
Featured Answer
Sort by:Oldest
Comments (13)
 PRO
PROMark Bischak, Architect
4 years agoRelated Discussions
Help? Access panel for shower plumbing: how big ?
Comments (6)Actually, there is no requirement for an access panel for the shower where you are, as far as I know. It can be as big or as small as you wish it to be. Of course, the bigger you make it, the easier it'll be to work through should that be necessary. However, especially in your case, where it'll be visible in the bathroom, it'll also stand out like a sore thumb....See MoreI need info on poly barrier install behind hardibacker
Comments (4)1. Is there a special kind of non-rusting staple that should be used? No need, regular staples are fine. 2. Can I simply staple the poly across the top and then let the board screws secure the rest of the poly or should the whole sheet be stapled? If staples are recommended, shouldn't each staple be sealed to prevent water/vapor flow? The staples really aren't a factor in terms of affecting the poly sheet permeability. There's not a vapor drive in a regular shower like you get in an enclosed steam shower with a true steam generator. So hang the poly, slap a few staples to hold it in place, then cover it with the cement board. 3. Once the hardibacker is in place, should the screws also be sealed? If not, why not? (The Hardibacker instructions only say to tape and seal the seams.) If the screws should be sealed, is thinset enough, or use some other type of sealant? Screws don't need to be sealed. The vapor barrier is behind the face of the hardie so there's no need to seal anything on the face of the board like the screw holes. Any divot where the screw head is will get filled with thinset when you tile. 4. Should the poly be sealed across the tops and sides with some sort of sealant? If not, why not (wouldn�t the water/steam simply go around these unsealed ends? No need. Again, it's not a steam shower where all six sides of the steam shower cube need a tight and integral vapor barrier. We're really just worried about water on the walls getting through the tile/grout, be it through penetration/absorption, through pinholes in the grout, cracks in the grout or tile, etc. In a shower surround I usually hang one sheet of 6-mil plastic and wrap it around the walls, from one wall to the next. Leave it a little slack in the corners so it doesn't get stressed/stretched when you hang the tile backer board. 5. For the area where the poly overlaps the tub flange, again I assume a sealant should be applied between the tub flange and the back surface of the poly. Yes, you can run a bead of sealant or caulk on the flange then bed the poly into the sealant/caulk. That'll hold it secure to the flange. Then cut the excess off with a utility knife. 6. What about the plumbing pipes? Will a good bead of sealant all around be enough, or is there some technique for this area? No worries, again, this isn't a steam shower where you have true vapor drive. The shower arm hole will be covered with an escutcheon plate and it'll be above the splash zone. The trim plate that covers the shower valve usually has a gasket on the back of it, when you install it it seals the trim cover tight to the tile so no water can get through the valve trim and into the wall. 7. EXACTLY what type of sealant should I use? I've seen references to using asphalt tar, silicone caulk, acoustic sealant, Kerdifix�.? Can acoustic sealant be bought at HomeDepot/Lowes/Menards? I usually use a urethane sealant when I'm looking for a sealant. For caulk, usually a silicon-latex will work fine. 8. Should you use the same type of sealant on the poly/tub flange area as you would on the other edges of the poly? Really no need. Just seal the poly to the tub flange to help hold it in place. 9. Here is my major puzzlement: I keep reading that a bead of caulk should be run between the installed poly and the cement board at the bottom of the tub flange. Wouldn't this trap any moisture between the board and the poly?? How can the water run back into the tub if there is a line of caulk blocking the path? On the other hand, if it is left unsealed, how to you prevent water from the shower area getting on the end of the board and wicking up the board? (Or is it irrelevant that the board gets wet because of the poly barrier?) It's a confusing area. You can seal the poly to the tub flange, it's not necessarily a "seal", it's more just tacking it in place so it doesn't slide around. That's really the only thing you have to do at the tub flange, is make sure that the poly is overlapping the tub. After tiling, a lot of folk will caulk the tile to the tub. Some caulk the entire line, some leave a few areas open as "weep holes", some don't caulk it at all. Whatever moisture gets through the tile and grout then hits the cement board. The poly prevents the insulation and framing from wicking that moisture out of the cement board and into the framing cavity. What usually happens is that during a non-showering drying cycle, the moisture that got through the tile and grout leaves the wall through the same path it entered...through the grout, the tile, the cracks and crevices, etc, and goes back into free air within the bathroom. If you do get excessive wetting in the cement board, then yes, liquid droplets can form on the poly. They'll run down the poly, or down through the cement board, and theoretically drain back in to the tub over the tub flange. Sealing the poly to the cement board deosn't do any good that I see. WEre you to ever get excess amounts of water in there, moisture down there will just wet the cement board and excess moisture will then just drip out the bottom edge of the cement board. That's why some folk leave weep holes or gaps in the caulk if they caulk the tub-to-tile line, or why some installers don't caulk it at all. Still, most people want the tile caulked to the tub, and that's fine, I have no reservations about doing that at all. Some people envision water building up back there...realize that if there were excessive water, it would saturate the cement board, then the grout would appear wet, and the grout would dry with the moisture going back into the bathroom air. It sounds a lot more serious than it all is. You need a seriously compromised wall to get water collection on the back side of a tiled wall. 10. What about the ceiling � My plan was to leave the existing drywall/greenboard up there (I haven't started demo yet, so I don't know exactly what it is.) Does this need to come down to studs + have poly barrier there also? If not, why not? Wouldn't steam simply absorb into the ceiling and go through to the studs? Again, it's just a shower, not a steam room. If it's in sound condition you can leave the drywall up there and just paint it. The paint film itself can act as a vapor retarder. 11. As for the plastic itself, as long as it is 6 mil, does it matter what "kind" it is? Home Depot only had one type, and it just says "plastic" on the label, which no indication of if it is poly or not. Do I need to find something particular? 6-mil polyethylene, or "PE" sheet plastic. They normally sell 4-mil and 6-mil, use the 6-mil, and it's usualy PE. 12. How far past the edge of the tub/tile area should the poly and hardiboard extend? It usually stops at the edge of the tub under the last column of wall tile. The wall tile hides the transition seam between cement board and drywall. 13. Should I use alkali-resistant tape and thinset at the seam where the hardiboard meets the existing drywall, or regular fiberglass tape and drywall compound? I use paper tape and joint compound with drywall. I use alkali resistant mesh tape and thinset on cement board. Since the transition line will be covered with tile, I use mesh tape and thinset at the cement board/drywall transition seam. One extra tidbit: If you thinset and tape the seams between the cement board panels on one day and then tile the next, one big mistake people do is they leave too much thinset buildup on the seams, you end up with humps. The seam should be flat. It might even help to tape and thinset the seams as you're tiling the wall....See Moreattachimg dishwasher with water supply behind a wall
Comments (9)I would begin by getting a reputable plumber to look at the job; First off, the only approved method of making connections on iron pipe is by means of NPT (national pipe taper) threaded fittings or in some instances they will allow welding the pipe(providing you have a welder that is certified as a pipe fitter.) Next, A plumber can be held both civilly & criminally liable for any death, injury or property damage that arises from failure of his/her work. Now consider this: In order to get a Plumbers License one must undergo a four year apprenticeship where you must work 200 weeks under a master plumber & report your work history to the state apprenticeship board (any week with less than 40hours doesn't count). In addition to working under the master you must also attend an approved college or technical school night school and complete a state mandated carriculum on plumbing. Once you have a diploma from the college or tech school, and a certificate of completion from the state apprenticeship board confirming your hours of service you are then invited to go take the state licensing exam. You then pay anywhere from $250 to $500 non-refundable testing fee and they will schedule you for a time and place to take the exam. You will also be informed that the test is an open book exam and you are required to bring a list of reference books that generally cost another $600. Any reputable plumber will examine a job and figure out a "code approved" solution. In this case, if the pipe in question is an iron pipe and not accessible without major demolition they may locate another source for the water line to the dishwasher, but I can assure you, no reputable plumber is going to risk loosing his/her license and serious property liability problems merely to save the homeowner a few bucks. The fact that he is telling you that you will need an access panel so you can keep an eye on the work is a dead giveaway that this fool is not a reputable plumber and I don't care how many years he/she may have been in the business. We simply don't need that type of ppl making it look bad for real plumbers....See MoreHow To Make Toilet Less of a Focal Point???
Comments (104)I did try various looks for the curtains, lowered the pull backs, raised them, allowed them to just hang; the way they are now is was what looked okay to me. As the room evolves, these ones may get swapped out; for now they'll be fine. I also tried a heavier white curtain with white dots in the fabric which was too much as well as a valance that was totally hideous. Ohmygosh, the table is incredibly useful!!! I'm a huge fan of small, versatile pieces of furniture like tables and benches that can easily be moved around if need be, so this one was ideal. Many tables like this have a bottom shelf which I'm much happier without....See More
worthy
4 years agolast modified: 4 years ago
mainenell
4 years agoworthy
4 years agolast modified: 4 years agoUser
4 years agolast modified: 4 years agoworthy
4 years agolast modified: 4 years ago PRO
PROCharles Ross Homes
4 years ago
ksc36
4 years agobry911
4 years agoUser
4 years agolast modified: 4 years agocatbuilder
4 years agoUser
4 years agolast modified: 4 years ago


Related Stories
BATHROOM DESIGNHow to Install a Toilet in an Hour
Putting a new commode in a bathroom or powder room yourself saves plumber fees, and it's less scary than you might expect
Full Story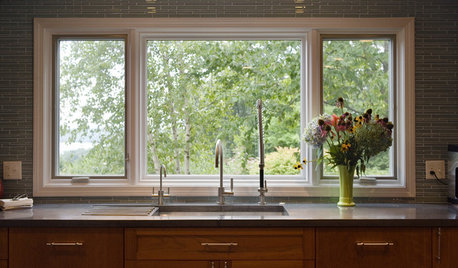
WINDOWSContractor Tips: How to Choose and Install Windows
5 factors to consider when picking and placing windows throughout your home
Full Story
REMODELING GUIDESContractor Tips: How to Install Tile
Before you pick up a single tile, pull from these tips for expert results
Full Story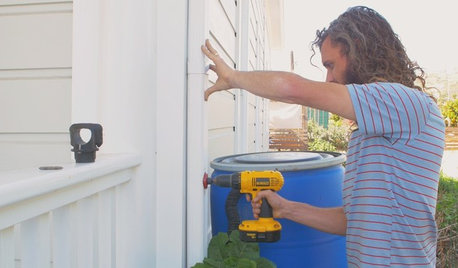
HOUZZ TVHouzz TV: How to Install a Rain Barrel
This DIY tutorial shows how easy it can be to capture rainwater from your roof to use in your garden later
Full Story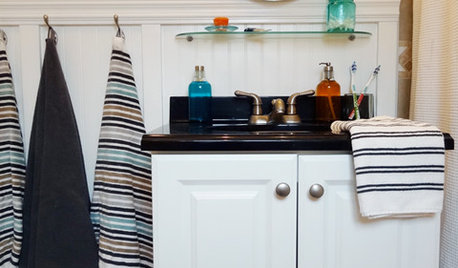
WALL TREATMENTSBeadboard Panels Offer a Shortcut to a Classic Style
Traditional touch: Change up plain bathroom walls with beaded hardwood planks and trim you can install yourself
Full Story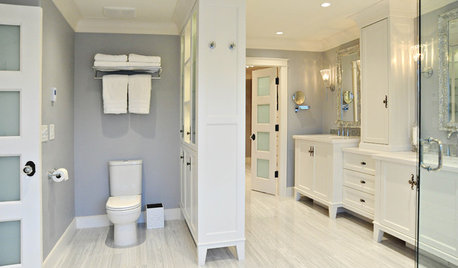
BATHROOM DESIGNBath Remodeling: So, Where to Put the Toilet?
There's a lot to consider: paneling, baseboards, shower door. Before you install the toilet, get situated with these tips
Full Story
GREEN BUILDINGGoing Solar at Home: Solar Panel Basics
Save money on electricity and reduce your carbon footprint by installing photovoltaic panels. This guide will help you get started
Full Story
DOORS5 Questions to Ask Before Installing a Barn Door
Find out whether that barn door you love is the right solution for your space
Full Story
GREEN BUILDINGLet’s Clear Up Some Confusion About Solar Panels
Different panel types do different things. If you want solar energy for your home, get the basics here first
Full Story
CONTRACTOR TIPSContractor Tips: Countertop Installation from Start to Finish
From counter templates to ongoing care, a professional contractor shares what you need to know
Full Story


User