


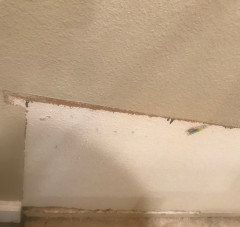
How can you remove / blend the hard edge of an old paint line
Ryan
4 years ago
last modified: 4 years ago
Featured Answer
Sort by:Oldest
Comments (9)

party_music50
4 years ago
functionthenlook
4 years agoRelated Discussions
Old question.....Know how to remove paint from a soda bottle???
Comments (2)I've never tried goo gone but twice now I've put what I thot was red colored glass in the dishwasher but it wasn't colored glass but some sort of colored coating over white/green glass. This coating turns cloudy in the DW and I've had to scrape it off. On this last one DH used paint remover which worked fairly well except for the crevasses. I really need to look closely at cheap YS colored glass before I buy it....See MoreOld house - not hard wood flooring questions
Comments (7)I realized after I posted that I just added more issues to think about; but you are correct there are tons of info and misinfo out there about floors in general. Nail polish remover is acetone, and what you removed was probably old-fashioned varnish which I think is soluble in acetone. I'm not sure acetone dissolves shellac - alcohol does that. It's not un common to have multiple different types of old finishes, for various reasons, (You might try some denatured alcohol, or vodka. I use grain alcohol which is the nuts, though sometimes hard to obtain because of laws trying to prevent people from misusing it. I actually have to leave NY and buy mine in VT, by preorder from a State source.) The cracks you see in August (and still now) are likely the narrow ones! Wait until late March rolls around after a full winter of heating. I can lose Bic pens in some of mine. That's when they are easiest to clean out, though. I wouldn't try anything other than emergency washing until the cracks are clean as there is no point moistening that junk in there. It's important that at the end of the season that the gaps are clean as they begin to swell back up. Dirt and debris trapped in the cracks as they close can compress the edges of the floor board, causing increasing gaps the next season. Of course old houses weren't built when there were effective vacuum cleaners so there's a lot of debris down there. As to washing: Murphy's has long been a standby, but has also acquired some (perhaps innaccurate) reputation as being hard to fully remove from floors prior to using poly urethane finishes. I will say this: about a decade ago I was visiting Montpelier, Pres. James Madison's plantation, (he was comtemporary pal of Thos. Jefferson) in VA. I happened to be visiting in the off season and got to wander around a bit more than most visitors. I climbed a staircase and encountered the curatorial staff working on an as-yet-unopened-to-the-public room. They were busily at work washing the floor of the room, with you guessed it: Murphy's and water. So if it's good enough for such an important and professionally cared-for house, it's probably good enough for mine. Otherwise I use Organic Linseed Oil Soap - imported from Sweden, doncha know. I got it from the site that sells the Silent Paint Remover. I find it's an excellent cleaner, smells nice and wasn't particularly expensive since I only use a little at a time. In olden days the floors were sometimes washed with lye, leached out of wood ashes, so I imagine a little Murphy's or Method won't hurt. Floors were also strewn with sand which was then swept up. (That's why you'll likely encounter sand in the cracks even if you're far from the beach.) Don't try washing unless you have a huge pile of rags on had to handdry the floor off at once. Yes, hand sanding or scraping is a one-room-at-a-time type project. More so than renting a drum sander. The only catch is how to meld the meeting point of applied finishes at the threshold when the adjacent rooms are not done all at once, if you don't have a raised threshold. One of the beauties of shellac is that it can be patched up or touched up, or joined together seamlessly anywhere, even in the middle of board in the middle of a room. It's not without its detractions however, the primary one being that it is not bulletproof the way modern poly is. OTOH, should trouble ensue you just clean the surface where the problem is of any wax and dirt and get out a brush and touch it up. It redissolves the old shellac, mixing it with the newly applied stuff and dries so the patch is invisible. Can't say that about any poly finish. You can get it completely off with rags and alcohol and start the whole thing anew if you want. The fix-ability and the reverse-ability have much to recommend it. It is also pretty easily DIY-ish, and cheap. You can search for more info using Google and here on thsi site. But be forewarned there is a LOT of anti-shellac prejudice out there by floor pros, and some people who are just repeating what someone else said. There are also some excellent reports by people who took the chance on it and are very happy. It is relatively slower to apply and more hands and kness sort of work. Don't try it unless you are in a warm-ish, but mostly unhumid time of year. You need to ventilate the room. It is not the worst stuff for breathing, but not benign either. Shellac itself (though not the carrier) is an organic product made from exudations of a beetle in India. I'm imagining you might be interested in seeing what can be learned from your floors. Here are two things to look for (get down on your knees with a good flashlight.) Look for little rows of holes running along the floor. The holes will probably close be together but the rows separated by about 21-27 inches apart. This is evidence of an early floor covering called ingrain carpet held down by tacks. Another thing to look for is evidence how the floor was finished originally (and to know if it has ever been sanded by modern methods). Drum and orbital sanders didn't exist, even sand paper as we know it didn't, so very sharp broadknives were used to scrape the floor flat and ready for finishing. If you hold a light at a raking angle in a place where the wouldn't have been much foot traffic, you may be able to see shallow 1/16th to 3/16 ths inch wide grooves on the surface. This are the still-remaining toolmarks of the original floor's finishing, you are looking at the hand-made work of the floor installer. If you can see the undersides of the boads, say y looking up at the first floor from the cellar, you may be able to see the saw pattern, which can tell you if it was made from logs using a hand-powered pit saw, circular saw, etc. This helps nail down the age of the building because of technology of locally available materials is often known pretty accurately. Have you sorted out which floors are the splintery-est? I have some fir and it has narrow, sharp, fierce splinters. The flat-sawn wide-board pine pretty mellow. Quarter-sawn oak strip is rarely that way. It's not uncommon to find many types of wood in a single house. It's worth learning the correct indentifications of both species and board type (flat, quarter, radial, T&G, butted, lapped, etc.) as sometimes choices of floor finishing techniques are limited by type of wood. Oh, I forgot to add: the reason I use old credit cards (and similar plastic things) to clean out cracks is that the edges and rounded corners are less damaging to the board sides within the groove than metal implements. Plus all the credit cards that are expired get another round of use if recycled into my floor tool box. Card companies used to send out plastic versions of fake ones they use to try and get you to apply for them. I was in plastic tool heaven, but, alas now the facsimiles are just cardboard. Another solvent to try is Soygel. It is particularly, though slowly, useful on floors. Leave it covered with plastic wrap for days, if necessary. Let time do the work, rather scraping it yourself. It also cleans up nicely which is something you can't say about most chemical strippers. All these solvents and the rags used to apply and clean off have the potential for spontaneous combustion. Either air them out on a line for days or dispose of them in a metal, closed container filled with water, and kept outside away from the house. HTH(elps) more than just adding to the overload. L. Here is a link that might be useful: source of Excellent Technical on Info on Care of Old Buildings (NPS Preserv. Briefs)...See MoreHow hard is it to remove a toilet........
Comments (4)The idea is very simple; 1. turnoff water 2. flush toilet 3. remove any water left 4. remove holddown bolts 5. lift toilet #3 is a mess, not only water but all the black gunk in the tank and then you need a large bucket to set the toilet on and tip to get any more water out of the trap. Get some help for this because toilets are heavy and awkward. #4 if it's been there a while you probably need to grind off the bolts To replace you need a new wax ring $1 and new holddown bolts $1. Pretty cheap but a lot of work. If you want a new toilet now is a good time, otherwise I would work around it....See MoreHow to remove incorrect Old English Scratch Remover from wood
Comments (6)Old English furniture polish (which this is) lists this product as an oil. It is possible/probable that you can leave it alone and the oil will eventually disappear with normal cleaning methods (hardwood floor cleaner such as Bona, Loba, Polywhey Cleaner, etc). Even a 'drop of dawn' soap in 1 gallon of water would do it. As mentioned above, a bit of bleach (5% solution on wood is about as exciting as you want to get) *might do it. If I'm correct and this is a temporary 'oil' then a mild degreaser (such as Windex original) can get rid of this stuff. I would be VERY cautious when using ANYTHING other than a wood floor cleaner. Personally I would dampen a clean cloth with the Windex and then LIGHTLY DAB at a bit of the dark colour. I would check the clean cloth to see if there is any 'old english' that is coming up. If it is, I would continue to be very gentle with the removal. And for the record, these 'oil' based products can cause damage to wood floors to the point where they may not be refinished in the future. That would be a TERRIBLE upset to someone who just wanted to make their floors look 'a little better'. You currently have a CLEAR finish over the wood. To get rid of the LOOK of nasty scratches (from dragging things across the floor), you can work with a FINISH pen. Yep. Home Depot, etc carries many versions of Finish pens. These are pen-like containers filled with URETHANE. You use them like a stain-pen...except there is zero colour. All you have to do is match the gloss level of your floor and voila you have a 'cure' for damaged finish. And the good thing about finish-pens is: they do NOT damage the wood nor cause any issues with future refnishing. Anything 'oil' (ahem...Murphy's Oil Soap, oil soap of any kind, 'eco' cleaners of any kind, etc, etc, etc) can and will contaminate the WOOD underneath to the point that future refinishing *could be made impossible....See MoreRyan
4 years agolast modified: 4 years ago
HU-955941711
4 years agoRyan
4 years agoDavidR
4 years ago
morz8 - Washington Coast
4 years agoci_lantro
4 years ago
Related Stories
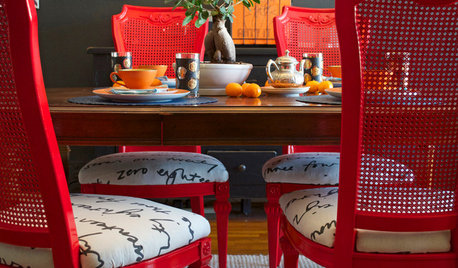
DIY PROJECTSDining Set Makeover: Paint and Tea-Tinted Fabric Make Old Chairs New
Reclaim dated dining chairs for far less than buying new, using spray paint, modern fabric and a handful of tea bags
Full Story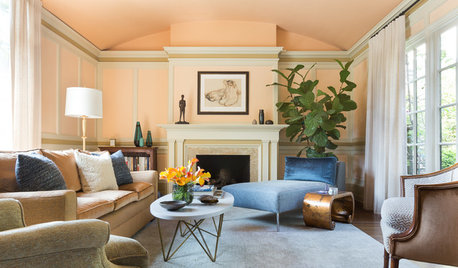
TRANSITIONAL HOMESHouzz Tour: The Science of Blending Old and New
An interior designer helps clients pull together modern furniture and heirloom pieces in a classic home
Full Story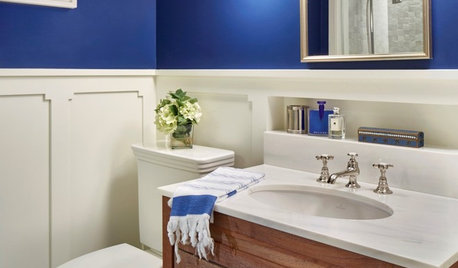
COLOR8 Small Spaces Where Paint Can Make a Big Impact
Don’t forget about these little areas in your home. The right paint color can inexpensively transform a space
Full Story
LIVING ROOMSOpen-Plan Living-Dining Room Blends Old and New
The sunken living area’s groovy corduroy sofa helps sets the tone for this contemporary design in Sydney
Full Story
DECORATING 101How to Choose a Paint Color You Can Live With
See 8 tips and tricks that can help you commit to a color you’ll love
Full Story
ADDITIONSWhat an Open-Plan Addition Can Do for Your Old House
Don’t resort to demolition just yet. With a little imagination, older homes can easily be adapted for modern living
Full Story
PAINTINGWhat to Know About Milk Paint and Chalk Paint — and How to Use Them
Learn the pros, cons, cost and more for these two easy-to-use paints that are great for giving furniture a vintage look
Full Story
HOUZZ TOURSHouzz Tour: A Modern Twist on a Century-Old Brooklyn Brownstone
An architect takes a ‘hard lines with soft edges’ approach to create a warm and cozy yet cleanly defined New York home
Full Story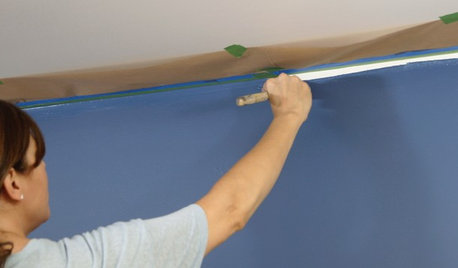
PAINTINGHouzz TV: How to Paint a Wall Faster
Should you roll your paint first or ‘cut in’ the edges with a brush first? This expert’s preference can save a lot of time
Full Story
DECORATING GUIDESAdd a Metallic Edge with Nailhead Trim
See what a line of studs or nailheads can do to upholstery, wood furniture, doors and more
Full Story


ci_lantro