


Wood Table Top DIY help
Sarah Linda
4 years ago

Featured Answer
Sort by:Oldest
Comments (6)

Ashley Riley
4 years agoRelated Discussions
Help identifying old marble-top coffee table
Comments (3)It's "French provincial" 1960's version. The piece of marble was obviously cut in Italy. The finish was called "fruitwood" and the wood was most any light colored wood. Looks like a well made table. He probably got it from one of the North Carolina furniture makers. Linda C...See Moreceramic tile top table help
Comments (0)This is a ceramic tile top table that i would like to replace the 4 corner tiles with floral designs. What would you recommend? The floral designs are stamped and painted so there are grooves going into the tile - is there a substance or paste to fill it in then paint over it? Or should i smash the tiles and replace with new ones? They measure 7 3/4" wide. They sit inside a pine ? wood table frame so underneath is not exposed to tile. Any ideas? Look at this photo posted at webshots.com: http://home-and-garden.webshots.com/photo/2626630950014131356oNssnf Here is a link that might be useful: tile top table...See MoreHelp-DR table top ruined from foam pad?
Comments (4)Try mineral oil (from drug store) and and old T-shirt first, if that doesn't take it out then you can try a very fine abrasive - I would tend to use rottenstone, but I would try baking soda if you don't have a source for rottenstone. Silver polish might work if there is no acid in it, it should just be a fine abrasive (like jeweler's rouge), I wouldn't try toothpaste b/c don't know what else might be in it that might affect finish. Whatever you use, rub gently only on the spots that need it. It may change the sheen in that area. You don't say whether your finish is glossy or more of a satin. You may have to buff the entire surface to get it to blend in. You could try posting over on Woodworking. BTW - I learned the hard way that those shelf liners/china separators that are rubbery mesh mats leave marks on the finish. At least it was only inside my china cabinet drawers. But they're selling chair pads now with the same stuff ("The Gripper") on the bottoms - don't leave them on your chairs! Here is a link that might be useful: Smithsonian's take on furniture polishes...See MoreWood Kitchen Table - How to Finish the Top?
Comments (6)Is this raw wood new construction, unfinished furniture or recently stripped? *** Existing Kitchen Table; not sanded down yet (still in use) Stains and poly don't have an indefinite shelf life. Get fresh and reduce your risk for a few dollars. If it goes wrong, you're looking at a lot more expense and time to undo and redo. *** Sounds like some experience here. *** What kind of stain ??? Alot of confusing choices. What should I gravitate towards ? ...shy away from ??? *** MinWax brand ? Oil-Based ? Gel ? Stay away from PolyShades. MinWax Polyurathane...Satin? Semi-Gloss ? Gloss ? A - Sand with ___ grit sandpaper (using Palm Sander) > Start with a grit coarse enough to smooth it out, but not so coarse that it creates more damage. Once it's smooth, subsequent sandings just reduce the scratch pattern to a finer one. B - Dust off / wipe down with wet rag / let dry > Dry rag will work. Dampened with mineral spirits if you want. If you dampen with mineral spirits, you will get a preview of what the wood looks like with finish only (no stain). *** Regular HD/L Mineral Spirits good enough ? C - Re-sand with ___ grit sandpaper > Keep going up to about 180 to 220. You can skip a grit if you want in this sequence: 100-120-150-180-220. If you're using a pad sander, I'd recommend hand sanding the last grit or two. You don't want pigtails. *** the 180 & 220 by hand; the courser ones by Palm Sander D - Dust off / wipe down with wet rag / let dry > same E - Stain with rag; let dry overnite > Be sure to wipe off and not leave heavy stain on surface. Depending upon the wood species (and choice of stain) you may get blotching. Whatcha got? *** I can't identify it...probably not too great - bottom of chairs say "Made in Malaysia". Has a cream-colored opaque finish that's pretty much "done". F - Rub down with steel wool (grade of steel wool ????___) >>>> NO - Not steel wool. Not needed now and not under any coat of finish. It can leave metal shards that can rust and leave ugly spots. *** There will be no steel wool ! G - Dust off / wipe down with wet rag / let dry > You don't abrade after the stain, so you won't have anything to wipe off. H - One more coat of stain > Usually not needed. But again, depends upon your choice. You might do this to adjust your color to your liking. *** OK. I - Dust off / wipe down with wet rag / let dry >ditto - no abrasion here J - Put on a coat of polyurathane > I'd never use less than 4 coats of poly. Less and less thinning as coats progress. Sanding to dull the surface to create a mechanical bond and to remove defects is important between each coat. P400 sandpaper and light gray Scotch-Brite. Apply "as little as possible to ensure complete coverage" at each coat. Thick poly coats lead to brush marks, curtains, and plastic-looking finish. *** OK. 'light grey Scotch Brite' ??? I'm lost on this one. K - Let it dry > yep L - Put it back in the Kitchen *** Thank you so much !!! This will be a new 'adventure'...still in a NY winter - so likely won't start till later on... Again - thank you for steering me in the right direction !!!...See More
Sarah Linda
4 years agoremodeling1840
4 years ago PRO
PROBeverlyFLADeziner
4 years agoJennifer
4 years ago

Related Stories
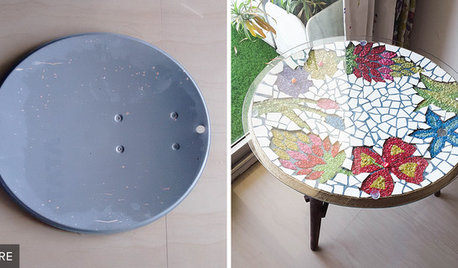
FURNITUREProject Rehab: Satellite Dish Now a Mosaic-Topped Breakfast Table
The signal was clear for this satellite dish: It was time for a change
Full Story
DIY Projects: Changing Your Look by Changing Your Table Arrangements
A guide to table decorations
Full Story

HOUSEKEEPINGHow to Remove Water Rings From Wood Tables
You may be surprised by some of these ideas for removing cloudy white water marks from wood surfaces
Full Story
HOUSEKEEPINGFurniture Clinic: Quick DIY Glides for Sofa, Chair or Table
Smooth things over between your furniture and floor with easy glides cut from leather scraps
Full Story
DECORATING GUIDESWeekend Project: DIY Side Table With a Novel Twist
See how to make this clever $30 over-the-sofa table for your coffee and book
Full Story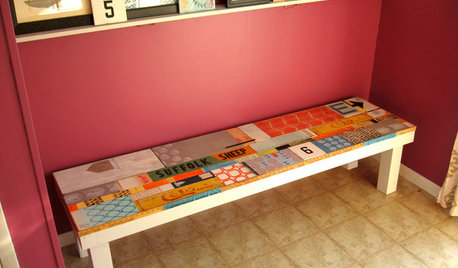
WOODWORKINGDIY Project: Artful Scrap-Wood Bench
Salvage signs, block-printed wood and a secret compartment turn a handmade bench into an interactive work of art
Full Story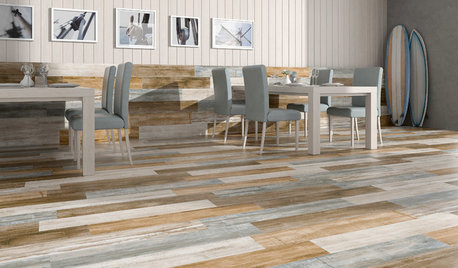
TILETop Tile Trends From the Coverings 2013 Show — the Wood Look
Get the beauty of wood while waving off potential splinters, rotting and long searches, thanks to eye-fooling ceramic and porcelain tiles
Full Story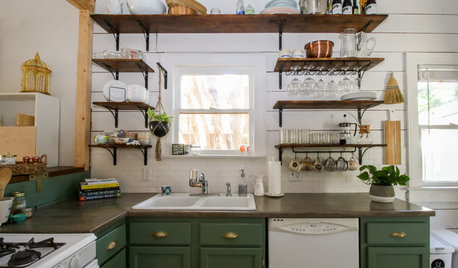
MY HOUZZMy Houzz: Friends Help With the DIY Redo of a San Antonio Kitchen
A Texas homeowner and her pals transform the room with green painted cabinets, open shelving and shiplap walls
Full Story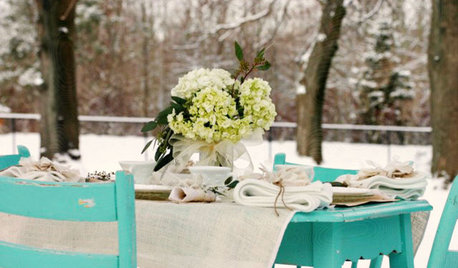
GARDENING AND LANDSCAPINGHandmade Home: DIY Outdoor Winter Table Setting
Embrace the cold weather and bundle up for an outdoor party in the snow!
Full Story


The KEEPING ROOM