

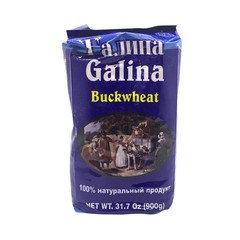
Buckwheat groats
8 years ago
last modified: 8 years ago
Featured Answer
Sort by:Oldest
Comments (14)
 8 years ago
Related Discussions
Oat farls - good and bad news
Comments (10)Glad you liked the recipe. I generally form two rounds (1-inch thick) and cut each round into 6 or 8 wedges, and that fills a cookie sheet. For a St. Patrick's Day Hooley (party) I cut them with a shamrock shaped cookie cutter. We're having oat farls for breakfast this morning, ironically enough :-). I will have to give it a try with buckwheat groats and run the buckwheat through my flaker first. Great idea! I would say add enough buttermilk to the buckwheat groats to make sure they are coated with buttermilk, but not "swimming" in buttermilk, for the overnight soak. You can always adjust the hydration when you add the dry ingredients to make the dough. I made the recipe with "heavy bran" instead of oats years ago. A local mill gave away some heavy bran through the Extension Office and asked a group of willing souls to try it in recipes. Heavy bran is made from whole wheat berries. It's tempered (steamed) like oats are for oatmeal, then flaked and dried. Heavy bran is a base ingredient for flaked cereal. Anyway, I used it like old-fashioned oats and made farls with it. It worked well, but oatmeal gives it the best flavor. Have you ever used buckwheat groats in Tabouli? A good wheat-free alternative. -Grainlady...See MoreBuckwheat
Comments (6)It sounds like you have kasha. Was it whole, coarsely chopped, medium or fine? Traditional recipes for kasha call for an egg to be mixed with the buckwheat groats before cooking -- I skip the egg (I'm cheap). It only takes whole kasha about 10-minutes to cook, so if you have coarsely chopped, medium or fine kasha, then it will cook up quicker according to the size. Personally, I only use buckwheat or kasha (as well as buckwheat flour) in the winter. It's a warming food and I tend to eat traditional foods appropriate for each season. But that being said, you can use kasha for Tabbouli and all kinds of salads like you would use whole wheat, cracked wheat, or bulgur. You'll find some recipes at the link below. I like kasha uncooked added to granola for an interesting crunch and flavor; as an add-in to bread recipes (1/4- to 1/3-cup per loaf); or in cookies and will replace half of the oatmeal with uncooked kasha. STEAMED KASHA (source: The Splendid Grain - by Rebecca Wood) 1 c. kasha 2 c. water or vegetable stock or chicken stock 1 T. fat (vegetable oil, coconut oil, ghee, butter....) Salt and pepper Combine the water, fat, salt and pepper in a medium saucepan over high heat and bring to a boil. Slowly pour in groats (dumping them in all at once can cause the pot to boil over). Cover, reduce the heat, and simmer for 10-minutes, or until all the liquid is absorbed. Remove from the heat. Let steam, covered, for 5-10 minutes. Fluff with a fork and serve. Place leftovers in a bowl, cover with a cotton cloth, and leave at room temperature for up to 24-hours. Within 4 hours, the kasha may be used in a salad; after that, use it in a filling, stuffing, croquettes, or loaf. Variations: -Stir 1/2 c. toasted sunflower seeds into the boiling water. -Saute 1/2 c. diced onion in the oil before adding the water or stock and groats. -Add 1 T. chopped fresh herbs. -Replace the water or stock with milk or soy milk. Sweeten with honey to taste and add a pat of butter when ready to serve. Yield: about 2-1/2 cups -Grainlady Here is a link that might be useful: The Birkett Mills...See MorePearled Barley - why do I have this?
Comments (25)I make beef barley/mushroom stew also. I use whole foods recipe as a launching point. I didn't know you had to soak it first. I always just add it at the end and wait a bit before serving. A word of caution: add less barley than you think you should. In the case of the following recipe, 1/3 cup goes a l-o-n-g way. Here is a link that might be useful: beef barley stew...See MoreLOOKING for: German Recipe
Comments (11)Okay - its obvious none of you have ever been to Bremen where it a celebrated dish. Pinkel is really only known the vicinity of Bremen - go to Hannover or Hamburg and there is another type of sausage that mixes with the green kohl I don't know about the loaf thingy - none of that came out of my Bremen ancesters' kitchens unless you are thinking of "knippe". Kale and pinkel are easy. First order some good pinkle. To make it is really daunting. Karl Ehmers makes a delicious one - just spicy enough. You can order online. I suggest for a family of four - order at least 3 lbs. Think of a sort of peppery Scrapple in a casing. But you don't fry it - it is boiled. Grun Kohl 6 lbs kale washed and stripped 2 large yellow onion cut up 1 cup steel cut or Irish oats - not instant or reg oatmeal 1 2-4 lb smoked tenderloin 8 oz. salt pork salt/pepper Layer 1st three ingredients in large pot. Lay tenderloin in middle and layer in 1st three ingredients again. Put in salt pork and layer with what ever is left over. Put in 1/2 cup water, cover and put over slow simmer for 1 hour - check occassionally to make sure there is some water at bottom. Kale will shrink in 1/2. As all the meats and other ingredients start to meld together - take a wooden spoon and stir once in awhile. Don't worry if your meats start to fall apart - kale is a great "mooshing" meal. Kale is best eaten after it has rested for a day in a cold place. Reheat it slowly. For the pinkle - keep frozen. Pierce them LIGHLTY in two spots with a fork and place into boiling water. Turn down the water to a rolling boil for 10 - 15 minutes. Serve with boiled potatoes, spicy mustard and beer. Sehr gut!...See More- PRO8 years ago
 8 years ago
- PRO8 years agolast modified: 8 years ago
- PRO8 years ago
- PRO8 years ago
- PRO8 years ago
- 8 years ago



wintercat_gw