


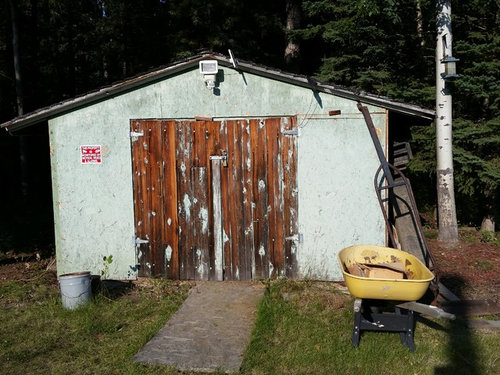
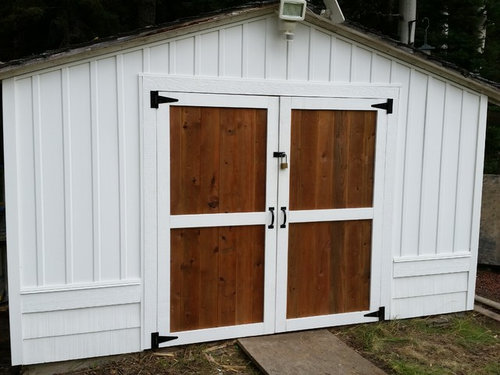
Seriously Ugly Shed, Before and After Exterior Redo
RenoGirl
5 years ago
Featured Answer
Sort by:Oldest
Comments (17)

apple_pie_order
5 years agoRelated Discussions
Updated 1980's bath...before & after pics
Comments (31)Wow, it's fun to see this thread again! I missed out totally on the posts made in April! I checked back here today because over on Home Dec Awm03 said she'd commented here. Thanks for letting me know, Awm03! NicoleAusten, thank you so much for your very flattering words!!! By now, I suppose you've selected your doors. Which did you choose? Flyleft! Hi! I wasn't hanging around when YOU posted, darling! I am very touched by your screen name suggestion. Thanks! Colorfast, that's nice of you to say. Yes, the paint selection is an important task, yes? I am delighted to say I am still enjoying this Clear Pond hue from Behr. Awm03, thanks for looking, and for checking on my little PR project! I have all my ideas together, but not the person to make it happen! I am interviewing another "Skilled Craftsman" Monday. Send positive energy for me that this guy is the "one!" LOL! Wifisker, thanks! I appreciate that! Indeed, HD & Lowes have some amazing options these days. Btw, my project was completed the day after Thanksgiving, 2011, and I purchased a lot from HD around Labor Day. Keep a lookout for really good sales there around that time. Many specials are online only. (I saved a bundle on the vanities buying them online and on sale.) Hi Lukki! I think of you as the bath remodel queen, so I am really delighted that we selected the same faucet! Thanks for stopping by!...See MoreBefore and After - Avocado Bathroom Update
Comments (99)Rjinga, I hope you see this, since it's not moving to the top. I was out of town for the holiday, but I found your posts in my email. Thanks so much for your lovely compliments! The painted top held up well. We sold the house a few months ago, and all the potential buyers thought it was granite! Even many Realtors (who have likely seen plenty of the real thing). I never did redo the poly to smooth out the brush strokes, and never even had to touch it up. My husband and I aren't hard on things, but I did have water, perfume, hairspray, curling irons, etc. on and around the counter with no problems. It wiped clean with a spritz of 409 and a soft cloth. If I ever do it again, I will try the oil poly with a pantyhose applicator, but I definitely recommend this easy technique if you want a faux granite top....See MoreGreige Kitchen Reveal (before and after pics!!)
Comments (47)THANK YOU so much for all the wonderful feedback! I'm sorry I've dropped off the face of the earth but btwn going back to work after 2 weeks off and having a sick kid at home I feel like I've been hit by a fast moving train... I wish I knew how to hyperlink back to specific people so I can respond directly but I will try to address a few questions that I've seen! Table -- we definitely had to replace that sucker! It was Pottery Barn circa the mid-90's, and was very "well loved"!! We did have a smart idea that actually my PAINTER suggested -- we painted it (the same color as the island, b/c we had a lot of it left over and loved the color - Black Fox), and moved it up to our playroom to use as a game table (took the leaves out). It looks like a million bucks, and it's so nice to be able to reuse it! I do love our new table (which was the last thing to arrive, just last week!). I definitely wanted round so we had more space to navigate, but we were torn btwn 60 and 54"... Went with the smaller one which is perfect for five, but might be tight for more people! But, I do think any bigger would have been a little crowded down at that end of the room. I had to keep reminding myself to think about our day to day needs as opposed to much more infrequent entertaining or hosting situations. Day to day it is perfect!! And yes we did just keep our existing chairs and reupholster. Tried to tie in a couple of "pop" colors (turquoise and orange) so it was not so monotone. We also had considered painting the chairs to match the table more closely, but I like the contrast of the wood! Here is a close up picture (with one chair removed): Hutch -- definitely was a great idea to hide clutter! Funny story: My 11 yr old took one look at it once the glass was installed and was horrified! "Mommy did you actually PAY for it to look that way? It's all spotty!" :) Very funny to see things through the eyes of a child!! Here's a close up of the mirror: Oven/Range -- I hope I love my griddle some day! I'm really intimidated by it. I actually bought steaks to make on it tonight. I wish I could find a griddle cookbook!! Please lmk if anyone knows of such a thing! I need to just keep trying and hopefully the love will grow... :) My husband uses it for breakfasts but that's about it so far! Outlets - we did include just one pair of outlets at the hutch, and tbh we have not really plugged anything in except the phone. So we have an outlet and a phone connection in there. Otherwise, we put an outlet on each end of the island (facing the window wall). We do not have any outlets on the other side (facing the pantry wall), which sometimes is annoying but mostly I would use it for my laptop, and I can just reach around. Aesthetically it would not have been the best. Also, for some reason my GC was very down on installing plug mold under the cabinets. He did not want to put it in, and I did not want outlets on the backsplash. Ultimately he put regular 2-gang outlets (?) up under the lip of the cabinets, mounted against the bottom of each cabinet -- genius idea. So now I have two plugs (if that makes sense) under each of the three cabinets. Definitely more than I need! And we put a couple of outlets in the coffee bar, and had a couple on the walls. So far so good! Floors - One more thing I'm really glad we did while we were redoing the floors, which I never would have thought of, is to replace our old metal A/C registers with wood ones that are flush with the floor. My GC suggested it, and I think they were like $10 a piece -- another genius idea!! They look SO great compared to the old ones! I love the small updates that end up making a big difference! Microwave - this was a tough decision as well. We were going to put it in the island, but I was worried about it being too crowded wherever it went. We really only use it for popcorn and an occasional reheat. It's definitely not a super convenient location, but I thought it was the lesser of two evils! (ie in the way, or out of the way!!). It is also nice to be able to close those doors and not look at it, too. TV over fridge -- someone on this site gave me that suggestion, literally at the very last minute, and I'm really glad we did it! Funnily enough, my husband wanted to put it between the two windows by the table, but then I realized we would not be able to see it b/c of the light fixture. So then he wanted to put in recessed cans, which I briefly considered, but I really like having a hanging fixture there. So over the Refrigerator it went. Here is a picture of it taken from the family room with the TV cabinet open. A great side benefit, which we did not plan for, is that apparently my husband can sit on the sofa and watch two football games at once, since we arched that doorway -- he can clearly see it from the other room! While I'm at it, here is a pic of the kitchen from the Dining Room (other doorway). I was hesitant to put the oven against the wall b/c this is literally the view you have as you walk into my front door -- you can see through the dining room and into the kitchen. But, I figured, it's a beautiful appliance, and at some point you just have to make the best decision you can with what you have. It was either on the island (I was not crazy about having a ceiling-mounted hood), or against the wall, so the wall is where it ended up. Last thing -- this is pretty much off topic, but I wanted to share my favorite "score" during our reno!! Unfortunately we had some scope creep, and since we were redoing the floors, we ended up redoing a couple of bathrooms and the laundry room - partially... Husband did not want to rip and replace cabinets b/c after all it's just a laundry room! So we kept the boxes, replaced the ugly doors, repainted inside and out, installed new floor tile that we found at Home Depot (previously had been linoleum), got new sink/faucet, and then I was left with what to do about countertops. I looked and looked at builder-grade granite, but it was all speckly and just not what I wanted. There were so many great options but all were more than I wanted to spend. One day at Home Depot I happened upon the laminate area, and lo and behold, there was a laminate in the SAME PATTERN as my quartzite - Mother of Pearl! I ended up spending $325 on the countertops, which I think look AWESOME, and coordinate w/the rest of the house really well! I'm afraid that if there is such a thing as over sharing, I crossed that boundary LONG ago... Sorry for such a long post!!!!!! Oh and the pig - I do love that guy! He is a pitcher actually. Still need to do some work on "accessorizing" a rather monotone kitchen... I admit that I had to google towel pig and now I must try to find one!!! :)...See MoreHelp for an ugly exterior
Comments (36)You've got a house with some good lines. The place just needs a little punch (and a lot of elbow grease) to bring it back to the gem it should be. Here are a few suggestions... 1. Change the style of the shutters to more of a recessed panel look and paint them black. The recessed panel is more sophisticated and the black will add the punch you need. The white shutters that are there now look dingy and are just the same color as the rest of the paint on the house. 2. Center your portico on the front door and make it more substantial. Roof it with black seamed metal...it'll tie to your new shutters. 3. Take off your screen door, and replace your door with a wood door with character. Your new portico should be substantial enough to generally shelter it from the weather. 4. Remove the wrought iron railing and replace with a more traditional balustrade and newel post. Repeat the same style balustrade and newel post on your side porch to the right....and add steps from the side porch. 5. Replace your garage door with a white carriage-style garage door. Add a shed awning above the door to add architectural interest to the left portion and to break up an otherwise flat part of your house. Use the same black seamed metal roof that was used on the new portico. 6. Add beefier trim to the upstairs windows and tie it to a heavier trim board at the very top next to your eave. If you can, add muntins/mullions to your windows that have more of a profile...or replace the front windows with windows that have a truer divided-lite look. Add a black window box to the window on the left side of the house. All of these black accents are now tying together, creating a color theme and adding the punch this house needs. 7. Tame the hill! Take back your yard by adding a curved stone retaining wall and steps. The curve softens the straight edges of the house and follows the theme of the front door. Move the steps back toward the house more. This invites your guests up your driveway and is not as meandering as your current setup. Mirror the curved stone wall on the left of the driveway and make it shorter (not as tall). 8. You could also replace the driveway with pavers the same color as the stone retaining wall. All of this stone ties back to the stone on the house. It is always good to have themes run through your design...the stone, the black, the curves, etc. 9. Landscape with a mix of hostas, bushes and other shade-hardy, low-maintenance plants. Plant a flowering crab apple tree, cherry tree or something like it to introduce more color to your landscape in the springtime. Some boxwoods would also add some winter interest...and they are slow growing. 10. Introduce grass to your front yard. Here's how it might look......See More
Molly D. Zone4B
5 years ago
houssaon
5 years ago
grapefruit1_ar
5 years agoUser
5 years ago
teeda
5 years ago PRO
PROMichels Homes
5 years agoUser
5 years ago
simplechoices
5 years ago
RenoGirl
5 years agolast modified: 5 years agohummingalong2
5 years ago PRO
PROEBL Interiors
5 years ago
indomom
5 years ago PRO
PROOTM Designs & Remodeling Inc.
5 years agokaye1951
5 years ago
torreykm
5 years ago

Related Stories
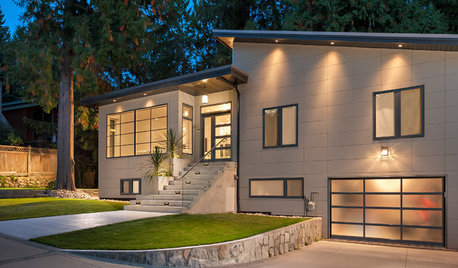
EXTERIORSBefore and After: 5 Striking Exterior Makeovers
By the time these designers were done, it was hard to believe these were the same houses
Full Story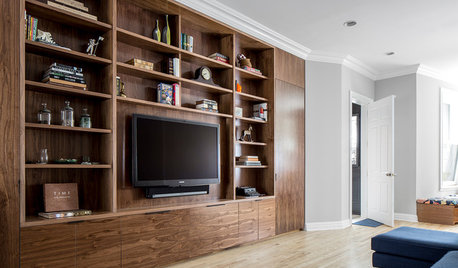
BEFORE AND AFTERSBefore and After: Redo Includes a New Media Wall and More
Gorgeous new built-ins, furnishings, windows and a new backyard update this New York family home
Full Story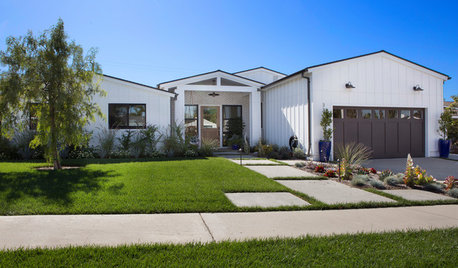
BEFORE AND AFTERSBefore and After: 5 Delightful Exterior Makeovers
See how new materials, bold paint colors and fresh landscaping transform these home exteriors
Full Story
SMALL SPACESBefore and After: Storage Spot to Backyard Bungalow for $2,000
A budget-friendly redo turns a ho-hum pool house into a beachy oasis for entertaining and hosting houseguests
Full Story
TRADE PROGRAMBefore & After: Glitzy '80s Bathroom Goes Sleek Modern
A Michigan design-build firm gives a Hollywood-inspired bathroom a radical redo
Full Story
BATHTUBSBefore and After: 6 Dream Bathrooms That Free the Tub
Freestanding tubs replace bulky built-ins in these beautiful bathroom remodels
Full Story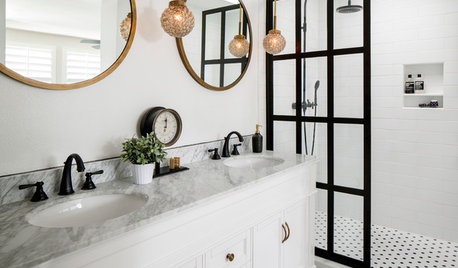
BEFORE AND AFTERSBefore and After: 6 Bathrooms That Said Goodbye to the Tub
Sleek showers replaced tub-shower combos in these bathroom remodels. Could this be an option for you?
Full Story
MOST POPULARBefore and After: 13 Dramatic Kitchen Transformations
See the wide range of ways in which homeowners are renovating their kitchens
Full Story
LANDSCAPE DESIGNBefore and After: 5 Amazing Backyard Transformations
Let these before-and-after photos inspire you to create a more functional, colorful and stylish backyard
Full Story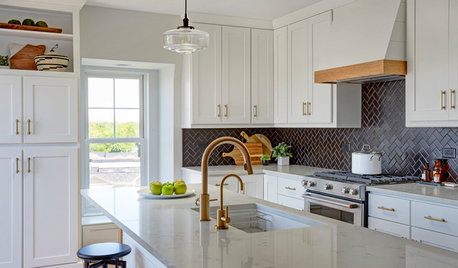
KITCHEN DESIGNBefore and After: 6 Kitchen Makeovers in 200 Square Feet or Less
See how pros used new layouts and finishes to make these kitchens work better for homeowners
Full Story


Saypoint zone 6 CT