


Newbie could use some sage advice
Hello, I am about to try (for the first time) starting seeds under a light, before planting them this spring, in my outdoor container garden. I'd love some advice. I have a couple basic questions:
1. What type of bulbs should I consider using? I want to avoid anything that will break the bank. But I also don't want to waste my time on something that isn't decent. I"m currently overhwlemed by LED vs fluorescent vs just using natural light...
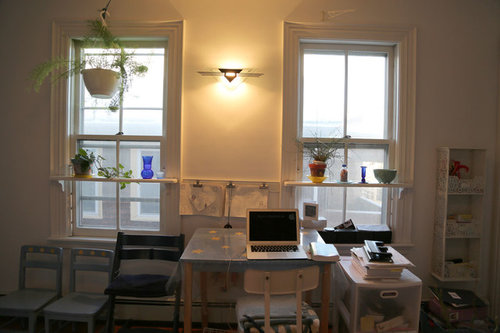
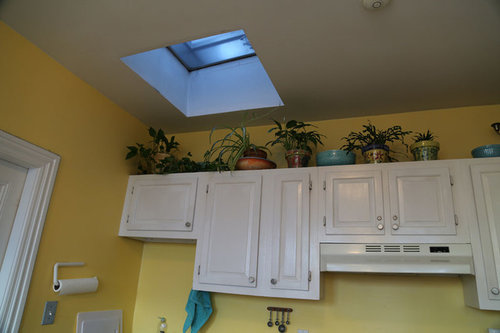
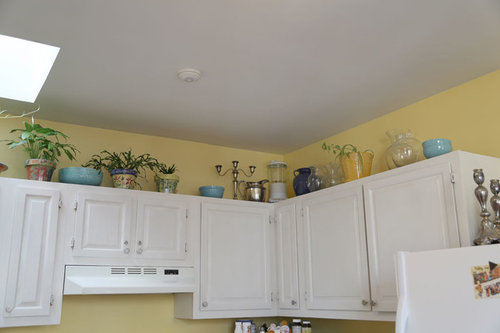
2. What location is best? (See pictures) The window (where would I put the bulbs?) Or, above the cabinets? (Not under the skylight, but rather, toward the right side of the pictures - where it's darker)
3. I want to start with some basic tomatoes and a few easy flowers, but also try (and I know it's hard) to start Gerbera daisy seeds. Would I use the same light for both?
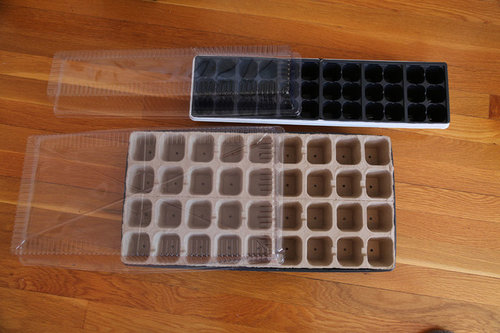
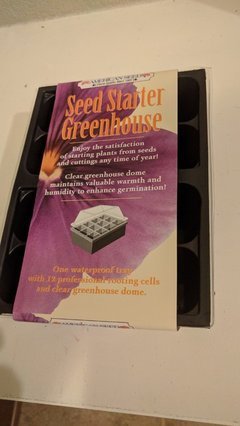
4. I'm not sure what to put the seeds in. I bought these two containers, and am debating their merits. The black plastic has 2"x2" "pots." The brown one is has 1.5" x 1.5" pots. Also, the directions say that I can put the brown pot right into the soil w/o needing to remove the seedling. I worry though, what is in that brown pot? Is it okay to eat a veggie grown in it? (See picture) Also, would I use the plastic tops or only if/when I bring them outside?
Thank you for any help you can offer!!!
Noel
Comments (71)

NoelinMA
Original Author6 years agoHi Tim,
Wow, you grow veggies year round? So you pick and grow from the same pots -- and never replant outside? That's a concept I never thought about. Regarding seed trays, I bought mine at Christmas Tree Shops. At least they were cheap! Thank you for the tip about seed starting mix.
Great point about the width of the lights. Oh man, the water always looks so scary before you jump !
Yes, I agree re: Youtube. I feel exactly the same way. I've done a bunch of googling and it seems like there pot growers are the most avid posters. LOL. I'm going to do some more looking.
Thank you again so much for *holding my hand* here.
Tim in Colorado (5b)
6 years agolast modified: 6 years agoWell, I'm new to attempting the year-round thing. I just built that rack last month and I'm fine-tuning it. So I should have started off with a disclaimer that I'm pretty new to this and don't have anywhere near the experience of many others here. But I've also recently done a lot of the research, having just gone through some of what you're looking at.
Some things grow great indoors. At the top if the list is lettuce (as you see in the picture in those 6" pots (Dollar Tree). When it's not seed-start time for the upcoming outdoor season, I plan to grow a steady supply of lettuce and spinach for harvesting Oct-May. Seems to be the most foolproof stuff to grow, and save money growing my own. Got various herbs started too but I've had mixed results growing those indoors. The grow rack should help though for a consistent light source.
The plan is to get tomatoes and peppers started a month or two earlier so they're ready to produce outside by mid-summer instead of just late-summer. While I have a limited in-ground garden for some things too, I put the tomatoes and peppers in grow bags. I'll transplant those to the bigger grow bags in May when it's warm enough outside. That's the "reuse" soil I was talking about, bringing any in from outside. I did that a month ago which was a big mistake. My first set of seed starts mostly all died from "damping off". Tried to save money by not buying a new bag of seed start soil, but that didn't work. Except for the lettuce and some of the spinach, which seems less prone to damping off for some reason.
On YouTube, there's a lot of great gardeners out there that have their own channels. If I had to pick one to recommend, I'd probably go with Gary Pilarchik as being the easiest to follow for beginners. His how-to's are really well explained...
https://www.youtube.com/channel/UCptL6_qMImyW_yZwiMjQdpg
https://www.youtube.com/watch?v=Xg8SbKdsUuY&t=32s
I'm still a relative beginner myself, just 3 years into doing any vegetable gardening. I recently retired, so I have a lot of time to devote to it (probably too much). Forums like this are great place to share info and experiences. We're all still learning. Gardening seems to be the ultimate "trial and error" endeavor.
Hope it all goes well!
Related Discussions
I could use some advice (sorry, kinda long)
Q
Comments (55)Linda, dropping dirt is exactly what I do ha. I work for a propogating nursery and we have huge compost piles outside which we are generously allowed to use. I take two big plastic boxes left over from when we moved here and fill them every day with the compost (mostly dirt but lots of interesting stuff comes up in it). I take it home and drop it on the sand until I have the size or shape garden I want. I plant it and eventually I border it with dropped cement. I've made about seven gardens of different sizes doing this. Seriously I could drop the dirt and water it and all kinds of goodies would pop up (along with weeds). I've had datura, viola, spiderwort, hyssop and of course petunias come up in it. Adele...See MoreSucculent Newbie: could use some help with ID's and a few questions?
Q
Comments (12)I am assuming you bought the C&S soil from Amazon, so it is quite new. In that case, you can use it, adding lots of pumice. Many use it mixed 50/50. You could keep that decorative pot (cache pot) if you like it. The problem with those is that they fit (usually) very tight, not allowing any air circulation, sometimes creating sweating-too much humidity and moisture. But if you were to leave the inner (plastic) pot out of it for a day or two after watering, it may work. Make sure there is never any standing water in these cache (decorative) pots. If any of the pots are without drainage holes, either change them or drill some holes in them. Slots (if I am correct about what you call slots) are most likely not enough for good drainage. Your Mexican giant is apparently Echeveria colorata 'Mexican Giant' - it is supposedly slow grower. The powdery coating is most attractive (probably more than some other succulents), so just try not to touch new leaves much (not easy to do!) Difficult to say exactly why it is leaning: it may be that was 'squished' much in the box; it could have been growing that way since it was leaning towards the light source; the worse would be if the stem is rotting - you would probably already noticed. Make sure they are healthy, if any roots are damaged or rotting, they should be cut off. Prop it lightly with a bigger rock (similar to photo below) and make sure it gets good light - if needed, rotate the pot 1/4 turn every few days: Many succulents propagate from leaves easily - I have no idea about this one. You can try - & let us know......See MoreCould use some pruning advice
Q
Comments (5)I’d cut it at line #2 , to get rid of that ugly purposeless graft scar. With time it will be a beauty! Let us know how it’s doing! :)...See MoreCould use some advice from Texas
Q
Comments (35)Here is a list I compiled of blooming plants that do well for me in the heat of summer. Bear in mind........these might not do well for everyone, but they work for me. I would think they would do well in any hot climate. My clematis have always done just fine with extra mulch/composted horse mature put on the base of the crown - same as I do for my roses. When I first started growing them, I put the proverbial stone over the roots to keep them shaded. When I realized it didnt make any difference, I just used the mulch. I just bought 3 more at Tractor Supply this afternoon. [Nelly Moser, Jackmanii and Rouge Cardinal]......needed some special feed for one of my older horses - came out with that, 3 clematis and 3 roses - Tiffany, that I had been wanting, 2 Sally Holmes, 1 for a friend. Same with Walmart - found 3 Lavender Crush I had to have........good thing every store I go into doesnt have roses! Hope this list helps! SUMMER PLANT LIST: periwinkles [Pacifica red is great] angelonia – dark purple and white show up best purselane/portulaca [does well in pots] – edging in hot sun hibiscus [tropical] – in pots or planted in ground lantana – New Gold is not as invasive mandavilla – climbing vine, loves hot sun plumbago canna Sun Coleus profusion zinnas [like white & yellow gomphrena [combo: orange marigolds or profusion zinnias w/ purple gomphrena] Fireworks is lovely – tall and spreads zinnas from seed [spray for mildew] salvia – perennial greggii [put in drifts or rows] - Blue farnicia esperanza Gold Bells - sun cant get hot enough for this one, blooms constantly blue daze Lady In Red salvia [overwintered well in pot in greenhouse in 2011- Celosia cristata – cockscomb celosia – loves heat Mexican Honeysuckle – justinicia Mexican heather Mexican Cosmos [tithonia] – hard to find, was at ARE Jerusalem sage potato vine [use new bronze color with fall blooming plants] grasses: purple fountain grass ,asparagus fern, ornamental peppers...See MoreNoelinMA
Original Author6 years agoHi, Tim, thank you so much (for the info and the video links)! I think you can never have too much time to do the things you love. Sounds like you a relearning and growing (pun intended) all the time. I hope you follow in your footsteps and I start growing indoors! Thank you again so so much!!
User
6 years agolast modified: 6 years agoTim- I started using straight coir for my seeding trays and damping off disappeared. If I seed in a deeper cell I put potting soil in the bottom two thirds and a layer of coir on top for the seed to start in.
Tim in Colorado (5b)
6 years agoThanks Ubro. I did some trays with just pure peat moss+perlite mixed in and many of those got it too. But I had them all in close proximity to the others with outdoor soil, and gnats, so seems like it might have cross-contaminated somehow. Or maybe the bucket or shovel contaminated it. I didn't wash them out good first before using them to moisten the peat+perlite mix.
From now on I'll be much more careful cleaning before doing seed starts.
NoelinMA
Original Author6 years agoUbro. I did something like this with an indoor plant. What confused me was then, how much to water. I found it tough to tell when was too much vs too little. Feels like this might be even trickier with seedlings.
User
6 years agoCoir is easier with seedlings, coir seems to resist damping off disease more than anything else I have used. It stays damp(not wet) longer than peat moss so little seedlings do not suffer as quick from lack of water. You can let the surface dry, which is where damping of starts, and the little roots are still in a slightly moist medium.
I do over 1000 flower seedlings each spring and I don't sterilize any of my last years seedling trays, just wash, fill with coir and go. Sometimes I put my seeds in a plastic baggie with damp, not wet, coir, let them germinate. Then I dump them out onto a tray and only plant the ones that have rooted.
Coir works for me, but if you use other media it can work as well, especially if you put a small 6" fan blowing gently over them. This can help combat damping off as well. Fungus gnats are usually a sign that the media is too wet for too long.
NoelinMA
Original Author6 years agoUbro, So you use ONLY coir? (I get it now, "straight coir") Do you recommend your baggie approach for a beginner? I'm assuming the baggie is open. Do you put the baggie under a light? How long does it take generally? How many seeds per baggie? Lots? A few? Thank you.
User
6 years agoI use about 1 cup of damp (not wet) coir and as many seeds as I like. I close the bag and put it on a shelf, I don't pay much attention to the light. It doesn't take long if the baggie is in a warm place. It is easy for a beginner but some people find it hard to pick up the germinated seed. I make a hole in my cell with a pencil, toothpick or skewer, drop in the seed root down, push a little dirt around it and water.
If you go the the Growing from seed forum and type in "baggie method" in the search area you will come up with lots of suggestions and good directions on this method, I am sure you will find one that works for you. This method saves a lot of space as you only pot up the seeds that are viable.

Paul MI
6 years agolast modified: 6 years agoFirst bit of advice would be to get those poor plants off the cupboards (unless that is just a very temporary winter home) ... With the exception of the ones directly under the skylight, the light they are receiving there is poor at best. Even low light plants will not thrive there.
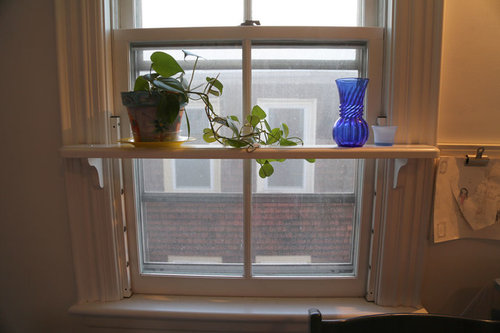
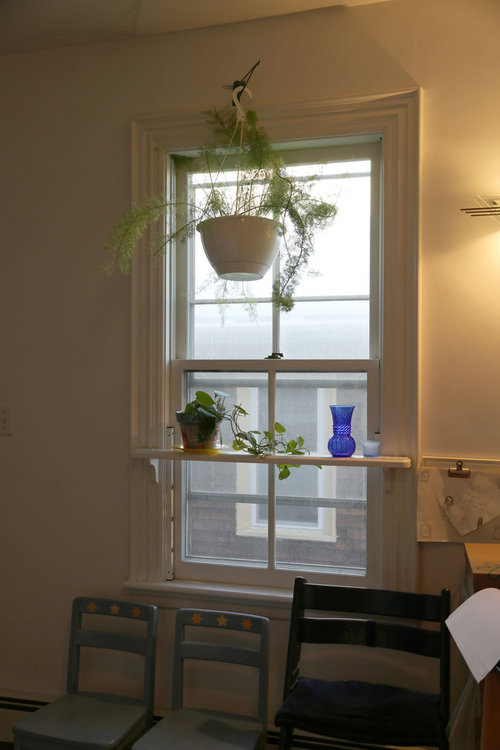
Btw, if you did wish to make more use of your window areas, on rare occasion I have seen hanging shelves. They would hang from a hook like the one your spiderplant is on. Usually when I have seen such things, they are at craft shows or specialty nurseries. If that sounds like a useful idea, perhaps you can even sweet talk a craft-handy family member or friend into making one for you. :-)
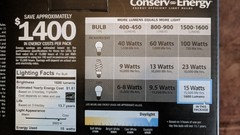
Many generic LED lights are in the yellow range of the spectrum (color temp around 3000K) which is of little use to plants. The most useful color ranges are the blue and red ends of the spectrum, (Unfortunately for plants, few of us want to view things under purple light.) So do look for the temp color as others have mentioned.
With fluorescent tube lights, keep in mind that with a standard 4ft tube, the light output of first 6-8inches at either end of the tube is far below that of the rest of the tube even though it doesn't usually seem like it.
If you do elect to install lights above your cabinets, you may wish to consider to go with more aesthetically pleasing fixtures than a standard shoplight. That way it would not detract from the appearance of your kitchen and might be serviceable for plants year round. Also, I don't think I would bother trying to install chained fixtures above the cabinets: 1) I don't think you'll really have enough room to make that practical, and 2) it would look rather odd as in that location one would expect "regular fixtures" installed to be even with one another. An alternative would be to raise or lower the trays instead. I do something like this on my lighted plant stand which I use year round for a number of my plants. My lights are shoplight fixtures and they are on chains so I do indeed do some raising and lowering of the fixtures. However, because of the wide variety of plants I grow and their different needs and sizes, there is a very real limit to how much I can lower the lights. My solution was to put some of my mini plants which desire very high light on top of pots (turned upside down) or square containers/boxes to put them closer to the lights.
Also regarding LEDs "lasting forever", keep in mind that, like any light, the actual output and quality of the light decreases over time. The generic LED tubes generally report a predicted lifespan of 30 000 -- 50 000 hours. However, if you read the fine print, that is only when run 3hrs/day or less (at least on the ones I have examined). If run longer one will likely have a significantly shorter lifespan than the hours predicted. (Btw, for those interested, 30 000hrs at 8hrs/day equates to approx 3750 days -- so a bit over 10 years -- while 50 000 would result in 6250 days.) After that time, while the lights may still light up, one should regulate them to use in the washroom or other places where one only needs light to see by rather than continue using them for plants. (The intensity and spectrum plants require to carry out photosynthesis is different than what our eyes need to see.)
@Tim: You can sterilize your old soil if you wish to reuse it. Depending upon the amount you need, you can either bake it in an oven or microwave it ... though either way you will want to open a couple windows to let the "earthy" scent disappate. Make sure the soil is damp not wet. In an oven, cover the soil with foil or a lid. You want to keep most of the steam in as this will kill just about anything. Bake for an hour and 350F.
@Tim: Most herbs require VERY high light and good air circulation. For your closet turned growing area, you could also install some PC fans -- one or two on each shelf. They are cheap and last a long time. (I have some in my 90gal terr that have been running 24/7 for at least 5-7 years now.)
Air circulation can help greatly reduce damping off and other mold issues.
Tim in Colorado (5b)
6 years agoOne note on the bulb life calculation... I believe you're off by a factor of 10. 30,000 hours / 8 hrs/day = 3750 days (~10 years). But good point about them losing some brightness over time. I've heard that too, but since LEDs are still fairly new, not sure there's a lot of extensive data on it yet. That is something I'll have to keep an eye on over years, but even if they only last 2-3 years at near-full brightness, I still prefer them over fluorescent fixtures for a variety of other reasons. Just wish they were a little cheaper but I don't think the cost curve is done coming down yet.
Thanks for the tips on herbs and air circulation. I had thought about PC fans too, and I might switch to that in the long term. For now the 9" clip-on fan seems to be working OK, even though it's a little strong even on the low setting. And it's fairly low power draw (0.2A, or 24w, about the same as one of the lights).
NoelinMA
Original Author6 years agoHello, So sorry for disappearing - -we lost our internet connection pre-storm, and its still down. I can only get on for a few minutes so will try to make this quick!
UBRO: Thank you for the info about coir. Thank you as well for the baggie method information. It strikes me that it would be very easy for the sees to rot this way. I do't how long it takes for them to germinate. I'll have to check. Otherwise, sounds like a great idea!
PAUL: The plants of the cabinet top: I live in a tiny tiny tiny condo. Since I love plants, I have tried to make the most of every free space, with plants. I know it's not ideal, but so far I have had decent luck with the ones that live up there. They probably aren't thrilled, but no one has died yet, and it's been probably 15 years...Hanging shelves... Good idea. Actually my hubby made the shelves in the windows now, for my birthday. I'm lucky, he can and will build anything I can dream up. We're a good team. LOL. He's all set to hang growing lights form the ceiling, over the darker end of the cabinets.
Re: Fluorescent tube lights: Thank you for the tip re: the 6-8 inches. I had NO idea, That is incredibly helpful. I"m still trying to decide LEDS or not. May come down to what is available and affordable and what looks nice in our kitchen.
Re: aesthetically pleasing fixtures vs. shop lights. I love this idea but haven't seen anything in particular. Do you have any ideas?
Re: high of bulbs: The height form my ceiling to the top of the cabinet is 17" inches (15" if you measure from the top of the planting beds to the ceiling). Sounds like you think that is low enough that I shouldn't have to worry about raising and lowering the lights. I had heard that I should make sure, especially at the beginning, the light was 2-3 inches from the seeds. I LOVE your idea (again) of raising and lowering the pots. So much easier. I'll have to think about something that looks nice to use to sit under the beds. What a great idea.
Thank you both! Sorry again to reply so late. Hubby is working on Internet. Then he's all over my planting plan.
Best, Noel
Tim in Colorado (5b)
6 years agolast modified: 6 years agoAnother possibility (especially if you're just doing this for maybe 6-8 weeks/year and then taking it all down) is not to mess up the ceiling above the cabinets with hooks for hanging the fixture, but rather just place the shop light on blocks on each end. Cut a 2x4 into a bunch of 8" lengths. Stack 3-4 on each end just narrower than the length of the fixture and set the light on top. That way you can adjust the height by just adding or removing a block from the stack.
Another location if you're just doing 1 or 2 trays is on top of your refrigerator. It's easier to reach, and if you do have a water spill it doesn't damage your wooden cabinets. Plus it's usually warmer on top of fridge from heat of the compressor drifting up behind it.
Another thing some people do is build a grow box out of a Rubbermaid tub. Something like this, although I might tweak the design a little to keep the lid off (for air flow) and hang lights from a 2x4 or something sitting across the top. Without airflow, mold can easily grow on top of your seed cells. The foil around the inside is a great addition to magnify the light. You could always loosely drape a couple of sheets of foil over the top if you need more reflection, but with some openings for airflow.
With foil reflection, you don't need quite as much lighting, especially toward the edges.
Tim in Colorado (5b)
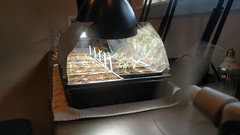
6 years agoJust for comparison, here's what I'm doing with my latest seed tray. My grow rack already has some stuff in it I'm nursing along with soil from the outside (big mistake) that has a lot of gnats and fungus in it (although some stuff is growing OK). I didn't want to put my new tray of tomato and pepper seeds in there (already had problems with damping off on the last tray), so I'm doing this one in a different part of the house to avoid contamination.
I had some swing-arm desk lamps around the house. Bought a box of 10 regular household lightbulbs at Costco for something like 20 bucks. 15w LED 5000k 1600 lumen (the equiv of an old 100w bulb). 3 bulbs provide 4800 lumens of total light for one standard 72-cell tray. Since they're regular-shape bulbs instead of long tubes, I can't place them evenly 1-2" above the plants. They sit about 4-5" above. I did lay a folded-over piece of aluminum foil on each side to reflect a little of the light back in. But I leave the ends open for airflow and run a small fan off and on a few hours/day to keep mold from growing on top. Seems to be working OK.
Even though the experts usually advise lighting only be 1-2" above the seedlings, with enough light I think that distance can be greater and still do OK. It's not always easy to get lights that close and get the coverage needed for many seedlings.

Paul MI
6 years agolast modified: 6 years ago@Tom: Ooops! Thanks for correcting the math error. Had one too few zeros when I did the second part of the calculation. Fixed it above. I would be interested to know just how much running an LED continuously for 8-12 hours at a shot affects LED lifespan. I suspect that the negative impact on light longevity and -- most likely quality -- is part of the reason LED growlights cost so much more. Those lights would be designed to handle long periods of use.
If you do go the PC fan route, hook them up to a variable AC/DC adapter. By changing the voltage you'll be able to change fan speed. (Hit a thrift/second-hand store like GoodWill or Salvation Army and you may score a very cheap but totally usable adapter.) In my 90gal terrarium I have a few PC fans -- a couple at either end -- on very very low voltage. It is enough to create a very faint "breeze" which helps to prevent mold and to prevent the glass from "fogging up".
@NoelinMA: Well if hubby is handy with wood, you may be able to install shoplights or other fixtures and then have him put a wood trim to match your cabinetry such that it would help hide the light fixtures somewhat. Might be the thriftier route.
Considering where they would be, you may be better off with LED tubes since they will emit less heat. In addition, they do not suffer from the light issues at either end of the tubes common with fluorescents. Fixtures of any kind will take a bite out of your "head" room above the cabinets. Basic shoplights will eat up about 3-4 inches of that 15-17" you mentioned. The plant trays with pots will use up another 2-3".
Tim in Colorado (5b)
6 years agoI really like the "naked" LED shoplights I got, that don't have any reflector or bulky fixture on them. They're only 1.5" tall, and they're light as a feather. The little hanger cables that slip into the slots on top take up another inch (plus however much of the cable you want to use), but you don't have to use that if you want maximum plant space. They can be flush mounted and take up just 1.5". Or just set the whole thing on top of blocks or something. Again, it's very lightweight and needs very little support.
susanzone5 (NY)
6 years agoWhat I don't like about those "naked" lights is that they glare into your eyes when you're trying to look at your plants, water your plants, etc.
NoelinMA
Original Author6 years agoHi Paul, Great idea about the wood trim! So given my limited space, are you suggesting I go the route of lifting the plants up toward the lights, rather then attaching a chain to drop the lights down?
Tim, thank you for the link. These look great.
Susanzone5: This is my concern exactly. I wonder if Paul's suggestion might fix this -- put a little "mask" in front of the lights -- to shield the glare.
NoelinMA
Original Author6 years agoSince I am such a beginner (and dislike failure -- LOL), I am thinking of trying an experiment:
1. Plant some seeds above the cabinet (w/ LEDS -- you have convinced me), and coir.
2. Plant a few seeds with the baggy method (thank you!!)
3. Plant a few seeds on my desk -- which sits in front of a big south facing window -- without any artificial light. (Of course, if the desk seeds work, I'll have to work somewhere else for a few months every year, so I'm not sure I even want to entertain this idea).
4. Plant a few seeds in a cheap-y greenhouse on my deck -- which I will be sure to ventilate well -- and anchor down.
5. I'm also going to try a small coldframe, on my deck, as some have suggested, just to get the seedlings used to the temps (hardening off?)
Now, my next task is to buy the seeds. I feel like I'm already a bit behind :-)
Noel
Paul MI
6 years ago@Noel:
"Hi Paul, Great idea about the wood trim! So given my limited space, are you suggesting I go the route of lifting the plants up toward the lights, rather then attaching a chain to drop the lights down?"
Honestly, that is what I would do in your situation. Having the chained version would take up even more space above the cabinets, be awkward to adjust, and harder to "dress up" the fixtures. Since you would only be using the area for seed starting part of the year, you may as well take steps to make it look nicer up there so the rest of the year you aren't stuck with an "eye sore".
"Since I am such a beginner (and dislike failure -- LOL), I am thinking of trying an experiment
1. Plant some seeds above the cabinet (w/ LEDS -- you have convinced me), and coir."
I would mix the coir 50/50 with perlite. Look for perlite that does not have fertilizer added (so skip all MiracleGrow products). Work with the perlite outdoors if you can. You do not want to breath in the perlite dust (and there will be dust) nor get it in your eyes as it is abrasive. I try to do it so the wind carries any dust away from me.
"2. Plant a few seeds with the baggy method (thank you!!)
3. Plant a few seeds on my desk -- which sits in front of a big south facing window -- without any artificial light. (Of course, if the desk seeds work, I'll have to work somewhere else for a few months every year, so I'm not sure I even want to entertain this idea)."
Depending upon the distance from the window to your desk, artificial light may be needed.
"4. Plant a few seeds in a cheap-y greenhouse on my deck -- which I will be sure to ventilate well -- and anchor down.
5. I'm also going to try a small coldframe, on my deck, as some have suggested, just to get the seedlings used to the temps (hardening off?)"
With any of the above, you will need to keep in mind that with enclosed containers, direct sun will have to be avoided. Too much chance of cooking the seeds or seedlings otherwise.
Also, keep in mind that some seeds require direct sun to germinate. These will be seeds like sweet alyssum where the instructions tell you to sow on top of the soil -- not to cover the seeds with dirt.
"Now, my next task is to buy the seeds. I feel like I'm already a bit behind"
Not really. Depends upon when your last expected frost date is. Here in my area, that is usually the end of May. Starting plants now for me would still be premature for most garden type plants.Also, unless you are looking for something a bit more "exotic", most of the BBSs have seed packets available now so not like you would have an ordering/shipping time lag.
Tim in Colorado (5b)
6 years agolast modified: 6 years agoIf the idea is still to go above the cabinets, I personally wouldn't bother trying to shield a ceiling-hanging shop light with wood trim. It's gonna look bad no matter what, and since the lights shine down and the top of the cabinet is way up high, a little trim isn't going to hide much of anything. Unless by "trim" you mean cabinet doors or something that is going to enclose the entire opening from cabinet to ceiling.
You've also got the power source to consider. Assuming you're not going to actually mount a light fixture in the ceiling with house wiring and a wall switch, then you're going to have a cord running down the side to an outlet too. No matter what, it's going to be an eyesore for the 2 months in Spring, so trying to make it look better with wood trim just seems like a lost cause.
But if the point is to shield the abrasive light so it's not as annoying, I'd use something like a roll of Reflectix. It's stiff enough to stand on it's side, easy to trim, and has the extra benefit of reflecting the light back inward to help the plants.
Again, if the point is just to use this setup for 2 months in Spring, I wouldn't want to mount anything to the ceiling. I'd want to be able to take it all down and still look good the other 10 months of the year. Instead of hanging the light, I'd just set it on stacked blocks or something, and run an extension cord down the side end of the cabinets. At least for this first attempt until you find whether it works the way you want or not, and is something you wan to keep doing again.
NoelinMA
Original Author6 years agoHello, Paul:
Thank you for the perlite information. I've used it once before (probably incorrectly) and I remember how little water it absorbed. The water literally ran off the top of the pot. This gives me a good idea of what the seeds need!
Re: seeds on my desk. Okay, sounds like natural natural light through a window might not even be enough?
One question, I am curious why the planting beds/pots I bought (in photo way at the top) come with those plastic covers. Is there ever a condition under which I would use them? Seems like it's unnecessary under an indoor light, and way to flimsy to use outside instead of an actual greenhouse.
Direct light: Is direct sunlight bad because of the heat? At what point will direct light be okay? Once I get them in the coldframe?
I guess that brings up another question: So do I just go from inside growing for 6-8weeks (or whatever the package says) to outdoor container planting? At what point might a coldframe be useful. Or, it is just to extend the growing season?
In case I didn't mention this, I will be growing plants on my full sunlight desk, in containers. (Done this for years, but not from seed).
One question: BBS?
As always, thank you! Noel
NoelinMA
Original Author6 years agoHi, Tim: LOL! You are right about the power source. There is indeed going to be a cord hanging down from the ceiling across the wall, and behind our refrigerator. Not very attractive. The price we pay for a small cramped condo! Hopefully the rest of our house makes up for the kitchen growing craziness. .
I will need to see how much of a problem the light is. I'm glad you told me about Reflectix. Just looked it up. It looks great. The question is, who would I attach it to the lights?
Since the cabinets are pretty high, I'll have to see how abrasive the light is.
My question is, and I think I understand this -- people use Reflectix (or even aluminum) to get more light for the plants, not heat, right? It's the heat, not the light that could,, dare I say, bake the seeds?
Your idea of putting the light on stacked blocks is an excellent one! Thank you. My husband will love that -- he is hoping the whole thing is temporary anyway LOL. I, on the other hand, feel as if this is only just my next step in terms of taking our whole entire condo over with plants! (I'm pretty close already.)
Thank you so much! Noel
Tim in Colorado (5b)
6 years agoMy thought with the Reflectix is just to cut a piece that's the exact width of the space between the top of the cabinet and the ceiling. And then stand it on it's side, so the roll curls around your grow fixture some. I think it might just stand up on it's own that way. You could even cut a few "tabs" just slightly wider (like 1/4") than the opening so it presses against the ceiling to stay in place (pressure fit). That would at least shield the light from view so it doesn't look quite as obnoxious in the kitchen. You just pull the Reflectix aside when you need to get into it, then set it back in place.
I don't think heat would be a problem, especially if you use LED lights that only put out slight heat. In fact, holding in a LITTLE heat is good for seed starts. Temps around 75-80 are ideal, which might be close to what you get naturally up high toward the kitchen ceiling like that.
The concern would be airflow. I probably wouldn't wrap the Reflectix ALL THE WAY around the setup (to the wall) because that would seal it off completely from airflow. A little fan is always something to consider too.
But the Reflectix and is something you could get and slap up later if it looks like it's needed. I'd probably just get it started first with the lights on blocks, and see what it looks like. The lights don't even need to be turned on until the seedlings break through the surface. If the light is really annoying, run over to Home Depot and grab a roll of Reflectix (not that it's the prettiest stuff either, but it's effective). If you start seeing fuzzy mold on top of the soil, set up a mini fan with a gentle breeze blowing over the top.
User
6 years agolast modified: 6 years agoThank you for the info about coir. Thank you as well for the baggie method information. It strikes me that it would be very easy for the sees to rot this way.
They do not rot in the time it takes to germinate, all seeds need to be moist until they send out roots, but the advice from Paul to add perlite is good. I have started seeds this way in straight vermiculite, peat moss, purchased seedling mix etc. The only seeds I don't start this way are the very tiny, snapdragons and lizzies come to mind. As with all seeds, the moisture needs to be monitored, not too wet, not too dry. You will manage just fine, trust in your abilities.
Direct light: Is direct sunlight bad because of the heat? At what point will direct light be okay?Plants that have been grown inside need to be put in direct sun slowly or they tend to burn. Starting them outside in a shaded area and then slowly moving them to direct sun will allow them to adjust.
Paul MI
6 years agolast modified: 6 years agoIt strikes me that it would be very easy for the seeds to rot this way.
As Ubro said, the seeds shouldn't be an issue in this regard. The seedlings, on the other hand, are a different story. Particularly if there is poor to nonexistent air circulation, seedlings are more prone to "damping off" -- dying due to fungal or bacterial issues.
Re: seeds on my desk. Okay, sounds like natural natural light through a window might not even be enough?
Might is the operative word. Will depend upon factors such as how much sun you actually are getting, and what type of plants. Seeds which require UV exposure may not germinate as windows reflect some of the light away from the home, UVB rays do not pass through glass, and newer windows may be resistant to UVA penetration as well. Other seeds may germinate with no problem and then it comes down to how much direct sun the plants will want. Lower light plant seedlings will likely be fine. Higher light plant seedlings may be fine or may show signs of etiolation (weaker, leggy/stretched growth) if the light turns out to be less than what they want.
One question, I am curious why the planting beds/pots I bought (in photo way at the top) come with those plastic covers. Is there ever a condition under which I would use them? Seems like it's unnecessary under an indoor light, and way to flimsy to use outside instead of an actual greenhouse.
Only reason is to keep the humidity higher so the media stays moist longer. Personally, I try to avoid using them as seedlings which have adapted to that much more humid environment may have issues adapting to drier air when the lid is removed.
Direct light: Is direct sunlight bad because of the heat? At what point will direct light be okay?
Heat is indeed the main issue -- but we are only talking about closed containers. In an open container or even pots just sitting in a tray it is not a big deal since the heat isn't confined so the plants will be fine. But in a closed container heat can't escape and can reach lethal temps. (Think about how hot a car's interior gets when sitting out in the sun with the windows rolled up.)
Once I get them in the coldframe?
Keep in mind, that on a sunny day, temps can get surprisingly high in a closed cold frame especially if the frame is getting full sun in the mid afternoon. So a you get closer to warmer spring temps, if the forecast is for a sunny day with temps in the 50s and the frame is going to get direct afternoon exposure, you may want to leave the frame open a crack or more to allow excess heat to escape then close it again in the evening.
Also, while I realize this is a bit of a "no brainer", don't forget that a closed cold frame is also preventing water from getting to the plants. If the frame's "windows'' get foggy, you many need to open the frame to allow the excess moisture to escape.
I guess that brings up another question: So do I just go from inside growing for 6-8weeks (or whatever the package says) to outdoor container planting? At what point might a coldframe be useful. Or, it is just to extend the growing season?
Cold frames can be used to extend the growing season on either side. In the spring, such can give you a head start on plants .... especially cool weather crops like peas and lettuce which tend to peter out once temps get hot or plants that require a longer growing season to produce fruit like "beef steak" tomatoes a head start ,,, or to keep frosts from killing off the plants as quickly. Depending upon one's zone and the plants in Q, it is supposedly possible to extend some harvests into late fall/early winter.
Some folks also use such to provide more cold protection for perennials which are only marginally hardy in that zone.
Absolutely no reason you can't do a bit of experimenting to see how you can make use of a cold frame or two.
One question: BBS?
BBS = Big Box Store (Lowes, HD, Walmart, et cetera)
Tim in Colorado (5b)
6 years agolast modified: 6 years ago"One question, I am curious why the planting beds/pots I bought (in photo way at the top) come with those plastic covers. Is there ever a condition under which I would use them? Seems like it's unnecessary under an indoor light, and way to flimsy to use outside instead of an actual greenhouse.
Only reason is to keep the humidity higher so the media stays moist longer. Personally, I try to avoid using them as seedlings which have adapted to that much more humid environment may have issues adapting to drier air when the lid is removed."
One benefit I found with the dome is that it helps retain heat. When I had to plant a new seed tray a few weeks ago, I intended to go without the dome entirely so the top got more air and would dry out some (to avoid mold/fungus/gnats). I had the tray on a heat mat. But even with the heat mat, the tops of the soil were only staying 65-70F (I use an infrared thermometer gun to monitor it).
So I tried putting the dome on (I have one of the taller domes with air vents on the top and sides). The soil temps shot up about 10 degrees, right where I wanted them.
My goal now is mainly to keep the top of the soil dry, or only slightly moist. If more than a few cells are showing more than slight moisture peaking through (dark spots), I keep the dome off. But if mostly dry, I don't mind using the dome for half a day at a time to raise the temperature.
susanzone5 (NY)
6 years agoThe dome or any covering should be removed as soon as germination takes place (sprouting) or else disease will set in really fast from being too wet with no air flow.
NoelinMA
Original Author6 years agoHi, Tim: Thank you again for the Reflectix idea. Perfect. I'm going to try it, if needed. I think it's true -- I can live with anything (looks-wise) for two months -- especially in the name of growing! Okay, so the light is only for once the seeds germinate. I wasn't sure, but of course this makes tons of sense.
I love your description for using (or not using) the dome. Thank you. So I would aim for about 70 - 80 degrees? Is there a humidity that you aim for?
I'm curious about your heat mat. I've head people mention this. Do you find this useful for retaining the temp?
Noel
NoelinMA
Original Author6 years agoHello Ubro: You are right, I am really anxious to get started. I am hoping this weekend/ upcoming week to start ordering seeds. Can. Not. Wait!! Thank you for these tips re: light and perlite, vermiculite (any difference?).
NoelinMA
Original Author6 years agoHello, Paul: Okay, I won't worry about the seeds so much. And, will keep an eye on the seedlings. I am so excited to get going!
Thank you for the tips re: seeds in my window. I think as I buy my seeds, I will consider what location each of them might need. It'll be a unscientific process at best, but I'll definitely learn as I go.
Your answers (and everyone's here) have been incredibly helpful. Clear, thoughtful, and really patient. Thank you so much for helping a beginning. I can't wait to jump in!
Btw, any good suggestions for tasty and easy-to-grow red cheery tomato seeds?
Best,Noel
User
6 years agoNoel, you will do just fine, your questions have created a good discussion, and some of the information on lighting as well as growing out seedlings has been very informative even to those of us who have done this for a while.
Tim in Colorado (5b)
6 years agoHeat mats can be helpful, yes. Seed will germinate and roots grow faster when the soil temps are higher. The ideal temp varies by type of seed but here's some examples...
https://www.gardeners.com/how-to/when-is-it-warm-enough-to-plant/9029.html
None of this is an exact science though, and seeds will still usually germinate (albeit a little slower) at a normal room temperature (65-75). But about 10 degrees warmer is better. Amazon has heat mats for $13.
As for humidity, I don't really know specifics. But you don't want soggy soil. And you especially don't want soggy soil tops (a breeding ground for mold/fungus/gnats). So for instance, if you do put on a dome periodically and you're seeing more than a tiny bit of condensation on it, I'd say remove the dome and let it dry out more. If you're getting condensation, it probably means your soil tops are kinda soggy. That' where a small fan comes in handy too - to dry the tops some when they get a little too soggy. And to help when the plants get bigger and crowd the soil.
But this can all vary depending on part of the country and your normal humidity levels. I was describing more my experience here in dry Colorado. MA is surely more humid. I'd just watch your soil tops and try to keep them teetering between that slightly moist to slightly dry look. It's good to let the tops dry out SOME, but no more than maybe a day since you want to keep the seeds and roots from drying out just below the surface.
Others with more experience than I might be able to give better tips on watering (I'm still struggling to figure it out), but that's how I'm trying it now based on the various videos and advice I've seen.
NoelinMA
Original Author6 years agoHi Susanzone 5: Great! I will give them a try. Thank you. It's funny, yesterday I was pouring over my Burpee seed catalog and those exact tomatoes jumped out to me.
NoelinMA
Original Author6 years agoUbro: That is very nice of you to say. Thank you. Everyone here has been so patient and understanding and helpful!!! I'm just glad the discussion has been useful for others, as well. I love having this forum to *meet* others who share my interest, er, eh, passion, and who know more then I do!!! Really, thank you for your kind words!
NoelinMA
Original Author6 years agoWow, Tim, I love that link!! That's wonderful. So something like this?
https://www.amazon.com/VIVOSUN-Waterproof-Seedling-Hydroponic-Standard/dp/B00P7U259C/ref=sr_1_3?ie=UTF8&qid=1520594316&sr=8-3&keywords=heat+mats&dpID=41Mg5ca7DbL&preST=SY300_QL70&dpSrc=srch
Do you leave them on all the time? Our condo is pretty warm, so I may not even need one. My only problem might be the fluctuation between daytime (our place arms up very fast) and evening (when I turn the heat way down).Thank you re: humidity. One possibility might be at night, to put the done on, just to keep the temp in.
I have learned that over watering plants is not something to do!! I think that was my first learned lesson with my house plants. I was probably a bit too over zealous. On the other hand, it is something still difficult for me to tell the difference between underwatering, and just right watering. Your description is just perfect! Thank you.
Tim, thank you again for your really really helpful advice and guidance. I couldn't do it without you.
Tim in Colorado (5b)
6 years agoYes. Or here's one a couple of dollars cheaper...
As far as I know, they're all pretty much the same. Most are 10"x20" to fit under a standard 10x20 plastic seed tray. Usually you leave it on 24x7 until most of the seeds have germinated, then turn it off. Some people leave it on even as the plants grow but I've also heard that can grow the roots too fast and they're not as strong (I really don't know though). Up high above the cabinets, it's probably going to be 75F-ish anyway, so I'd probably turn it off after they germinate. After plants start growing, it's good to (gradually) get them used to warm/cool temp cycles anyway for when they go outside. Some even NEED cool nights.
I think every one of us has gone through the overwatering lesson. I still struggle with how much to water my plants and veggies. It's probably the #1 challenge.
Lastly, can't remember if I mentioned this already, but if you have a dollar store nearby, they're great for cheap gardening supplies. I buy a number of things from Dollar Tree each year. They have 25c seed packets, pointy little garden clippers ($1) that are great for thinning, and these 12-cell seed trays ($1) that I love because they're a lot less cumbersome to move around (and water) than the standard 10"x20".
Good luck, expect some failures through the learning process, and have fun!
Tim in Colorado (5b)
6 years agoHere's one more thing I ran across yesterday while checking out videos. It's a time lapse someone put together of their tomato seedlings growing, with the day# and when they watered. I love this as an example of what to expect and compare mine against.
NoelinMA
Original Author6 years agoHi Tim, Sorry for the delayed reply. Thank you for the link!! Thank you for the information about leaving it turned on until the seeds germinate. Have you found it to be really useful?
Thank you as well for the Dollar Store tips, yes, I do have one of those. I'll have to check it out. I also love Christmas Tree Shops for the exact same reason.
As for the Youtube video, I LOVE this. Thank you. I think it's actually really beautiful. I especially loved how clearly you could see what happened on the days he watered and days he didn't. Kind of like all of us, when we are hungry :-)
This list and youtube "how to" videos are two examples of what is so great about the Internet.
By the way, I have been pouring through catalogs lately. I keep seeing these sort of things:
Is this just an unnecessary expense? I"m not sure if watering from the bottom is any better.
Noel
User
6 years agoI like to water from the bottom but don't use mats. For some people the watering mats work and for others they attract both mould and fungus gnats if they keep the medium too wet. I was on a recent Garden thread ( the name escapes me) and they were talking about controlling the mould that can build up on these types of mats with some type of chemical. I would rather not use those, but, each to his own.
I buy cheap seedling trays, and I have even purchased cheap plastic food trays. Any tray without holes will work. Watering seedlings is something that I believe has to be monitored every day, sometimes I can have 3 cells in a tray that are extremely dry along with others that are very wet. I like to water just those that are dry rather than expect that every seedling will need the exact same amount of water as the next.
Tim in Colorado (5b)
6 years agoAgree with Ubro. Maybe those fancier trays could work, but I would keep it basic for your first year of doing this. It's good to go through the learning experience of manually controlling water levels so you know what to look for and how to adjust.
I used to put water in the whole 10x20 tray, but not anymore. Like you said, some 6-packs tend to dry out faster than others. So now I pull each one out separately and set it in a bowl of water (maybe 1" deep) for 15-30 seconds (roughly every other day on average). If it's a drier one, I give it a full 30 seconds. If it's not very dry, I'll just do 15-20 seconds. The Jiffy seed mix soil absorbs the water pretty fast. Within 5-10 minutes, the top tops usually all darken.
I've learned to judge the moisture in the cells as much by weight as the look on top. When pulling 6-packs up individually, with a little practice you get a pretty good feel for how dry they are. Pretty dramatic difference in weight between a damp 6-pack and a dry one.
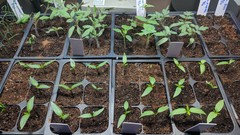
Here's my latest seed tray at the 18-day mark. Mostly tomatoes and peppers.
Tim in Colorado (5b)
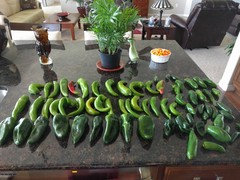
6 years agolast modified: 6 years agoJalapeno, Anaheim, California Bell, Cayenne, Keystone Giant Sweet, and Habernero were what I got for last season (first time I grew peppers). All ended up doing fairly well, in grow bags. We love Jalapenos in everything, and Anaheims are great for homemade chili rellenos. The rest were just randomly chosen from MIgardener (except the Habernero, which were 25c Dollar Tree but grew just fine).
Using the same seeds again this year, plus Banana pepper seeds I bought new this year. Only one I'm not growing again is Habernero. Made hot sauce from it last year and it's HOOOOOT. We like hot, but this is like tabasco x 3 hot. A few drops turns a dish quite hot. We have 10 bottles of it. Not gonna need to grow any more for years.
Even starting early in grow bags, most of them took a long time to grow much fruit. And hot temps. The bell peppers (Cal and Keystone) only did fair. Cayenne were the most prolific. But my favorites are the Jalapeno and Anaheim. Here's one of my harvests last September...
NoelinMA
Original Author6 years agoThank you, Ubro. I was wondering about the mold issues with those mats. I think I will stick to the dyi approach.
One question though, if you water form the bottom, does the plant absorb the water at about the same rate as if you watered form the top? Slower? Will the soil be damp on the top? (This is how I usually tell if the plant needs water.)
Noel
NoelinMA
Original Author6 years agoTim, yes my inclination is to do this sort of thing manually, first ,as well. I like the learning by doing and trial and error as well. I like your individualized approach. I'm just worried about how long that will take. On the other hand, it's worth it if this is the best way to do it.
So it sounds like you water from below. Is there any advantage? This is fascinating to me.
Your peppers and tomatoes are gorgeous!
Noel
Tim in Colorado (5b)
6 years agoBiggest advantage of watering from below is being able to keep the tops from getting as soggy, where mold/fungus/gnats are more likely to be a problem. But some people prefer to water from the top. It can certainly be done, although if you do, it needs to be done with something that's more of a drip spout rather than a wider pour spout, or else you may wash your seeds out. Most of your seeds will just go 1/4" deep in rather loose, fluffy seed-start soil that's disturbed pretty easily with much water force.
You just need to play with it some. But I think you'll find when using the standard thin 6-cell packs, it gets pretty easy to tell when they dry out. Even if you choose to water an entire 10x20" tray (72 cells) at once rather than pulling each of the 12 6-packs out and dipping them individually like I do, you'll figure out the approximate watering balance before long. Just give the tray maybe 1/2" of water. All or most should get absorbed within 5 minutes or so. It may take another 10 minutes for it to creep up to the tops of the cells, and you'll see those turn darker in most spots, but with maybe some light (dry) edges still. That's good. If it all turns really dark, and almost shiny, you've probably overwatered and made it soggy. You don't want the trays actually sitting in water for more than a few minutes, otherwise they will sop up too much water. Better to add less and see if it all absorbs than add too much at once and find you've saturated the cells and made them soggy. You can always add more if it looks like it needs more. I water roughly every 2nd or 3rd day. If you have a fan gently blowing on it, then a bit more frequently.
Don't sweat the details, because it varies and there's a lot of different ways that work. Just need to start some and play with it, even if you end up discarding it as a test. One of those little $1 12-cell trays would be perfect for testing on. It's really not as difficult as I'm probably making it sound.
NoelinMA
Original Author6 years agoHi Tim,
Oh, good to know that watering from below helps prevent mold/fungus/gnats. I certainly understand... I was imagining just a tiny bit of water might even start to wash my seeds away...Thank you so much for detailing out how to tell if the plants are getting enough/to much water!! Yes, the last thing I want to do is let the roots get soggy and mushy.
I've wondered about how to tell on my larger house plants, as well.
Anyway, I especially like your dipping idea. I'm going to try it.
Thank you for all your help. You have been really patient with me!
Noel
Tim in Colorado (5b)
6 years agoThe "dipping" method is just something I started doing in the last month (dipping each 6-pack individually for 15-30 seconds as needed). It's working pretty well for controlling the amount each cell gets based on how light it feels and how dry it looks on top. And like that time-lapse video shows, as the plant gets bigger, it sucks up more water and needs watering more frequently. Now that my tomato plants are 3-4" tall, I'm finding I have to dip those daily.
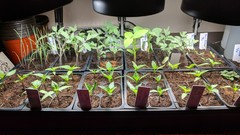
Most of my (main) seed tray is coming along well. I had a couple of tomatillo plants that suddenly wilted for some unknown reason. But the rest is doing pretty well. Over the last week I've been setting it outside in my small greenhouse for a few hours/day to start hardening off. Maybe the tomatillos didn't like that, although 3 of the 5 plants are still doing well. Most of these are just short of 4 weeks old...
User
6 years agoOn your large houseplants some people on the citrus forum suggest inserting a wooden skewer down into the pot. Leave it sit 10 minutes and pull it out and check how far down the dirt is damp.
Tim in Colorado (5b)