


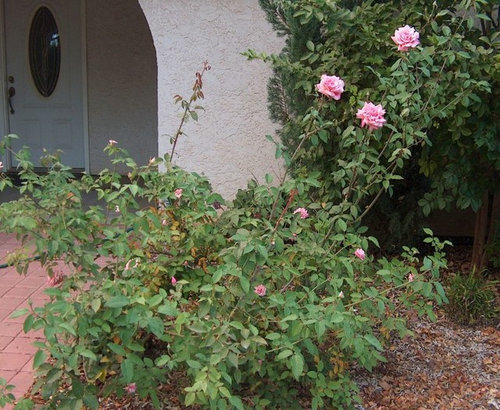
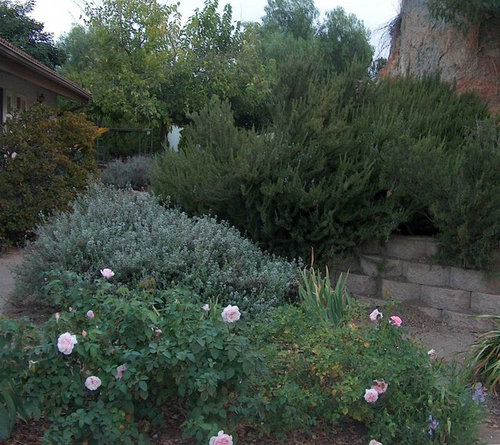
This Is From Before - I'll Spare You The After
6 years ago


Featured Answer
Sort by:Oldest
Comments (14)
 6 years ago
Related Discussions
Suggestions to spare you problems, before using the gritty mix.
Comments (7)Mike, I can share my story. I read the content here gritty mix on this forum several times before I went and got the ingredients. pine bark fines/peatmoss/perlite/gardenlime(pellets. Went by 5-1-1 mixture. Started with my jasmines in 4inch containers. Started the mix by wetting peatmoss then adding perlite to it and then pine bark fines. I did not mix gardenlime right away but added in pots 1/2tsp per pot and watered them. Drainage is excellent. I did not use anything to block the drainage holes and water is draining very well yet looks wet. Looks like the plants need watering more frequent than when using potting soil. However I do notice the leaves yellowing(chlorosis). How do I correct this? by adding ironite? I like the mix but not sure I did it correctly because I did not measure the size of the pinebark fines to be 1/8thinch. Some of them may be larger also, not sure. I do not have a seive, where can I buy soil seives. If I need one where do I find one for reasonable price. Did I do the mix correctly, I still feel that I may have messed and I also need to fertilize on regular basis with liquid fertilizer. Alos wonder if I applied garden lime correclty. Experts, please advice...See MoreCan you stand one more before/after? Thrift chair makeover
Comments (54)Renofan - You did a fantastic job on that chair, and I think you should go ahead and do the little chair in the yellow toile, too. That's the fabric that I used to make my bedroom duvet and curtains, (the thread is "I've got the blues...thanks to you"). You'll find that this fabric is very reasonably priced, yet a good, sturdy fabric to work with. I also used the yellow duck ticking fabric from the same site, FashionFabricsClub.com. Wouldn't you know I have 4 wingback chairs that are in excellent condition, but all have old fabric on them that I can't stand. Two of them, in fact, resemble what your wingback looked like before. Thanks to you, and the website that you furnished on upholstering, I now know what project I plan to tackle next! I know I'll never match your speed or expertise in these projects, but at least I can make an attempt. Your motivation inspires me to get my butt off this chair and start searching for more fabric. Now I can't wait to see your little toile chair, and if you ever need to find a home for it once it's done, I have a bedroom that would love to adopt it....lol! Beautiful job!! Heidi...See MoreBefore & After Pics Built in bookcases from stained to painted -
Comments (36)msrose the product i used on the fireplace is called DAP All-Purpose Stucco Patch. It's in a red, black and white container. My husband had it in the garage from our old house which was stucco on the outside. It is in a 32oz container. I have no idea if it comes in larger sizes. It's very thick. I actually rubbed it on with my hands and wiped it off. Very messy technique. I wouldn't recommend it. But, I didn't want it really thick. Wanted some of the brick to show. The other reason I did it by hand was because of the grout lines. I felt like i had to rub it in there really good. There is probably an easier way but as thick as that stuff was, I don't know. I just did it on a whim. I am no professional (LOL) for sure (Im in the IT business, definitely not a decorator). I then painted over it with really watered down flat paint to tint it off white. Hope this helps. Sorry I don't know any more about it. Some of the pros on here may be able to add some suggestions to this. I am so glad i did it! I have gotten a lot of compliments on it in person. Here are some additional pictures below. The floor brick you can see in the 2nd one is what it looked like before I put the stucco on it....See MoreBefore and after kitchen. From honey oak to white shaker!
Comments (34)Hi Laura - I have zero regrets on this backsplash. I cook a LOT. Every night. I have not had any problems cleaning behind my stove. I have upgraded my stove since this photo was taken, and my knobs are now in front with the full backsplash behind the stove. I have taken a warm cloth and wiped it down (I know there are stone cleaners you can also use but I haven't had to use them yet)....See More 6 years agolast modified: 6 years agoingrid_vc so. CA zone 9 thanked portlandmysteryrose
- 6 years ago
- 6 years agolast modified: 6 years ago
- 6 years ago
Related Stories

LIVING ROOMSBefore and After: Living Room Goes From Blah to Bright in 4 Days
See how a designer helps her client surprise his wife with a living room transformation for her birthday
Full Story
BEFORE AND AFTERSBefore and After: From Functionally Bad to Efficient and Plaid
A poorly laid-out kitchen gets a makeover that works hard for the homeowners who use it
Full Story
BATHROOM DESIGNBefore and After: From Cramped Closet to Open Master Bathroom
Seattle homeowners work with a design team to transform an attic closet into a bathroom with a shower and walk-in closet
Full Story
POWDER ROOMSBefore and After: Powder Room Goes From Bland to Bold
A striking black-and-white wallpaper and personal touches wow in this Indiana home
Full Story
TRADE PROGRAMBefore & After: Farmhouse Flip From Bland to Breathtaking
A distressed modern farmhouse gets a face-lift
Full Story0

FUN HOUZZEverything I Need to Know About Decorating I Learned from Downton Abbey
Mind your manors with these 10 decorating tips from the PBS series, returning on January 5
Full Story
BATHROOM MAKEOVERSWhat I Learned From My Master Bathroom Renovation
Houzz writer Becky Harris lived through her own remodel recently. She shares what it was like and gives her top tips
Full Story
FIREPLACESBefore and After: 6 Dramatic Fireplace Makeovers
See how designers refresh the look of a fireplace with everything from a simple paint job to a new stone surround
Full Story
MY HOUZZMy Houzz: A Seattle Bungalow Goes From Flip to Happily-Ever-After Home
Once intended for a quick sale, this 1930s house now bears witness to its remodelers’ love and marriage
Full Story
INSPIRING GARDENSBefore and After: English Cottage-Style Garden Takes Root
A blogger shares money-saving tips as she walks us from designing the flower beds to building the greenhouse
Full Story


jerijen