


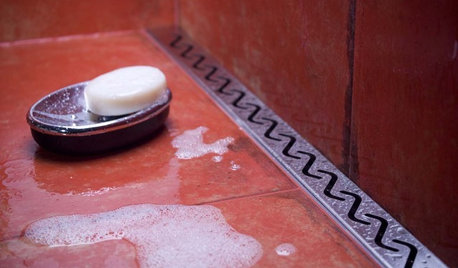
Moving shower drain
waltonglade
6 years ago
Featured Answer
Sort by:Oldest
Comments (14)
 PRO
PROJoseph Corlett, LLC
6 years ago
waltonglade
6 years agolast modified: 6 years agoRelated Discussions
Converting Tub drain to Shower drain
Comments (5)Ouch didn't see that coming. I see that they did some creative framing, but didn't expect it to be unsafe. This is a one story home and the end of the roof is above this area. The house is about 20 years old and has seen a few huricanes....See MoreRerouting Shower Drain Pipe
Comments (11)UPDATE... First off, thank you all for your comments and suggestions. I thought you'd like to know the final outcome of our plumbing & venting issues.... We have moved the shower drain pipe. After getting a totally unacceptable estimate of $4,800 to move our shower drain pipe & vent from our kitchen contractor that included punching a hole in the roof to vent the drain, we solicited comments and estimates from 3 outside plumbers. Of those 3, 2 proposed the same solution and a third proposed a different solution...none of these solutions involved punching a hole in the roof. Why not? Well, it turns out we have a whole-house vent stack in the attic that we can tap into. All 3 outside plumbers checked our attic to see if we had one and then proposed solutions using that vent stack. Our kitchen contractor's plumber never checked the attic for that stack so assumed he would have to go through the roof. (You know ASSUME does...) Our first outside plumber proposed tapping into the toilet waste pipe. But, all of the other plumbers were uncertain if that would pass code...this estimate was for $550 + $150 for an express permit The other two plumbers proposed rerouting the shower drain back to the main 2nd floor waste pipe...one was for $925 and the other for $1,000 both + cost of drywall repair. We went with the $925 estimate for a couple of reasons...(1) they were local and have an "A" rating across the board on Angie's List (the first time it's been useful!) and (2) the other plumber was not a master plumber (journeyman), he was not insured, and wasn't even sure if his license was up-to-date in our county...all red flags to us. Anyway, so our plumber came out and moved the drain pipe. He then told us he would try to run the vent to the attic without cutting into the wall (saving us the $500 for drywall repair). It worked! He was able to push the vent pipe up the wall and into the attic without any problems. While he was working on this we asked him about the Polybutelyne water pipes...he, as well as all the other plumbers, had recommended changing them out. We're on well water so there's no chlorine involved, but they did tell us that it would eventually become brittle and split. So, we got estimates for that and, since our kitchen project has been stalled for over 8 weeks, went ahead and had it done ($3,200 for replacing water pipes + $1,900 to repair drywall in 3 bedrooms + LR textured ceiling = $5,100. We already have the ceiling down in the kitchen and the main wall opened up so no charge for repairing those) This was all done fairly quickly and we have had both our final inspection done and the drywall repairs completed...in time for our kitchen to restart Wednesday. The only drawback...previously, since each fixture had it's own water pipe, flushing the toilet had no affect on the shower. Now, however....a very different story! It's taking some getting used to! BTW...it turns out the first plumber's solution would have met code and passed inspection since he had planned to use a sanitary T. I was curious so I asked the inspector about it when he was out Friday. If you want pictures, let me know and I'll post them. Thanks again everyone!...See MoreReplacing lead drains with ABS, moving vents
Comments (2)Good Morning Jeremy, I received your drawing via email and have reviewed it thoroughly. Before we begin, let me take a moment to commend you on both your code research and the proper use of fitting nomenclature. This is the type of description I would expect to receive from a 2nd year Apprentice; you have done your homework well. You are correct in your assessment that the original installers made this project far too complex. Not only can you combine the lavatory and shower or tub drains as you suggest as we go deeper into your project you will see that there is a distinct advantage in doing it in that manner. If I am understanding your description correctly on your main CI stack you have a 4" CI Double Tee (Sanitary cross) with a 4" closet bend to the closet flange on either side of the stack, then directly above that you have a second 4x4x2x1-1/2 Double Tee for the shower, tub and lavatory drains. We can simplify this but I would be hesitant to remove any fitting from that 4" vertical stack because cutting into a CI stack can be a very dangerous undertaking. CI stacks are extremely heavy and in most cases they were originally installed to be self-supporting or at best a couple strap-hangers that have by now rusted through or perhaps a couple pieces of wood blocking, which was crudely fastened in place. If you cut a section out you have the risk of the remaining stack above the cut falling down, causing serious structural damage as it rips waste arms out of the walls, possibly ripping a large opening in your roof and not to mention the risk that it would fall on you, causing serious personal injury or even death. I would begin at the 4" sani-cross where the closet bends are attached. Using a CI snap cutter cut the CI about 3" from the face of the hub leaving enough so that you can attach a rubber 4x3 reducing Fernco coupling NOTE: when your house was built the WCs had a 3.5 or 5gpm flush rate and required a 4" drain. When 1.6gpf WCÂs were first introduced they had serious problems with clogging. It was later determined that a 1.6gpf WC should be on a 3" line to reduce clogging. From the 4x3 Fernco you can connect an ABS "3x3x2 side inlet closet bend to a 3" closet flange, then run a 2" line to both the tub and the shower. The reason for enlarging the tub drain will be apparent in a moment. (Note: Code standard for a tub drain is 1-1/2" however there is an exception in the code which allows us to increase the size of a trap or drain line by one nominal trade size of pipe.) Next install an 1-1/2" riser in the wall behind the lavatory, with an 1-1/2" Tee for the lavatory waste arm to the lavatory trap and connecting the top of the riser to the existing steel vent with an 1-1/2" Fernco rubber coupling in the manner that you described. At the base of the riser you can install an 1-1/2" 1/4bend, however, given that the connection will be in the stud bay in the basement, and in an accessible location, I would prefer to install an 1-1/2" Wye & 1/8bend or a Combo, with the side opening connected to the riser. On the upstream end of the Wye or Combo I would then install an 1-1/2" female thread adapter and an 1-1/2" screw in plug to form a cleanout for the horizontal drain line. For each lavatory drain I would then run a 1-1/2 line straight from the base of the riser to the point where it will intersect with the tub or shower drain line at a right angle. Connect the lavatory drain to the tub or shower drain line by means of a 2x2x1-1/2 Wye & 1-1/2 1/8 bend or a 2x2x1-1/2 combo. (If you canÂt find a reducing Wye or Reducing Combo you may use a straight 2"Wye & 2" 1/8bend with a 2"x1/2" reducer but be careful here, a Tee would be prohibited.) In this configuration the tub and shower drains are wet vented from the lavatory drain thus all the tub and shower drain line on the downstream side of the Wye & 1/8bend is defined as a "vented branch" and the remaining short run on the upstream side of that Wye or Combo to the tub or shower trap is well within the 5Â maximum length limit for a 2" waste arm. The reason that we increased the tub drain line from 1-1/2" to 2" is because under the UPC an 1-1/2" horizontal branch line is limited to 1dfu, which is not sufficient for a tub drain, which is 3dfuÂs, however by increasing to 2" the line is rated for a maximum of 4dfuÂs, which is enough for both the tub(3dfu) and the lavatory (1dfu). If you have the second sanitary cross on the main stack as was mentioned before you can now cut the lines on the side inlets about 3" from the hubs and cap the lines with rubber Fernco caps. Note: for cutting the CI I would strongly recommend you rent a "CI snap cutter". Most tool rentals will rent a snap cutter for about $15 a day, and with the snap cutter you can make a good cut in about a minute. CI can be cut with a reciprocating saw but in my experience it will take about 20 minutes per cut and you will burn up so many blades that it will end up costing more than the rental cost of the snap cutter. CI can also be cut by means of a circular saw or side grinder with a metal cutting abrasive wheel, but using an abrasive wheel is never a good idea. Keep in mind that sewer gas is highly flammable and potentially explosive, not to mention the shower of sparks and debris you have from the wheel, and here again, if you figure in the labor time and cost of the cutting wheels it is still more economical to rent a snap cutter....See Morelinear or square drain in walk in shower? placement of drain
Comments (40)seems like it could be a tough one since smell is subjective (although there's probably something out there that can measure smell) plus if more than 1 of u can smell it that'll help. I'm just thinking ahead if u need to file a complain with the licensing board. How long has it been since u texted him? was a good with texts before? i hope he's getting in touch with who he will and then get back to u but would be nice if he let u know he got your msg and will deal with it. I have a very sensitive nose so this problem would be a big one for me. I just got a bunch of air purifiers and have been learning more about pure air. your nose is telling u something. glad u r listening to your body...See More- PRO
Joseph Corlett, LLC
6 years ago waltonglade
6 years ago
roof35
6 years agowaltonglade
6 years ago PRO
PROMint tile Minneapolis
6 years agolast modified: 6 years agowaltonglade
6 years ago- PRO
Mint tile Minneapolis
6 years ago Lisa
6 years agowaltonglade
6 years agomrpandy
6 years agowaltonglade
6 years ago


Related Stories
BATHROOM DESIGNHow to Choose the Best Drain for Your Shower
Don't settle for a cheap fix when you can pick a shower drain that suits your style preferences and renovation codes alike
Full Story
SELLING YOUR HOUSEA Moving Diary: Lessons From Selling My Home
After 79 days of home cleaning, staging and — at last — selling, a mom comes away with a top must-do for her next abode
Full Story
REMODELING GUIDESShould You Remodel or Just Move?
If you're waffling whether 'tis better to work with what you've got or start fresh somewhere else, this architect's insight can help
Full Story
HOUZZ TOURSHouzz Tour: Design Moves Open Up a Melbourne Cottage
A renovation rejiggers rooms and adds space. Suspended shelves and a ceiling trick make the living area feel bigger
Full Story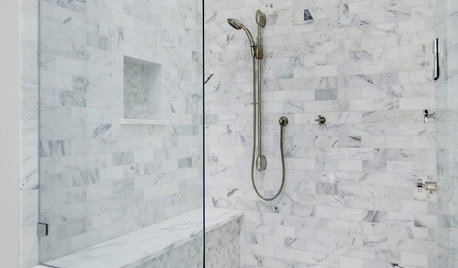
BATHROOM DESIGNConvert Your Tub Space Into a Shower — Waterproofing and Drainage
Step 4 in swapping your tub for a sleek new shower: Pick your waterproofing materials and drain, and don't forget to test
Full Story
LIFEThe Moving-Day Survival Kit: Lifesaving Items and Niceties
Gather these must-haves in advance for a smooth move and more comfortable first days in your new home
Full Story
MOVINGRelocating? Here’s How to Make the Big Move Better
Moving guide, Part 1: How to organize your stuff and your life for an easier household move
Full Story
MOVINGThe All-in-One-Place Guide to Selling Your Home and Moving
Stay organized with this advice on what to do when you change homes
Full Story
LANDSCAPE DESIGNHow to Move Water Through Your Landscape
Swales, underground pipes or a mix of both: There’s more than one way to distribute water in the garden
Full Story
LIFERelocating? Here’s How to Make Moving In a Breeze
Moving guide, Part 2: Helpful tips for unpacking, organizing and setting up your new home
Full StorySponsored
Professional Remodelers in Franklin County Specializing Kitchen & Bath
Mint tile Minneapolis