


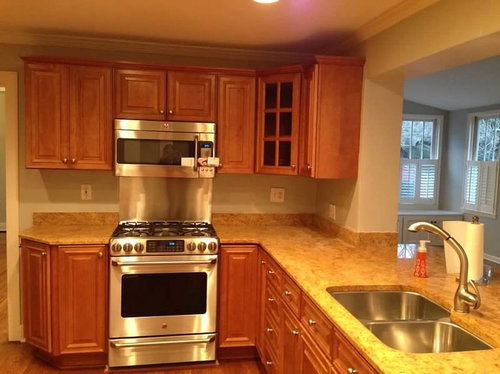
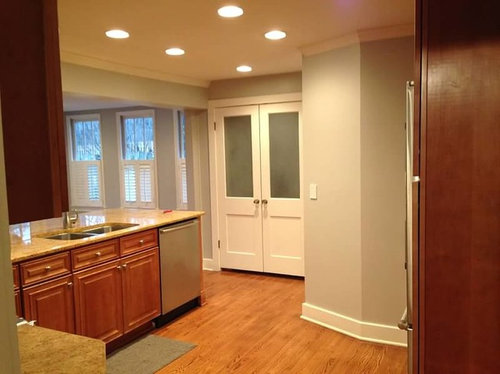
Reveal: DIY update (skip if you're sick of white kitchens)
browniepie
9 years ago


Featured Answer
Sort by:Oldest
Comments (53)

badgergal
9 years agolast modified: 9 years ago
cat_mom
9 years agolast modified: 9 years agoRelated Discussions
kitchen reveal almost completed not staged kitchen-need tile help
Comments (96)This is my FAVORITE FAVORITE GW kitchen. It has soul and personality. I look at your pictures and just want to wander in there and linger, feeling the coziness and healing properties of that welcoming and nurturing space. It feels like a li'l ol' soft grandma with arms outstretched waiting to hug me. It does NOT remind me of so many cold, hard casket like fancy kitchens in the pictures. This one has a warm heartbeat throughout. Fantastic job, and I'm sure with the elbow grease/blood/sweat/tears you put into her you'll love her all the more over the years!!...See MoreI am sick of white kitchens!
Comments (62)I had two apartments in my early years (20's). The first one (c. 1920) had inset cabinetry (painted teal) w/ latches and a real original old wood top. It also had a free standing sink with legs and a drain board. Off to one side was a built-in breakfast nook w/ benches and an arched opening. It was so charming! I loved it. My next apartment, built in the early 40's was painted white, had "lipped doors" with the slatted air vents on the sink base panel. It has flush toekick and was just as charming as my first apartment's kitchen. This was the late 80's and I decorated it with pastel aqua, red geraniums and copper pots and accessories. Those two kitchens always made me feel GOOD. That was when I decided that some day, I would have a white, vintage looking kitchen...and I did it last year! I love it...it's my favorite room in my 1925 home! It suits my home...even when dirty, looks amazing. In my last two homes, I've had hickory and then cherry. They were nice but they didn't "sing to me"! On another note, my father was also a kitchen designer from 1966 to 2000. He did a kitchen in 1983 and you know what? To this day, that kitchen looks current. Here's a picture of it. Only thing you would need to do is change out the dated navy blue wallpaper, brass fixtures and get a new countertops. This was Formica Butcherblock! :-) She had a white beadboard ceiling too. She may have been a little ahead of her time....or just timeless!...See MoreSoapstone is IN - midway kitchen reveal (tons of pix!)
Comments (40)Yikes! I've been busy and haven't checked in and missed all these questions. Sorry! AilsaM - we left our "feet" off the floor a bit so we wouldn't have to cut around them. They are completely fake and do not support the cabinets at all so structurally it wasn't an issue to do that. Actually, our tile JUST came in today. YIPEE! Lake Girl - we have a sample of a hand made 3x8 subway tile ordered. I ::think:: that will be the one, but I'm not 100% sure until I see it in person. The sample is supposed to be here on Friday. I LOVE my recessed lights. My dh jokes that it looks like a spaceship has landed when they are all on, but it is such a bright and wonderful space to work in now. I don't regret them AT ALL. If you're having issues with Dorado, call Premier Surfaces. They have an Atlanta location. I can't recommend them enough. They have been WONDERFUL! Pupwhipped - the tin ceiling came from Lowe's. I love it in the small space of the pantry, but I'm afraid it might be gaudy in a larger space. Proceed with caution :) We had to use some special glue (came in a caulk tube) and small finishing nails to put the tin up. Somewhat of a pain, but not too bad. HTH! mtnfever - The breadboard on the ceiling is actually meant to go on the wall. It is quite thin (we didn't want to lower the ceiling since they are only 8' to begin with). We used an adhesive on the back, and used a crown stapler to secure them to the studs. Can I tell you how long it took to fill and sand all the staple holes? @@ kevinwl - no worries on the bare feet. I can assure you, no one was hurt in the demo of the kitchen floor. They are in much more danger of being hurt when going to feed the cows. Having a 1200 pound cow step on a bare foot is a very unpleasant experience (speaking from experience!). I guess farmers just have tough toes :) MIssyV, ejbrymom, SK97232, celineike, clg7067 - thank you for the compliments :)...See MoreFinal reveal - skip if you're tired of white cabs!
Comments (27)" Yours is a great example of how switching finishes and just do minor tweaks can result in a fabulous transformation." I was thinking the same. Then things like cost, hassle, time, stress jumped into my thinking... Still, it is amazing how color, a bit change of style/some updates, w/o knocking out a wall, adding on space, vaulting a ceiling etc. makes so much difference! It IS lovely! the island counter top is so beautiful - would scare me to death - lol! love all those drawers! plllog's corner drawers are the first I remember being on here and I think I've been here over 4 yrs now. I do like your floor ... so much like my Armstrong planks. I tested some out on my puppy who slid and skid across a 6'x6' span of it just outside my bedroom door. I'd be on the bed watching tv (or trying to nap) and I'd throw her toy thru the door clear into the LR and off she'd race after it. Fly back to me and pounce on me... her nails were sharp and a bit rough (a lot) - I still have scars from them. BUT, the plank section didn't have any scratches to be seen even after about 6 wks of her wear and tear on it. I knew it was the floor for me. The color is about the same too. I've been thru the old dog (and meds) and slippery flooring. My old girl's last yr I carried her into the vet office for appts and someone there thought she couldn't walk (I guess I was cruel not to put her down). She walked fine (boy did she walk - wore me out) just not on their slippery tile floors! I didn't want her to fall on them with her little boney body....See Moredixiedo
9 years agolast modified: 9 years agoEllen1234
9 years agolast modified: 9 years agoUser
9 years agolast modified: 9 years ago
Errant_gw
9 years agolast modified: 9 years agoblfenton
9 years agolast modified: 9 years ago
bbtrix
9 years agolast modified: 9 years agoannaship1
9 years agolast modified: 9 years ago
Jeannine Fay
9 years agolast modified: 9 years agoMarinaGal
9 years agolast modified: 9 years agoJillius
9 years agolast modified: 9 years agomarcolo
9 years agolast modified: 9 years agokksmama
9 years agolast modified: 9 years agoflyingkite
9 years agolast modified: 9 years ago
Lisa
9 years agolast modified: 9 years ago
romy718
9 years agolast modified: 9 years agobrowniepie
9 years agolast modified: 9 years agomgmum
9 years agolast modified: 9 years agoUser
9 years agolast modified: 9 years agojuddgirl2
9 years agolast modified: 9 years ago
amykath
9 years agolast modified: 9 years agoRudebekia
9 years agolast modified: 9 years agooldfixer
9 years agolast modified: 9 years agogreenhaven
9 years agolast modified: 9 years agoCEFreeman
9 years agolast modified: 9 years agocoll_123
9 years agolast modified: 9 years agochitown_mary
9 years agolast modified: 9 years agobrowniepie
9 years agolast modified: 9 years agosis2two
9 years agolast modified: 9 years ago
lisa_a
9 years agolast modified: 9 years agotuesday_2008
9 years agolast modified: 9 years ago
threegraces
9 years agolast modified: 9 years agofirstmmo
9 years agolast modified: 9 years agofpmom
9 years agolast modified: 9 years agojuddgirl2
9 years agolast modified: 9 years agobrowniepie
9 years agolast modified: 9 years agobrowniepie
9 years agolast modified: 9 years agobrowniepie
9 years agolast modified: 9 years agobrowniepie
9 years agolast modified: 9 years agofpmom
9 years agolast modified: 9 years ago
gr8daygw
9 years agolast modified: 9 years agoCatharine442
9 years agolast modified: 9 years agotuesday_2008
9 years agolast modified: 9 years agobrowniepie
9 years agolast modified: 9 years agofpmom
9 years agolast modified: 9 years agoHomeChef59
9 years agolast modified: 9 years agokatesaunders
9 years agolast modified: 9 years agojoviboys
7 years ago


Related Stories
MY HOUZZMy Houzz: Surprise Revealed in a 1900s Duplex in Columbus
First-time homeowners tackle a major DIY hands-on remodel and uncover a key feature that changes their design plan
Full StoryREMODELING GUIDESBathroom Remodel Insight: A Houzz Survey Reveals Homeowners’ Plans
Tub or shower? What finish for your fixtures? Find out what bathroom features are popular — and the differences by age group
Full Story
WHITE KITCHENSBefore and After: Modern Update Blasts a '70s Kitchen Out of the Past
A massive island and a neutral color palette turn a retro kitchen into a modern space full of function and storage
Full Story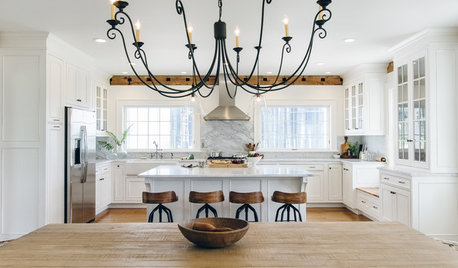
WHITE KITCHENS4 Dreamy White-and-Wood Kitchens to Learn From
White too bright in your kitchen? Introduce wood beams, countertops, furniture and more
Full Story
BUDGET DECORATINGBudget Decorator: 15 Ways to Update Your Kitchen on a Dime
Give your kitchen a dashing revamp without putting a big hole in your wallet
Full StoryBEFORE AND AFTERSGray Cabinets Update a Texas Kitchen
Julie Shannon spent 3 years planning her kitchen update, choosing a gray palette and finding the materials for a transitional style
Full Story
KITCHEN DESIGNWhite Appliances Find the Limelight
White is becoming a clear star across a broad range of kitchen styles and with all manner of appliances
Full Story
MY HOUZZMy Houzz: Kid-Friendly DIY Charm in Southern California
A family of 5 from Switzerland bring colorful modern style to their updated 1,028-square-foot bungalow
Full Story
DIY PROJECTS29 Home Projects to Make You a DIY Superstar
Patch up holes, turn trash to treasure, erase stains ... these doable DIY projects will better your home and boost your ego
Full Story
HOUZZ TOURSHouzz Tour: A 1905 Cottage Gets a Major Family Update
Historic Boston meets outdoors Oregon in this expanded California home
Full Story


susanlynn2012