


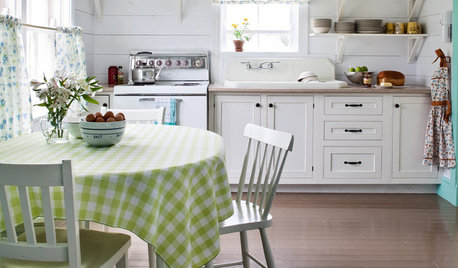
Touch up kitchen redo (pics)
pepperidge_farm
13 years ago


Featured Answer
Sort by:Oldest
Comments (22)

flwrs_n_co
13 years agolast modified: 9 years agovampiressrn
13 years agolast modified: 9 years agoRelated Discussions
Finished remodel pics! Need suggestions for finishing touches.
Comments (5)Thanks, olychick! I had about a week to pick the big stuff so they were all available, so really about three days of actually store time. At least one of our local Lowes guys knows me by site now! Thank goodness after all the initial research I ended up liking all the stuff at Lowes, it would have been a nightmare driving back an forth with tiles and samples. I just had to keep running over a few aisles! Thanks, lynn2006! Our whole house is a sea of tan/beige - walls, carpet, trim - so I wanted to keep the "permanent" items neutral but not plain beige. It's my favorite room in the house now, and the motivation to keep pushing forward with redoing all the rooms. Luckily after the kitchen it will be mostly flooring and paint, so a lot more affordable....See More90's oak kitchen redo...help with decisions?? pics!
Comments (22)Hi Zen and Renee~ yes,we are going with white (off-white) lower and upper cabs. I like the dark pebble as well but it does have little shiny flecks in it that I'm not too crazy about. I do like the tone and warmth it gives and if we do use the cream BS tiles, it all goes very, very nicely. As for darker floor throughout the house....hmmm. Most of our furniture is dark (cherry, walnut, dark stained mahogany)...and our downstairs is essentially one large room. We have fairly dark carpet in there now and if I kept my walls light, it would work. As for the golden retriever hair (Australian Shep, Pomeranian and springer span. hair in reality)...sigh....are dark floor *that* hard to keep clean? I suppose I'd be sweeping and swiffering alot? I probably need to figure out where I could make a transition on my floor to go from dark to lighter...or do the perimeter in the dark and maybe a carpet inset?? I looked at the darker travertines but they were not very pretty and still carried that yellow tint when I wetted them to see how they'd seal. Janine...See MoreOk-I did it!! Mini kitchen redo is done (pics)
Comments (31)Thanks everyone, for the kind words! This site is amazing. I really learned so many great tips by visiting here. Squirrelheaven- Thanks for the photoshopping!! I filed that in my clippings so I can refer to it. Where do we keep the nuts/? There are 4 of them currently residing in this joint!! Trying to keep out the rest of the nuts is the challenge, haa haa. Lauraa- yes, I used a foam 4"roller. I also used 1 1/2" good quality purdy brushes (angled). I would definitely recommend waiting til spring to do yours b/c it takes about 2 weeks or so with all the prep time and wait time in between coats. You dont want to be out in the garage for any length of time when its really cold. Momto4boys- if you have any questions, I'd be happy to answer as best I can. I actually followed step-by-step instructions that I found in the paint forum under "Cabinet Coat" although I used SW paint. carriem25- love the temporary backsplash idea. Was considering changing out my 3D tiles and putting these in- what do you think?? I would take these kind out: and replace with these: Not sure how difficult it is to remove random tiles, that's something to consider. Oh yes, I definitely will replace the light fixture too, as someone had mentioned and I will put in some version of a track light. Thanks, again, everyone for your helpful input and suggestions!...See MoreKitchen Redo Ideas Needed in House I'm Looking to Buy- Pics Post
Comments (6)Ebse, the den is a must-have. I actually didn't care if the house I found had a formal dining room if there was an eat-in kitchen, or if it didn't have a den and had a dining room I could convert to a den, I just wanted a den. The den is too big to lose to being more kitchen, it's 15x16 if I remember correctly. It's going to be just the two of us, and this one of us is usually banned from the kitchen when it comes to the cooking, so we really don't need so a huge kitchen, just more cabinets and draw space for much needed "stuff" eandhl, I'd consider it an eat-in kitchen - the people have that oblong table and hutch. I have a table that seats 6 now, but would definitely get rid of it and have something small for just the two of us which I could open up with a leaf for 3-4 people. Since there's a formal dining room, any more than 4 people, we can eat in there. I may take my hutch with me, have too many collectibles in there not to have it, but then again, I could put that in the dining room and just have a table in the kitchen. diwoman1, the laundry room is very small, the washer dryer on that one wall, on the wall opposite from them, to the right of the door opening going in to the laudnry room, there's a tall bank of cabinets - good for storage/pantry if needed. On the two other walls, there's one window and the other wall is actually the door, leading to the garage. Within the garage is a storage room. I thought maybe I could put the washer/dryer in there, but it really doesn't help me much as that laundry room wouldn't work for much more than a pantry, or mudroom. I was thinking about trying to get a stacking washer/dryer and put it on the right side, and make a bench/coat rack on the left. Fori, the cabinets are just old wood cabinets that she's repainted. I even thought about refacing instead of replacing if possible. The kitchen isn't bad at all, I can definitely live with it for a while, but it's not "me" and I really want to update it, but it's livable the way it is now, at least for the time being. I will actually have the luxury of doing what I need to do before we totally move in - this is if we are lucky enough to get the house. It will be a slow move - DH has to get a transfer, so he'll stay here while I start moving stuff up there. I'll probably tackle the master bathroom first, out of the 4 areas I want to update, that's going to be the one that bothers me the most - this will be second - and besides, the bathroom is soooo tiny, it will be easier and faster to do that one first, or so I hope. Thanks to all who've replied thus far - hoping more will do so too!...See More
gsciencechick
13 years agolast modified: 9 years agorjr220
13 years agolast modified: 9 years agobostonpam
13 years agolast modified: 9 years agopepperidge_farm
13 years agolast modified: 9 years agochris45ny
13 years agolast modified: 9 years agodesertsteph
13 years agolast modified: 9 years agofirstmmo
13 years agolast modified: 9 years agofrancoise47
13 years agolast modified: 9 years agodoraville
13 years agolast modified: 9 years agobusybme
13 years agolast modified: 9 years agopepperidge_farm
13 years agolast modified: 9 years agolaurap_2007
13 years agolast modified: 9 years agodesertsteph
13 years agolast modified: 9 years agoformerlyflorantha
13 years agolast modified: 9 years agoclg7067
13 years agolast modified: 9 years agopepperidge_farm
13 years agolast modified: 9 years agogb85
13 years agolast modified: 9 years agopepperidge_farm
13 years agolast modified: 9 years agohouseful
13 years agolast modified: 9 years ago
Related Stories
KITCHEN DESIGNThe Cure for Houzz Envy: Kitchen Touches Anyone Can Do
Take your kitchen up a notch even if it will never reach top-of-the-line, with these cheap and easy decorating ideas
Full Story
KITCHEN DESIGN2012 Color Trends: Touch of Green for Kitchen and Bath
See how green can serve as both an accent color and new kind of neutral
Full Story
HOMES AROUND THE WORLDHouzz Tour: Fresh, Sophisticated Redo Wakes Up a Tired London Flat
Bold color punctuates the contemporary gray and white interior in this redesigned apartment
Full Story
KITCHEN DESIGN12 Rustic Touches That Add Warmth to a Kitchen
Exposed beams, chandeliers, farm tables or just a key accessory or two can bring some coziness to the heart of your home
Full Story
KITCHEN DESIGN12 Farmhouse Touches That Bring Homeyness to a Kitchen
Shaker cabinetry, country-store-inspired hardware, barn elements or a key piece of art will add homestead appeal to your kitchen
Full Story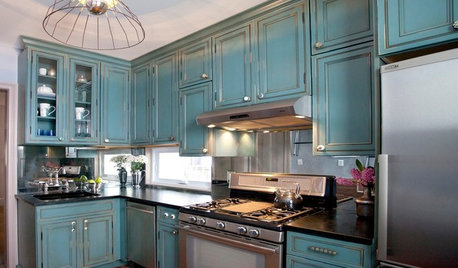
KITCHEN DESIGNKitchen of the Week: Turquoise Cabinets Snazz Up a Space-Savvy Eat-In
Color gives a row house kitchen panache, while a clever fold-up table offers flexibility
Full Story
TRADITIONAL HOMESHouzz Tour: Just the Right Touch for a Historic Renovation
A designer preserves period details while integrating the owner’s personality in this thoughtful redo of a Georgian townhouse
Full Story
KITCHEN DESIGNNew This Week: 4 Ways to Punch Up a White Kitchen
Avoid the hospital look by introducing a bit of color, personality and contrast
Full Story
KITCHEN DESIGN15 Ways to Wake Up Your Kitchen With Accessories
Do away with dullness by bringing in color, pattern and unexpected touches
Full Story
Guest Picks: Fun Fabrics to Perk Up Your Place
Go for striking patterns and rich colors to stir up drama, add a whimsical touch or tie a room together
Full Story


pinch_me