Well, first off I want to thank all of you who make this forum the best on the web! The time that you took to post to help newbies like me was so valuable. So, in return I want to share with others the success of this forum by posting this long work report!
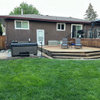
I am done with my patio and specifically, the arbor (and for that matter my backyard BBQ area is going to have to wait till money starts to grow on trees!). The arbor cut the temperature in my backyard and most importantly in the house by 5-10 degrees.
Construction:
-Redwood S4S, heart grade
-6x6 posts, 2x8 cross, 2x6 on top and finally 2x2 top cover
-6x6 posts are secured in two ways  structural engineer designed a 2 2"diameter steel post embedded in the concrete, very carefully and plumbly (?) drilled 2 up into post, used OSI glue to post. In addition, drilled 2" hole in Simpson anchor, slipped it over the steel post then anchored into concrete. This thing is doesnÂt budge.
-Applied copper green to each end and up into drill hole of each wood post prior to install. Let it sit for a week for absorption and smell! Should be good for a long time.
-Tapered tops of 6x6 posts for drainage and looks where one can see.
-Hand carved end detail to make a single stencil then jig sawed the rest to the form of the design
-Routed the edges of the 6x6 to soften edge (two small kids running around)
-Simple base design out of 2x6 with top cover 2x5 (routed to soften the edges) Â easy disassembly for the future to check for bugs, decay.
T-ook 4 weekends to build  screwed all where possible, no nails and used galvanized bolts for header beams. Had major help from carpenter friend.
Staining: (hereÂs the good part)
- Waited about 6 weeks for wood to dry. Wiped dust, etc off day before spraying.
- As pressurepros suggested, used Wagner HVLP ($60ish @home depot) to apply TWP 500 (California Redwood color).
Sprayer performed surprisingly well. No clogging. The TWP appears to be well suited for sprayers like this as the viscosity is perfect. Placed rate of spray on "medium" knob setting (between lowest point and highest point). Sprayer got into those nooks and crannies that were impossible by hand.
-Spent almost 4 hours prep prior day  covered every inch of patio, house and much of back yard in light duty plastic. Used lots of tape to secure. Even onto roof. Used more heavy mil plastic on areas where I was going to be using the ladder in case of tears. Would have used this plastic all around, as itÂs easier to work with then the paper-thin type.
-Spent 4-5 hours next day spraying  was blessed with a 64 degree foggy and windless morning until noon! Then temp rose to around 80 with a bit more wind (gusts to 5mph). Got done just in time. Could tell it wasnÂt applying as nicely as it heated up. Day ended to be around 87 degrees, but I was done by then. Stain behaved well even at this temp.
-Before I sprayed  checked and rechecked my prep work.
-Put some classic rock on and was ready to go!
-Overspray was not too bad! In fact over spray likely covered the top pieces where I canÂt get to.
Just did small sections at a time. Immediately back rolled drips and overspray once an area was completed. DidnÂt work too fast, developed a system of spray container replenishment, and kept things clean using only two shop towels. Actually used less material than I thought. About a gallon and 3/4.
-1st coat absorbed very nicely and did a second "wet on wet" coat which absorbed even better. Again, in spots where it was done absorbing, back rolled or wiped excess.
-Hand rolled and then back brushed the posts and bases, again wet on wet. Also hand brushed the ends of each exposed end. Really absorbed in those areas. Careful with drips. Also, careful the oil based stain on plastic is slippery!
Clean-up and appearance:
-Clean-up was a breeze because I really prepped for it.
-Only had two small drips on patio and one small drip on stone work. Rubbed those out to where they are hardly noticeable.
-I hate to say it, but ended up discarding the sprayer. Time and effort to clean with thinner was too much. Would have taken another hour to clean this thing. Will be taking it to the next haz mat disposal day.
-Did two final passes with rag and back roller. Sheen areas wiped down to "semi-matte" finish.
-Placed towels in bucket of water for later disposal.
-Color turned out very nice  now 4 weeks later, not orange which I was worried about. Some areas darker than others, but because of the grain of the wood. Looks nice that way though. Gave it a slightly rustic look in some areas. Pictures donÂt show it well, but it has a nice tone  sort of a sienna color look to the wood.
-No rain as of yet in California, so sprinkled some water on. Beaded nicely with no absorption even on horizontal surfaces.
-Best of all? Very little smell. Lasted about a day. No oily residue or tackiness either.
Hope it stays this way. Wife is happy, so IÂm happy! Explained to her that this is an ongoing project over the years to maintain the newer look to the structure. Since this came out nicely, I think IÂll be granted the time to for maintenance!
Hopefully these pics work!
Thanks all!
http://community.webshots.com/album/560583724lXdBtM


alb1k
fnmroberts
Related Discussions
Daylily Garden Shots - Part One for Sunday
Q
Done. Done, done, done planting bulbs.
Q
Ready for counter top template
Q
Maybe no cans (?) and verbal update.
Q
twntyonegamblerOriginal Author
fnmroberts
john_hyatt
twntyonegamblerOriginal Author
john_hyatt
twntyonegamblerOriginal Author
User
twntyonegamblerOriginal Author